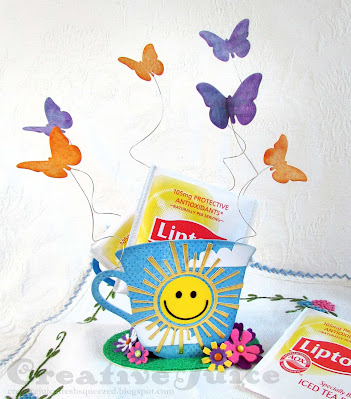
Hello there everyone and welcome to June! I look at it as the official kick off to summer and today we definitely have summer temps here. Whew! Eileen Hull's design Teams are working with the June theme "Summer Adventures" and I'm expecting some really creative interpretations of it! I wanted to create something bright, cheerful and full of summer feels so I made a iced tea bag gift container that doubles as a decoration for the recipient.
I used the
3-D Teacup & Spoon Die for the container and decked it out with flowers, butterflies and a very happy sun. Accents of
Rinea Foil Paper really add some sparkle and up the fun factor.
One of my favorite summertime beverages is iced sun tea. (Unsweetened! Don't hate me my southern friends. ;-) )
 |
| back view |
This didn't take long to put together. Let's take a look:
Step 1 - I painted a sheet of Sizzix Mat board with blue Fresco paint on one side and adhered a sheet of blue
Rinea Foil Paper on the other side. I then cut out two cup sides (mind the front and back directions of the shape) and one container bottom. The saucer is actually from an older, retired teacup die of Eileen's (#656549). You could make do with any oval or circle die you already have to make a base.
Step 2 – After decorating the cup sides, I was ready for assembly. You can use either strong red liner tape or a quick grab liquid glue to adhere the cup sides to the tabs on the bottom. Sometimes I'll use a glue gun but you can add a lot of hot glue bulk between the surfaces if you're not careful.
Step 3 – Butterflies! I used my
Xyron 3" Sticker Maker to adhere purple and orange inked papers from my stash to Rinea Foil paper, creating pretty 2-sided substrates to cut my butterflies from.
Using jewelry pliers, I bent the ends of pieces of wire to create 'bodies' to glue to the undersides of the die cut butterflies. I also cut two little pieces of foam core board 1 7/8" long and 3/8" tall to use as bases to poke the wires into.
I glued the foam core pieces into the base. Dabbing the wire end into some glue, I then carefully poked the wires into the foam core.
There you go, that was pretty easy. Thanks for stopping by! Be sure to keep an eye on Eileen's blog for some more summer project inspiration.
Supplies used:
Tim Holtz Sizzix
Other:
embossing ink
grey embossing powder
felt
brads
cardstock
wire
Some links in this post are affiliate links which do not affect the price you pay but allow me to earn a small percentage of a sale. Thanks! (My husband also thanks you!) If you shop at Topflight Stamps, use my coupon code LISAHOEL for 12% off your order.


what a great idea and wonderfully done Lisa! the fluttering butterflies really speaks summer as well as your smiley face sun on your lovely teacup!
ReplyDeleteIt's like those butterflies are hovering over the cup! Such a fun airy summer project to make <3 Makes me smile <3
ReplyDelete