

Monday, November 13, 2017
Sneak Peek!
It must be A Jillian Vance Design Monday! I have a sneak peek of the card I've posted over on their blog. Head on over to see the whole thing. ;-)


Wednesday, November 8, 2017
Village Church at Christmastime
My Tim Holtz Village Dwelling love continues! In case you missed it, I completed a huge Halloween Village project last month and now I'm turning my attention to Christmas projects. I made a little old fashioned country church scene for a crystal base I found at the thrift store. The church lifts off so you can put a battery tea light underneath.

I used heavyweight card stock for the structure of the house and then used the Notebook embossing folder to make "siding" pieces to go on all the walls. All the dies are from Tim Holtz's Village Die series.

The windows are scrap plastic colored with alcohol ink and coated with Stickles Rock Candy for extra sparkle.

I love the look of the light inside! Use a battery powered tea light.

Thanks for stopping by! I'm entering this into the Timeworn challenge on the Frilly & Funkie blog. Churches like this one are certainly from a by-gone era. =)
Other supplies:
Tim Holtz embossing folder Notebook

I used heavyweight card stock for the structure of the house and then used the Notebook embossing folder to make "siding" pieces to go on all the walls. All the dies are from Tim Holtz's Village Die series.

The windows are scrap plastic colored with alcohol ink and coated with Stickles Rock Candy for extra sparkle.

I love the look of the light inside! Use a battery powered tea light.

Thanks for stopping by! I'm entering this into the Timeworn challenge on the Frilly & Funkie blog. Churches like this one are certainly from a by-gone era. =)
Dies Used:
Sizzix (all Tim Holtz):
Other supplies:
Distress Ink – Picket Fence, Hickory Smoke, Pumice Stone
Alcohol Ink – Mushroom, Butterscotch
Distress Paint – Picket Fence
Distress Dry Glitter - Rock Candy
Stickles Rock Candy
Simon Says Stamp and Sizzix links in this post are affiliate links which do not affect the price you pay but allow me to earn a small percentage of a sale. Thanks! (My husband also says thanks!)
Distress Dry Glitter - Rock Candy
Stickles Rock Candy
Simon Says Stamp and Sizzix links in this post are affiliate links which do not affect the price you pay but allow me to earn a small percentage of a sale. Thanks! (My husband also says thanks!)
Friday, October 27, 2017
Tim Holtz Halloween Village Lantern
Well, it's taken me quite awhile, but I have finally completed my biggest lantern scene yet! I've been itching to create a complex scene in this really big lantern I've been lugging around for two years now. I hope you like it! It's just in time lol. If you are interested in the tutorial, it is all the way at the end of the post (which is long!)
I built the whole village on a base that could just slide right into the lantern since it opens from the top. It was much easier that way!

Also, I wired it up with little LED lights!
The manor house is also outfitted with a strobe pumpkin light. Tim Holtz did this for his manor house tutorial video and I thought it looked so cool I had to try it too. Unfortunately my video tech is sorely lacking and I couldn't get a good video of it in action in low light. So check out Tim's instead lol. It looks like that minus the sound effects.
On to more village closeups!

Of course the little church needed a spooky graveyard. I also put plenty of bats in the belfry! More of the graveyard continues around the back.

I colored the windows of the church with some bright colors of alcohol ink so they would shine like stained glass windows when the lights are on.
Each of the brownstones has a different look (because why not?)

Now let's go visit the mad scientist who lives on top of the hill. I hear he's invented a death ray…
If you'd like to see some 'how-to' info, keep on scrolling! It's coming. Otherwise, thank you for stopping by to see my project. =)
I'm entering this project into the following challenges:
• the Frilly & Funkie Trick or Treat Challenge. The treat is that the hidden lights are on a timer so as night falls they pop on!
• the Emerald Creek Dares Freaky Fun! Challenge. This project is definitely full of freaky Halloween fun.
• the SanDee & amelie's Steampunk Anything Goes Challenge. I think our mad scientist is definitely a steampunk type fellow. Look at all his gears he left laying around!
Other supplies:
*********************************************
TUTORIAL TIME!! You stuck in there, good for you!
I'm mainly going to talk about the base construction and lighting. There are lots of videos on how to put together the houses – Tim Holtz has really good ones on his blog.
To start, I made some quick little house mockups so I could move them around and get an idea of how I was going to fill up the space in the lantern.

Next I moved to making mockup pillars to play with the heights of the houses. It helped me to visualize the 3-D space.

Once I established the proper spacing, I cut the base and support pillars out of foam core board. (Truly a wonder of a substrate.) I used a glue gun to fasten all the structures in place.

The platform for the manor house got a 'pavement' treatment using Texture Paste and the Mini Stencil Set #28.

I used crumpled newspaper as filler around the rises and taped it into place.

Time for the plaster cloth! This is plaster impregnated cheesecloth that you dip in water and then form around your landscape feature. It's commonly used in model railroad landscaping. It was really easy to use but a bit messy. I had my work surface well covered with plastic.

Before the plaster had completely set up, I checked to make sure that nothing was sticking out beyond the edges of my hexagonal base. That would have been a major bummer to have it hitting the glass walls of the lantern!

Bright white wasn't exactly the look I was going for so I first sprayed it with a DecoArt Media Carbon Black Mister (it's permanent when dry). Then I painted over that with various Deco Art Media Liquid Acrylics in greens, greys and browns. I also kept in mind that I'd be covering parts in landscaping foam later on.

Once I finished the base, I made all the houses. (Insert long pause for all the time it took to make the houses.) Then it was time to figure out the lighting. I made loops of the light strand to fit under each building and played around with the spacing until I had it all evenly distributed. I temporarily taped it into place while I was figuring it out.

When it was all set, I hot glued each loop in its spot. With the loops glued, I could fiddle around with the extra wire in between the loops and tuck it away and glue it into place too.

Any shiny copper wire that was going to show I painted over with black or grey paint.


I rigged my strobe light like Tim suggested in his Manor House Tutorial video. I also wanted the manor to be lit like the others so I wrapped a portion of the light strand around the strobe battery box. I did not glue it down because I want to be able to change the batteries for the strobe. The manor house can lift off the base so I can turn on the strobes. The other houses are glued down.
The battery box for the lights is tucked up under the lantern lid. It is fastened in place with heavy duty Velcro Extreme Outdoor strips. Probably overkill, but I didn't want to risk the battery box coming loose and squishing my scene!
For the top decoration, I tore strips of muslin and stenciled on them with archival inks. I also had some black sari silk ribbon which looked good with the frayed muslin.

Whew! This is an epic post! I think it even beats my Atlantis Steampunk Journal post. I really appreciate you taking time to view my post. I hope you have a fab weekend and a happy Halloween!
 |
| The whole lantern stands about 29 inches tall. |
 |
| Eek! A giant spider is attacking the village ha ha. |
 |
| I made some custom muslin "ribbon" for the top. See how in the tutorial. |

Also, I wired it up with little LED lights!
 |
| It looks so cool in the dark! |
The manor house is also outfitted with a strobe pumpkin light. Tim Holtz did this for his manor house tutorial video and I thought it looked so cool I had to try it too. Unfortunately my video tech is sorely lacking and I couldn't get a good video of it in action in low light. So check out Tim's instead lol. It looks like that minus the sound effects.
On to more village closeups!

Of course the little church needed a spooky graveyard. I also put plenty of bats in the belfry! More of the graveyard continues around the back.

I colored the windows of the church with some bright colors of alcohol ink so they would shine like stained glass windows when the lights are on.
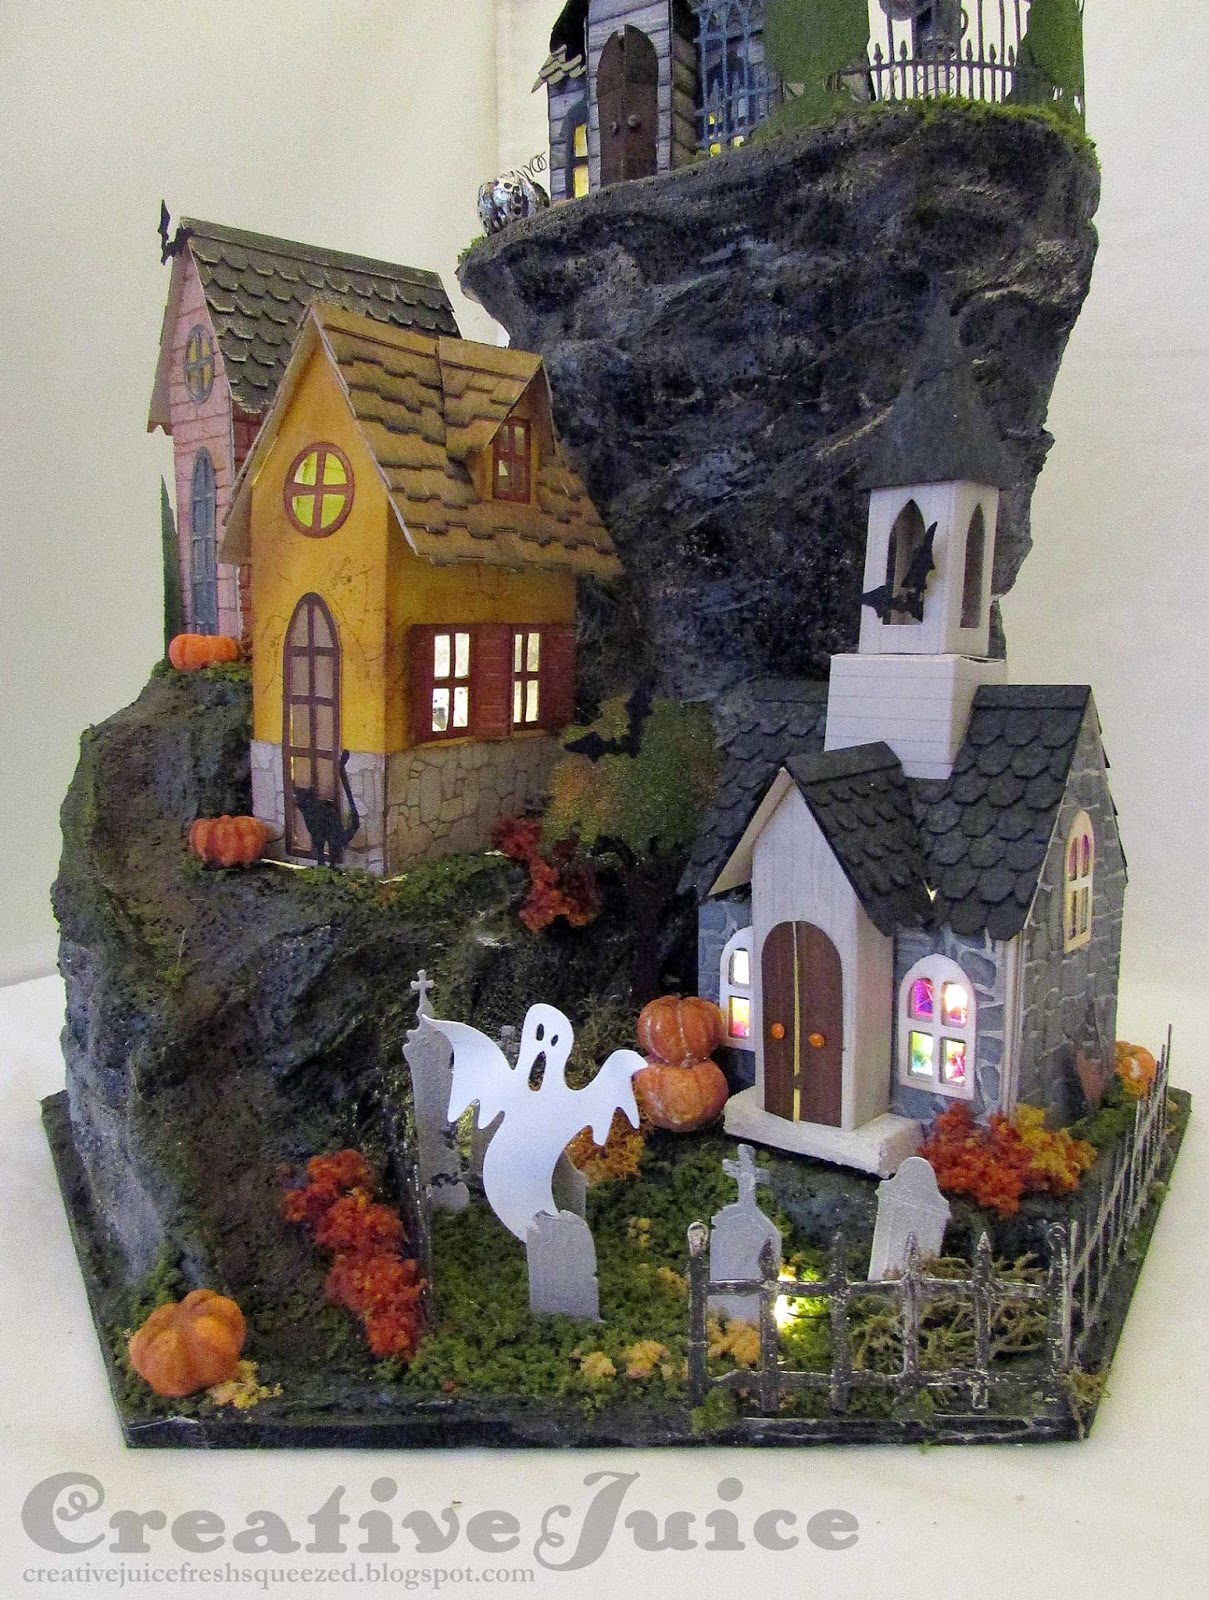 |
| I used Clearly for Art Modeling Film for the ghosts. Heat the plastic and it can be molded in a rippled, ghostly manner. Once it cools it stays put! |
 |
| Grit Paste and the brick and stone mini stencils are perfect for adding texture to the houses. |
 |
| The roof of the yellow house is made from wood veneer tape! |

Now let's go visit the mad scientist who lives on top of the hill. I hear he's invented a death ray…
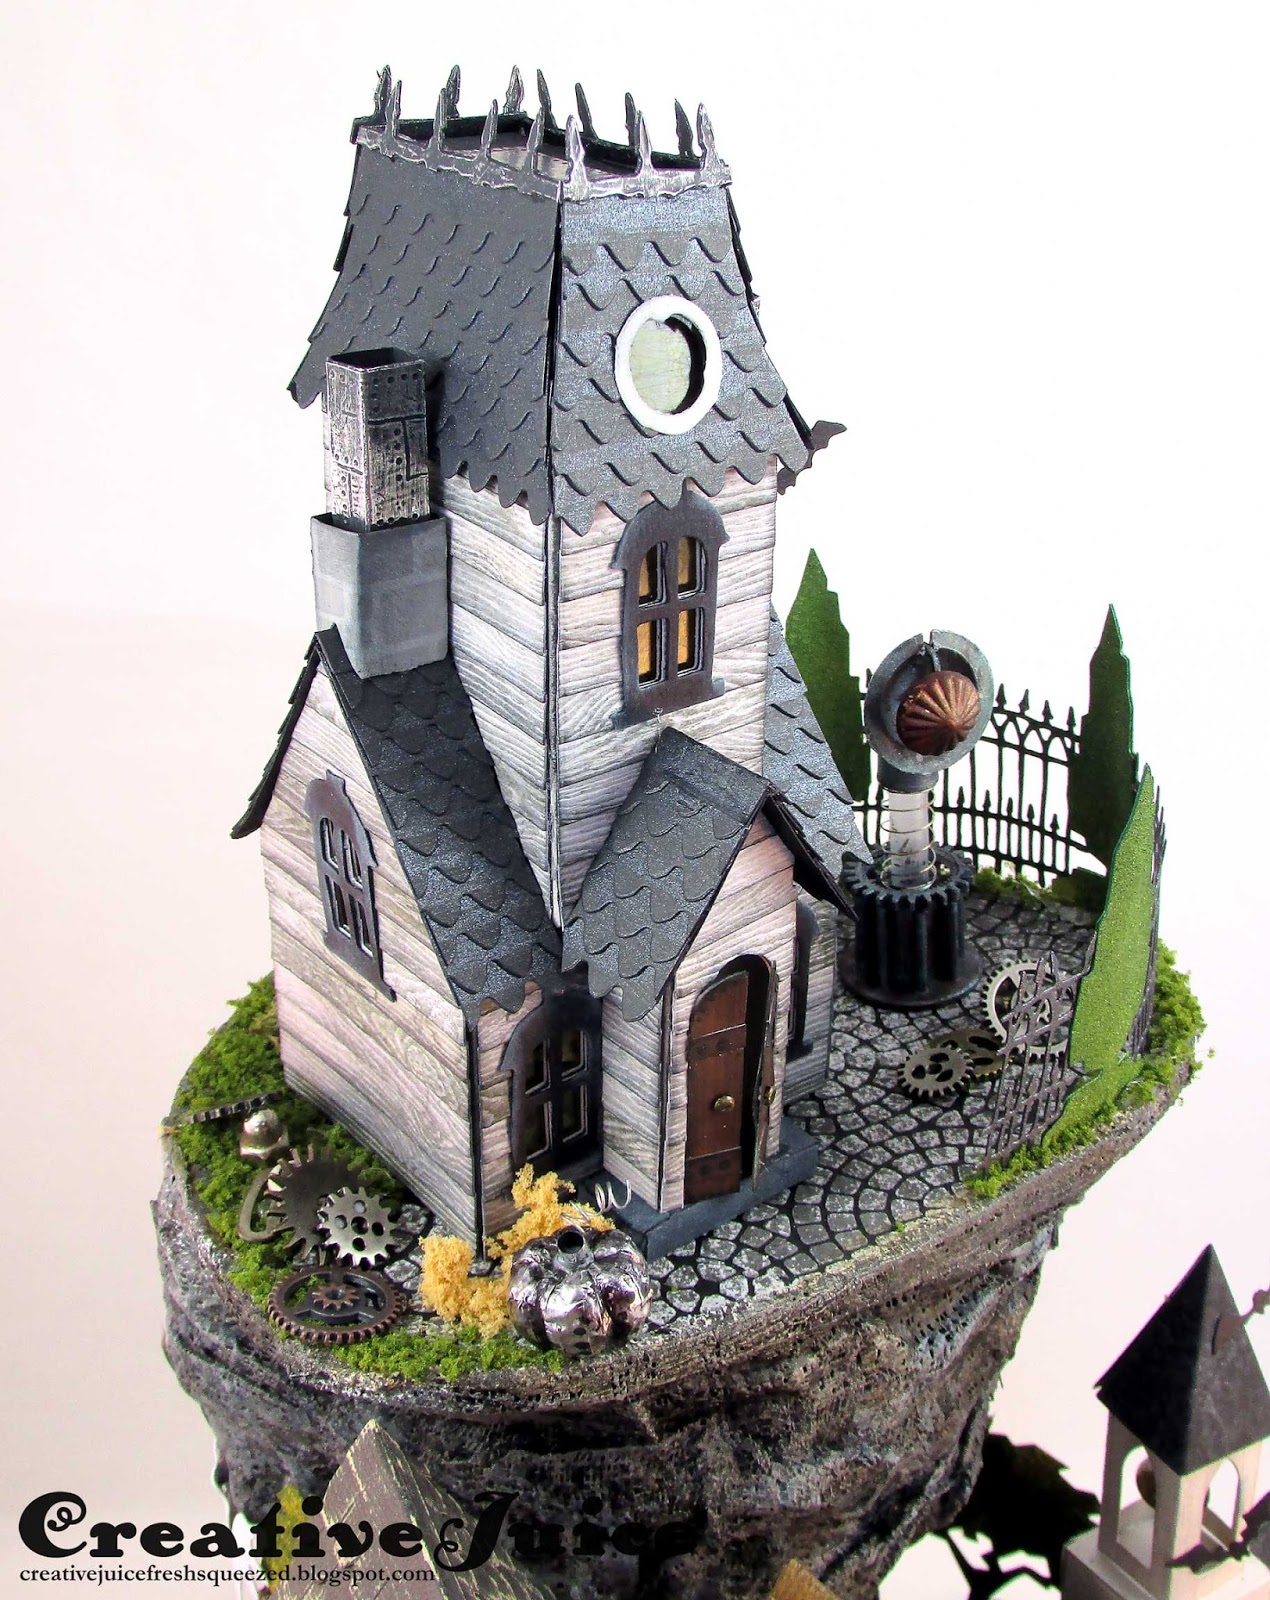 |
| He's the type to have a steam punkin' of course. (I covered a mini resin pumpkin with pieces of metal foil tape and antiqued it with black alcohol ink.) |
I'm entering this project into the following challenges:
• the Frilly & Funkie Trick or Treat Challenge. The treat is that the hidden lights are on a timer so as night falls they pop on!
• the Emerald Creek Dares Freaky Fun! Challenge. This project is definitely full of freaky Halloween fun.
• the SanDee & amelie's Steampunk Anything Goes Challenge. I think our mad scientist is definitely a steampunk type fellow. Look at all his gears he left laying around!
Dies Used:
Sizzix (all Tim Holtz):
Other supplies:
Stampers Anonymouse – Joyful Song
Tim Holtz Mini Pumpkins
Tim Holtz Sprocket Gears & Mini Gears
Tim Holtz Fringe
Wood Veneer Tape (link for cherry wood color, I had birch, same brand though)
Wendy Vecchi Clearly for Art Modeling Film - Whiteout
Tim Holtz Sprocket Gears & Mini Gears
Tim Holtz Fringe
Wood Veneer Tape (link for cherry wood color, I had birch, same brand though)
Wendy Vecchi Clearly for Art Modeling Film - Whiteout
Distress Ink – Black Soot, Ground Espresso, Pine Needles, Peeled Paint, Hickory Smoke, Forest Moss
Distress Ink Oxides – Antique Linen
Archvial Ink – Jet Black, Watering Can, Tree Branch, Tiger Lily, Orange Blossom
Alcohol Ink – Silver Mixative, Mushroom, Pitch Black, Butterscotch, Stream, Raspberry
Distress Stain – Hickory Smoke, Pumice Stone, Gathered Twigs
Distress Paint – Black Soot, Mustard Seed, Wild Honey
Distress Paint – Black Soot, Mustard Seed, Wild Honey
Ranger Texture Paste, Distress Grit Paste, Distress Collage Medium, Wendy Vecchi Crackled Texture Paste

Scrapbook.com, Simon Says Stamp and Sizzix links in this post are affiliate links which do not affect the price you pay but
allow me to earn a small percentage of a sale. Thanks! (My husband also says thanks!)
*********************************************
TUTORIAL TIME!! You stuck in there, good for you!
I'm mainly going to talk about the base construction and lighting. There are lots of videos on how to put together the houses – Tim Holtz has really good ones on his blog.
To start, I made some quick little house mockups so I could move them around and get an idea of how I was going to fill up the space in the lantern.

Next I moved to making mockup pillars to play with the heights of the houses. It helped me to visualize the 3-D space.

Once I established the proper spacing, I cut the base and support pillars out of foam core board. (Truly a wonder of a substrate.) I used a glue gun to fasten all the structures in place.

The platform for the manor house got a 'pavement' treatment using Texture Paste and the Mini Stencil Set #28.

I used crumpled newspaper as filler around the rises and taped it into place.

Time for the plaster cloth! This is plaster impregnated cheesecloth that you dip in water and then form around your landscape feature. It's commonly used in model railroad landscaping. It was really easy to use but a bit messy. I had my work surface well covered with plastic.

Before the plaster had completely set up, I checked to make sure that nothing was sticking out beyond the edges of my hexagonal base. That would have been a major bummer to have it hitting the glass walls of the lantern!

Bright white wasn't exactly the look I was going for so I first sprayed it with a DecoArt Media Carbon Black Mister (it's permanent when dry). Then I painted over that with various Deco Art Media Liquid Acrylics in greens, greys and browns. I also kept in mind that I'd be covering parts in landscaping foam later on.
 |
| The mister made it really easy to quickly lay down a base coat and get in the nooks & crannies. |

Once I finished the base, I made all the houses. (Insert long pause for all the time it took to make the houses.) Then it was time to figure out the lighting. I made loops of the light strand to fit under each building and played around with the spacing until I had it all evenly distributed. I temporarily taped it into place while I was figuring it out.

When it was all set, I hot glued each loop in its spot. With the loops glued, I could fiddle around with the extra wire in between the loops and tuck it away and glue it into place too.

Any shiny copper wire that was going to show I painted over with black or grey paint.


I rigged my strobe light like Tim suggested in his Manor House Tutorial video. I also wanted the manor to be lit like the others so I wrapped a portion of the light strand around the strobe battery box. I did not glue it down because I want to be able to change the batteries for the strobe. The manor house can lift off the base so I can turn on the strobes. The other houses are glued down.
The battery box for the lights is tucked up under the lantern lid. It is fastened in place with heavy duty Velcro Extreme Outdoor strips. Probably overkill, but I didn't want to risk the battery box coming loose and squishing my scene!
For the top decoration, I tore strips of muslin and stenciled on them with archival inks. I also had some black sari silk ribbon which looked good with the frayed muslin.

Whew! This is an epic post! I think it even beats my Atlantis Steampunk Journal post. I really appreciate you taking time to view my post. I hope you have a fab weekend and a happy Halloween!
Monday, October 23, 2017
Sneak Peek!
Hello!! Here's a sneak peek of the project I have posted over at the A Jillian Vance Design blog today. Check it out for a technique to stretch the use of your die collection. ;-)

Thanks for stopping by!!
Monday, October 16, 2017
Eileen Hull for the Fall-idays
Hello there. Fall is well under way and Halloween is fast approaching!! This month Eileen Hull's Inspiration Team is making all things related to the holidays, or "Fall-idays". Keep an eye on her blog to keep up on all the inspiration. I used her Train Case box die to make a decoration bursting with Halloween festiveness.

The train case die is easy to put together. I covered the Sizzles matboard with patterned paper from Tim Holtz's Halloween Paper Stash. To save time and paper, I measured out where the die cut parts for the lid and body would fall and adhered my patterned paper accordingly.

I used the Big Ticket die to cut a base for the Train Case to sit on. I filled the Case with pumpkins, monsters, vials of "potions" and other goodies.
Thanks for stopping by! I'm also entering this into the October 'Freaky Fun' challenge over at Emerald Creek Dares.
Tim Holtz Tiny Vials
Tim Holtz Adornments - Halloween
Tim Holtz Ephemera pack from 2016
Tim Holtz Alpha Parts - Wicked
Simon Says Stamp and Sizzix links in this post are affiliate links which do not affect the price you pay but allow me to earn a small percentage of a sale. Thanks! (My husband also says thanks!)

 |
| Somebody is grumpy! |
 |
| I love the Silly Monsters Die Set!! |

 |
| Cut 2 sets of these pieces |
Thanks for stopping by! I'm also entering this into the October 'Freaky Fun' challenge over at Emerald Creek Dares.
Dies Used:
Sizzix:
Eileen Hull - Train Case (Sizzix)
Other supplies:
Sizzles matboard – black (retired but you can still get white and cream)
Sizzles matboard – black (retired but you can still get white and cream)
Distress Ink – Black Soot
Distress Ink Oxides – Peeled Paint, Wilted Violet
Distress Paint – Picket Fence
Distress Paint – Picket Fence
Distress Glitter – Black Soot
Tim Holtz Paper Stash – Halloween
Tim Holtz Pumpkin PiecesTim Holtz Paper Stash – Halloween
Tim Holtz Tiny Vials
Tim Holtz Adornments - Halloween
Tim Holtz Ephemera pack from 2016
Tim Holtz Alpha Parts - Wicked
Simon Says Stamp and Sizzix links in this post are affiliate links which do not affect the price you pay but allow me to earn a small percentage of a sale. Thanks! (My husband also says thanks!)
Monday, October 9, 2017
Fall Card on the AJVD Blog!
Hello! It's sneaky peeky time for my post today over at the A Jillian Vance Design blog. Head on over to take a look at the whole card. ;-)


I hope you all have a great week!
Sunday, October 1, 2017
Mixed Media Monthly for October – Color Challenge!

It's October! That means we have an autumn fresh, shiny new challenge for you over at the Mixed Media Challenge Blog. This month is a color challenge; you need to base your project off of the color scheme in the challenge graphic above. Also, this month our sponsor is Rubber Dance Stamps from Norway and they have generously offered a $30 gift credit to their online store to the winner of this month's challenge!
Each MMM Design Team member got to pick a stamp to create their challenge project with. I couldn't resist this cute little Snazzy Squirrel stamp!

Be sure to head on over to the MMM blog to check out all the challenge inspiration created by the Design Team! Join in yourself and you'll have a chance to win our sponsor prize from Rubber Dance Stamps!

Stamps Used:
Rubber Dance - Snazzy Squirrel
Dies Used:
Sizzix:
Tag & Bookplate (Sizzix / SSS)
Other supplies:
Distress Ink – Carved Pumpkin, Vintage Photo, Barn Door
Distress Ink – Carved Pumpkin, Vintage Photo, Barn Door
Distress Ink Oxides – Wild Honey, Fossilized Amber, Antique Linen
Ranger Archival - Potting Soil
Tim Holtz Big Chat StickersTim Holtz Hinge Clips
Simon Says Stamp and Sizzix links in this post are affiliate links which do not affect the price you pay but allow me to earn a small percentage of a sale. Thanks!
Subscribe to:
Posts (Atom)