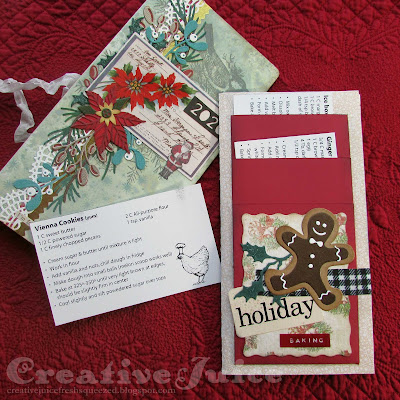
We need some fun in our lives so all of us at Eileen Hull Designs put our heads together and came up with an event that you can participate in as much or as little as you'd like. It's a challenge of sorts and we'd like to see you to make a Holiday Journal for this season using any of Eileen Hull Design's book dies. Your journal could include activities, photos, recipes, shopping lists, daily thoughts, etc. Really, it can include anything you want; after all, it's your journal!
Every Monday, Wednesday, and Friday between November 27th and December 23rd there will be a post in the Eileen Hull Fan Club from one of Eileen's team members with a prompt for a journal page. These prompts are meant to get your creative thoughts flowing and give you page ideas for your Holiday Journal. It might be in the form of a blog post, Facebook Live, recorded quick video, or a Facebook post in the group. It's up to you to take it from there and we can't wait to see what you come up with, so please share your covers and pages with us in the Eileen Hull Fan Club.
Today it's Day 2 and it's my turn to share today's prompt which is… Christmas baking! If you misssed my post about my cover, check here. I used Eileen's XL Journal Die so I created pages to fit inside. For this journal, I'm going to work on the pages separately and then bind them into signatures after the event is concluded. I find that easier if I'm stamping, stenciling etc as I go along.
Today's tutorial will show you how to make these pockets to hold favorite recipes!
I also included some throw back photos of my eldest son doing some baking when he was a little guy (so long ago LOL). He is now 17!! I will have to see if I can get some new photos of him participating (probably by tasting) for this years baking and add it to the journal. I also added a little journaling note. Back before the boys came along, I would bake several different kinds of cookies, make up cookie plates, and then anonymously drop them off at various friends' residences in the wee hours of the morning. How did I have the energy for that?? Then I had babies and got tired ha ha. I still love baking and sharing cookies but I've toned it down a bit in the years since. So, let's get on with the how-to! Also, at the end of the post I have a downloadable PDF file of recipe cards with some of my family's favorite cookie recipes. Some of these were my great-grandmother's recipes! So don't miss those. ;-)
Pocket Tutorial:
Step 1 - I first cut out a pile of pages to use throughout the whole Comfort & Joy event. Since I used the XL Journal Die, I cut my pages to 8.5" wide by 8.25" tall and then folded them in half. This gives you a folded page that is 4.25" x 8.25" which fits perfectly in the cover. I used a variety of patterned paper and plain paper so I can mix it up as I go.
Step 2 - Pockets! I made the pocket sizes to fit 3 x 5" recipe cards. I arranged it so I can cut four pockets out of one 8.5 x 11" piece of cardstock. For maximum efficiency, I scored my fold tabs before I cut them all apart (ah ha! Saving time, oh yes.) See the diagram below. Dashed lines are score lines and solid lines are cut lines.
 |
| Oops! Forgot to add the pocket height to the diagram. The finished height is 4.5" (so add 3/8" to the bottom of that for the tab). |
Here is a sheet all scored:
I then cut out the pockets. Trim the lower corners as shown:
Fold in the tabs. It helps to use a bone folder to get a nice sharp crease.
Step 3 - Glue the pockets to your pages. If you are layering pockets like I did, glue the top one on first! If you are using a different sized journal die you will have to adjust as you see fit. Maybe you will only fit one pocket on a page, that's okay. Use your favorite adhesive but make sure it's strong enough to hold the pocket on tight.
Step 4 - Decorating the pages! I used Eileen's Journaling Cards Die (sadly retired) to cut some decorative covers for the bottom pockets. I added some additional die cuts and pieces of ready to go ephemera. I tried not to overthink it. Use your stash to decorate your pages! =)
Last but not least, here are some cookie recipe cards for you to download. Click on the chicken below to download a pdf of recipe cards.
Thanks for stopping by! Check out Eileen's blog and if you are not already a member, join the Facebook Eileen Hull Fan Club group. If you want to participate in the Comfort & Joy Event with us you will need to join as that is where all the action will be! It is a warm, supportive group with lots of inspiration and sharing going on. You'll just have to answer a few simple questions when asking to join (to keep out spammers) and then you'll be added. ;-)
Supplies used:
Eileen Hull Sizzix
Dies:
Journaling Cards, Flowers & Leaves #662811 - retired
Tim Holtz Sizzix
Tim Holtz Layering Stencil, Shifter - Peppermint
Tim Holtz stamp set - Christmas Blueprint #3
Distress Spray Stains, Oxide Ink, original Ink
Tim Holtz Christmas Idea-ology: Fabric Tape, Snippets
Some links in this post are affiliate links which do not affect the price you pay but allow me to earn a small percentage of a sale. Thanks! (My husband also thanks you!) If you shop at Topflight Stamps, use my coupon code LISAHOEL for 12% off your order.


This is such a cute idea! thank you
ReplyDeleteLove this idea!
ReplyDeleteGreat idea Lisa! And easy to understand tutorial- I need to get baking so I can mail...
ReplyDeleteGreat way to use those stamps that I have never used! thanks for the recipes, holiday baking is on tap this year.
ReplyDeleteCould you share a height measurement for the pocket. On your diagram I see a width measurement of 3.5 but I don't see a height. Thanks! This pocket is so cute!
ReplyDeleteoops! The finished height is 4.5" (so add 3/8" to the bottom of that for the tab)
Deletethanks!
DeleteLove the recipe book!
ReplyDeleteLisa this idea for including recipes and precious family recipes to your journal is so gorgeous. Having the measurements really helps as we know the pockets will fit perfectly too xx
ReplyDelete