Showing posts with label Wrapped Journal. Show all posts

Wednesday, June 17, 2020

Jungle Wrap Journal with Eileen Hull & More Cork Fabric

Hello again! This month Eileen Hull's Inspiration Team has an exciting opportunity to work with Belagio Cork Fabric in our June Journal creations. This collaboration has been lots of fun! (Last week I shared this Firefly journal project.) This durable and user friendly fabric can be easily die cut, sewn by machine, combined with fabric, paper or pretty much any substrate you can think of. Thin sheets of real cork are laminated to a fabric backing so it is very flexible and durable. It is thinner that other cork sheets on the market but that is intentional to make it suitable for many different applications. It’s perfect for covering three dimensional projects like boxes, books, and home decor pieces. This week I'm sharing a jungle themed Wrapped Journal with you.


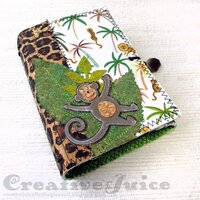
Eileen's retired Lion & Monkey Die Set is the perfect complement to the jungle cotton fabric and the animal print Cork Fabric.


How-to:
Step 1 – First I made the little lion and monkey to decorate the journal. Some of the parts I cut out of plain cork fabric. I also discovered that you can color the cork with ink and paint.


Step 2 – I fused the jungle print and green cotton fabrics to either side of a 13.5" x 5.5" rectangle of Pellon Peltex II #72F 2-sided Fusible Ultra Firm Stabilizer, then die cut out the journal cover using the Wrapped Journal Die. I cut a piece of the animal print cork fabric to fit over the spine area and overlap onto the front and back of the journal.


I stitched along the spine score lines through all the layers.


Step 3 – More Stitching! I die cut some leaves out of the cork fabric and colored them green. After drying the ink, I stitched veins onto them. I also used a zig zag stitch to sew around the edges of the journal cover and the loose edges of the spine cork fabric.


Step 4 – You can buy mini composition books at Dollar Tree stores that fit perfectly into the Wrapped Journal. Decorate the covers and it's a quick way to take care of your signatures!


To make some quick background paper to glue onto the mini books, I used some PaperArtsy Fresco paint and a brayer to lay down color on plain cardstock.


I cut it into strips a little wider than the book covers and ran them through a Xyron 3in Disposable Sticker Maker to add adhesive to the back. It's easy to apply to the book covers and then just trim to fit.


I cut some trim strips out of more of the animal print cork fabric and used the Xyron Create-A-Sticker 150 to add adhesive to the backs of them. (No wasting of adhesive!)


Step 5 – Stringing on the elastic is simple and makes it easy to add the mini book signatures.


Just slide each book under one of the elastic straps!

Step 6 – Finally I added a closure to keep the journal shut. I cut a little hole in the bend of the flap to install a Hitch Fastener. Then I punched a hole in the cover, added an eyelet and tied a loop of elastic cord through it to hook over the Hitch Fastener. Easy!


Where can you find Belagio Cork Fabric?

• Hobby Lobby carries packaged cork in 18″ x 15″ pieces in 9 different patterns in the notions department.
• There are two types – a natural and a natural with gold at Walmart stores that have fabric departments. It is sold by the yard.
• As for the entire collection, many quilt and craft shops around the country carry it by the yard and in packaged 18″ x 15″ pieces.
• Online the Belagio cork fabric is available on Walmart.com and Amazon.com.


Thanks for stopping by! I hope you have a great week and have a chance to do something crafty and creative. =) Be sure to check out Eileen's blog all this month to see what fab creations the Team has made to inspire you! I am also entering this into the June Mini Album Makers Challenge.


Supplies used:


Dies:
Eileen Hull Sizzix
Wrapped Journal Sizzix / SB ) 
Spring Leaves Sizzix / SB ) 
Lion & Monkey Thinlits #658973 - retired


Belagio Cork Fabric
jungle cotton fabric
Pellon Peltex II #72F 2-sided Fusible Ultra Firm Stabilizer
Elastic cord for binding
Eileen Hull Blends Ink - Leaf, Frog, Nutmeg
acrylic paint
Tim Holtz Hitch Fastener
Xyron 3in Disposable Sticker Maker
Xyron Create-A-Sticker 150

Some links in this post are affiliate links which do not affect the price you pay but allow me to earn a small percentage of a sale. Thanks! (My husband also thanks you!) If you shop at Topflight Stamps, use my coupon code LISAHOEL for 12% off your order.

Thursday, June 27, 2019

Mermaid Wrapped Journal with Eileen Hull

Hello there! I'm finally getting my June project for Eileen Hull posted! =) Eileen has new branded products through Therm-o-web as well as Clearsnap inks and the Design Team is highlighting them this month. Therm-o-web was so generous and sent each of us a big box of goodies to use in our projects! It was like Christmas opening that box.

woo-hoo!!! Thanks Therm-o-web!
I tried to use as many of the products they sent as I could as well as Eileen's Blends 2 inks. I think you'll like the result. ;-) Read on for photos and tons of techniques!


I created a mermaid themed Wrapped Journal! (You know me and mermaids lol.)

I love the flap that closes the journal.

Back side.


The inside is lined with mermaid fabric.

I packed soooo many techniques into this little journal! Check them out:

1) I tried the Blends 2 inks on a Gel Press plate and I got some interesting results. The inks bead up a bit but it left an interesting mottled effect on the prints.


I dotted ink directly onto the plate and then blended with a brayer. I also lightly misted it with a bit of water after blending.


I printed one side of a piece of matboard. For the part of the board that doesn't fit on the Gel plate, I just pressed it against the still 'inked' open side of the plate. I also made more of these prints onto copy paper which I used in the covering of the signature notebooks (more on that later).


2) I covered the other side of the matboard with fabric. It is really easy to do using Eileen's new Easy Cut Adhesive. It's a double sided adhesive sheet. I applied it to the blank side, peeled off the backing paper from the second side and then smoothed on the rough cut piece of fabric.


This will be on the inside of the journal.
Because more bling is good bling, I misted the inside fabric with Glitter Dust for some added sparkle. Why not lol? Next, I cut out the journal cover with the Wrapped Journal Die and it cut easily through all the layers.


3) Decorating the cover came next! I dug into my box of Therm-o-web goodies and went to town. First I used a stencil (Mighty Wave) to apply foil Transfer Gel all over the cover. It dries but remains tacky. Then you just press the foil sheets over the top and burnish it to transfer the foil. It looks so beautiful!


Therm-o-web also sent an Adhesive Pen to use with the foil sheets. After applying the Aqua foil, I wanted to add some Lilac foil accents. I used the pen to draw in some wavy lines among the stenciled shapes. Once the fluid had dried to tacky, I pressed the Lilac foil sheet over and burnished to get it to transfer.


4) Adding the fun decorative bits:


Therm-o-web sent Flock Transfer Sheets in the box. I ended up die cutting shapes (foliage/coral) directly out of the sheets. I also covered a small piece of matboard with the blue sheet and used the Journal Die to cut the little label piece behind the mermaid. I also used a stencil and the Deco Foil Metallic Gel to the flap first. I really blinged this journal up!

5) 101 and 1 ways to use Blends 2:
Well here are three more ways at least. ;-) I used a blending sponge to apply a bit of the ink to the mermaids' tails…


…and you can use the ink like watercolors (that are permanent when dry).


I tried a technique I use with Distress Ink with the Blends and it worked perfectly:


I squeezed a few drops of ink onto my craft mat and spritzed with water. Then I smooshed the cardstock into the puddles of ink. I used these pieces to diecut 'coral' elements out of.

6) And another way to use Blends! I took the extra gel prints I had made and added streaks of color.


I added some very small dots of ink and scraped the edge of the Stencil Pal tool across the paper to streak the color. (A little ink goes a long way!)

Mini composition books from the Dollar Store fit perfectly!
I cut the papers to fit the mini composition books and added some stamping, then glued them onto the books.


Whew! You made it through this huge, long post! I hope you are inspired by the techniques and apply them to your own projects.

Check out Eileen's blog and if you are not already a member, join the Facebook Eileen Hull Fan Club group. It is a warm, supportive group with lots of inspiration and sharing going on. You'll just have to answer a few simple questions when asking to join (to keep out spammers) and then you'll be added. ;-)

Dies:
Eileen Hull Sizzix
Wrapped Journal ( Sizzix / SB )
Journal Sizzix / SB )

Other:
Eileen Hull Easy Cut Adhesive
Eileen Hull Clearsnap Blends 2 inks - Coconut, Beach , Bay, Leaf, Frog, Pansy, Melon, Wildberry, Nutmeg, Sunshine, Rose Gold
Sizzix matboard
stencil - Diana Wakely, Mighty Wave
stencil - Tim Holtz, Burst
Gel Press Plate
elastic
$1 Store mini composition books
mermaid fabric
Lavinia stamps - Sebastian, Seaweed 2, Sea Creatures, Forest Spruce, Guinevere Mermaid, Alana Mermaid

Therm O web products:
Deco Foil - Aqua, Lilac
Deco Foil Transfer Gel
Deco Foil Adhesive Pen
Glitter Dust
Deco Foil Metallic Gel - Champagne Mist
Stencil Pal
Ultra Bond Adhesive
Flock Transfer Sheets - Orange Glow, Blue Diamond

Store links in this post may be affiliate links which do not affect the price you pay but allow me to earn a small percentage of a sale. Thanks! (My husband also thanks you!)

Tuesday, October 30, 2018

Jane Davenport Journal with Topflight Stamps

Hello! Today I'm sharing a Topflight Stamps project with you. I used Eileen Hull's Wrapped Journal die to make a mini art journal full of Jane Davenport stamps. I love her Relaxed Narwhal stamp ("inhale" "exhale" lol) and wanted to make it a focal image on the front.


In keeping with the ocean theme, I used some Lavinia stamps to add some more sea life on the back…


… and used mermaid fabric to cover the inside of the journal cover!


I custom made the four signatures. They include watercolor paper and sketch paper.


The journal is very easy to bind. The die punches holes in the spine when you cut it out and I just thread elastic through to create the binding. The signatures slip under the elastic.

Thanks for stopping by! Below is a list of supplies I used. Be sure to check out the Topflight Stamps blog for more inspiration. There is always something fun to see there! Have a great week. =)

I am also adding this journal to the October Mini Album Makers Challenge.


Topflight Stamps Products:
Jane Davenport - Relaxed Narwhal
Jane Davenport - Crafty Minx
Lavinia - Forest Spruce
Lavinia - Sea Creatures
That's Crafty Dinky Stencil - Burst


Other:
Eileen Hull Sizzix Die - Wrapped Journal ( Sizzix / SB )

Ranger Archival Ink - Jet Black
Distress Inks - Chipped Sapphire
Distress Oxide Inks - Chipped Sapphire, Milled Lavender, Mowed Lawn
watercolors
Derwent Inktense watercolor pencils
Ranger Distress Collage Medium - matte
Tim Holtz Typed Tokens
A Jillian Vance Design Pear Pins
elastic

Scrapbook.com and Sizzix links in this post are affiliate links which do not affect the price you pay but allow me to earn a small percentage of a sale. Thanks! (My husband also thanks you!)

Thursday, June 21, 2018

June Really is a Wrapped Journal Fest…

Hello! I'm back with another Wrapped Journal from Eileen Hull's newest Sizzix die collection Book Club Chapter 2 of which the Wrapped Journal is a cornerstone. Her Inspiration Team is sharing journal and other projects all month long so be sure to keep your eye on her blog. There is more inspiration there than you can shake a stick at!

This is another project I had made for the Creativations 2018 show and I'm happy that now I can share the tutorial and more photos with you.


In the course of his job, my husband runs across a lot of broken hard drives and other computer things so he'll save them from the trash heap and take them apart for me. I have a whole box of computer mother boards, RAM sticks and other do-hickies that looks so cool. I dove into that box for this journal.

Inside:


In the back I made a tuck spot with one of the parts.


Now hang on for some how-to!

Step 1 – Preparing the base: first I glued on some Seth Apter die cuts to the journal blank and then base coated everything with metallic green paint and dry brushed chalk paint.


Next I used Prima Soft Matte Gel to glue on the various computer parts.

Note: I did not glue the RAM stick onto the spine at this point. I waited until
the end after I had strung the elastic cord through the spine holes for
the binding of the inserts.

After the gel was dry, I coated all the computer parts with clear gesso to help the subsequent layers of paint adhere well. When completely painted to my satisfaction, I covered the whole thing with DecoArt Media Ultra Matte Varnish to help seal it and protect the paint.


Step 2 – The covers of the inserts are made from old paper cross stitch mesh I found at an estate sale. It never hurts to think outside of the box about materials and use them for purposes they weren't intended for. ;-) The inside pages are cut from an old ledger pad and a technical book.

Pages/covers were cut 4.25 x 7 inches and the final signatures trimmed to
4.25 x 3.5 inches after assembly.


I used a simple saddle stitch to sew the signatures:


Step 3 – I used elastic for the binding so I could easily slip the signatures underneath the straps.

Oops, I forgot to take photos of this part! BUT, it's just like Step 3 of my game journal I just posted about last week. See it here.

I glued the RAM stick on the spine after stringing the elastic cording.

Thanks for stopping by!

I'm also entering this in the June Mini Album Makers Challenge:


Dies:
Eileen Hull Sizzix -
Wrapped Journal
Mover & Shaper Book Binding


Broken Maze ( SSS )
Steering Wheel ( SSS )
Shield ( SSS )

Stamps:
Stampendous -  Andy Skinner Steampunk, ASCRS02
Stampers Anonymuos - Basic Backgrounds
Artistic Outpost - Typography

Other:
Distress Ink - Black Soot
Distress Oxide Ink - Frayed Burlap, Spiced Marmalade, Peeled Paint
Archival Ink - Jet Black, Leaf Green, Fern Green, Tiger Lily
Paper Artsy Fresco Finish Paint - Pumpkin Soup
Prima Clear Gesso
Prima Soft Matte Gel
Distress Collage Medium - Crazing

Perfect Pearls Mist - Green Patina, Kiwi
Eileen Hull Twist 'n Style Tool
black elastic cord
black rubber cord
Tim Holtz Hitch Fastener

DecoArt Media
Mister - Orange
Dazzling Metallics - Festive Green
Ultra Matte Varnish

Sizzix & Simon Says Stamp links in this post are affiliate links which do not affect the price you pay but allow me to earn a small percentage of a sale. Thanks! (My husband also thanks you!)