Showing posts with label autumn. Show all posts

Wednesday, September 24, 2025

Officially Fall Celebration Card with Topflight Stamps

This week at Topflight Stamps our theme is "Leaves" and I'm feeling the autumn vibe. Fall is my favorite season so this card is a celebration of the colors and fall feels.

Lisa Hoel for Topflight Stamps #creativejuicefreshsqueezed #topflightstamps


The background is created with the lovely Autumn Leaves Lindy's Stamp Gang Starburst Sprays set. The glimmer is so pretty! I topped that with an image (Crafty Individuals stamp Falling Leaves Repeating Background) stamped on top of a background made with PaperArtsy Infusions Dye.

Thanks for stopping by and be sure to check out the Topflight Stamps store for a wide selection of different and hard to find stamps, stencils and other paper crafting supplies from all around the world! Also keep an eye on the Topflight Stamps blog. There is new inspiration posted often!

Topflight Stamps Supplies Used:

Crafty Individuals stamp - Falling Leaves Repeating Background
Tracy Evans Boutique Designs stamp - Bubbles
AALL & Create stamp set - Everyday Sentiments
Lindy's Stamp Gang Starburst Sprays - Autumn Leaves
PaperArtsy Infusions Dye - Golden Sands, Terracotta
watercolors


Monday, September 23, 2024

Eileen Hull Stacking Drawer Die Inspiration

Hello there! For the month of September, Eileen Hull's Inspiration Team has been working with the theme, "Top Drawer Inspiration" and making creations using the Stacking Drawer Die (which fits perfectly into the Treasure Box by the way.) It is definitely a very versatile die you'll want in your crafty toolbox!

I'm in full on fall mode now so I was inspired to create a cute autumn themed decoration.

Lisa Hoel for Eileen Hull - Stacking Drawer Scoreboards Die  #creativejuicefreshsqueezed #EileenHull  #eileenhulldesigns  #sizzix #mymakingstory #TeamEileen #mysizzixstory

I love how you can configure single drawers in so many different ways. I stacked three of them up to create this little "dresser".

Lisa Hoel for Eileen Hull - Stacking Drawer Scoreboards Die  #creativejuicefreshsqueezed #EileenHull  #eileenhulldesigns  #sizzix #mymakingstory #TeamEileen #mysizzixstory

I cut an extra piece of matboard to fit around the three drawers for a neater finish and to give it more stability.

Lisa Hoel for Eileen Hull - Stacking Drawer Scoreboards Die  #creativejuicefreshsqueezed #EileenHull  #eileenhulldesigns  #sizzix #mymakingstory #TeamEileen #mysizzixstory

Top view! I raided my stash of little bits and figurines to decorate the top. Also included are some leaf die cuts.

Lisa Hoel for Eileen Hull - Stacking Drawer Scoreboards Die  #creativejuicefreshsqueezed #EileenHull  #eileenhulldesigns  #sizzix #mymakingstory #TeamEileen #mysizzixstory

This was pretty easy to put together. See below for some tips!

1) Here are the pieces to build three drawers. The drawers fit tightly in the sleeves. I like to cut a little sliver off the top edge of the drawer piece while it is still flat. Also, glue the drawer bottom inside the drawer and don't stick it on the bottom.


2) Here's the extra piece I hand cut to wrap around the sleeve part. I made my own score lines by cutting partway through the matboard.


Thanks for stopping by and be sure to keep an eye on Eileen's blog for more inspiration from the Educator and Inspiration Teams.

Supplies used:

Eileen Hull Die - Stacking Drawer 

Wednesday, September 13, 2023

Funkie Junkie Focus – "Fall Colors" Photo Flip Album

Hello Funkie Junkie fans! Our latest theme is "Fall Colors". I went all in (fall is my favorite season!) and created a flip photo album full of some of my favorite photographs I've taken in seasons past.

Lisa Hoel for The Funkie Junkie Boutique  #creativejuicefreshsqueezed  #eileenhull #mymakingstory #tim_holtz #thefunkiejunkieboutique #sizzix

The covers and pages I cut out using the new Eileen Hull Field Notes & Specimen Card XL Die. I cut off the binding parts of the journal, punched holes and made it a flip style album.

Lisa Hoel for The Funkie Junkie Boutique  #creativejuicefreshsqueezed  #eileenhull #mymakingstory #tim_holtz #thefunkiejunkieboutique #sizzix

Standard 4" x 6" photo prints fit perfectly into the album!

Lisa Hoel for The Funkie Junkie Boutique  #creativejuicefreshsqueezed  #eileenhull #mymakingstory #tim_holtz #thefunkiejunkieboutique #sizzix

Let's take a look at some of the 'how-to' steps…

Step 1 - I used Distress sprays and Mica spray to color sheets of Heavystock Kraft and white heavy mixed media paper for the pages. (I spritzed both sides.) Covers are cut out of Sizzix mat board.


Step 2 - After cutting out the pages, I randomly stamped them with the new Shattered Tim Holtz background stamp. (Love this new stamp!)


Step 3 - The frame on the front is a piece included on the Field Notes die (the Specimen card part!) I covered it with a piece of paper embossed using the 3-D Cracked Texture Fade folder. The vibrant oak leaf was made using an older Tim Holtz 3-D Impresslits folder.


The two leaves on the left are plain white cardstock, cut/embossed with Distress Glazes embossed on top. The two leaves on the right were cut from orange inked paper. I then added the same colors of Glaze on top and embossed. Two different looks!


As a final touch on the leaves, I scribbled Distress Crayon onto them, wet my finger and rubbed the pigment into all the nooks and crannies. I then wiped off most of the crayon.

Lisa Hoel for The Funkie Junkie Boutique  #creativejuicefreshsqueezed  #eileenhull #mymakingstory #tim_holtz #thefunkiejunkieboutique #sizzix


Thanks for stopping by. Keep an eye on the Funkie Junkie Boutique Blog, 
Inspiration Ave. because you are now getting regular doses of expanded (and inspiring) content each week. Don't miss it…

Supplies used:

Eileen Hull Die - Field Notes & Specimen Card XL Die  
Tim Holtz 3-D Texture Fade embossing folder - Cracked
Tim Holtz 3-D Impresslits - Oak Leaf
Tim Holtz Stamp Set - Shattered
Tim Holtz Stamp Set - Sketchy Leaves
Tim Holtz Idea-ology Backdrops - Halloween 2023
Tim Holtz Idea-ology Ephemera - Field Notes

Distress Archival Ink - variety of browns
Distress Mica Spray - Unravelled
Distress Spray - Vintage Photo, Antique Linen, Old Paper
Distress Oxide Spray - Vintage Photo
Distress Glaze Embossing Powder - Fossilized Amber, Fired Brick, Lumberjack Plaid
Ranger Distress Heavystock - Kraft
Distress Embossing Dabber 
Distress Crayon - Vintage Photo, Ground Espresso


Tuesday, September 21, 2021

Autumn in the Pumpkin Patch - Fall Lantern Decor

Hello! If you're a follower of mine on Instagram (@creativejuicefreshsqueezed) you might have seen my progression of sneak peeks of this latest project! It's finally complete and I can show you the whole thing now. The little shack in its pumpkin patch was destined to reside in a lantern and become my newest fall decor piece:

Lisa Hoel - fall lantern decor, little shack in a pumpkin patch!  #creativejuicefreshsqueezed #sizzix #mymakingstory #tim_holtz #minihouse #VillageDwellings #falldecor

Lisa Hoel - fall lantern decor, little shack in a pumpkin patch!  #creativejuicefreshsqueezed #sizzix #mymakingstory #tim_holtz #minihouse #VillageDwellings #falldecor

and an even closer look:

Lisa Hoel - fall lantern decor, little shack in a pumpkin patch!  #creativejuicefreshsqueezed #sizzix #mymakingstory #tim_holtz #minihouse #VillageDwellings #falldecor

The wee little scene is overshadowed by a tree full of fall color!

Lisa Hoel - fall lantern decor, little shack in a pumpkin patch!  #creativejuicefreshsqueezed #sizzix #mymakingstory #tim_holtz #minihouse #VillageDwellings #falldecor

… which is wired up with Tiny Lights!

Lisa Hoel - fall lantern decor, little shack in a pumpkin patch!  #creativejuicefreshsqueezed #sizzix #mymakingstory #tim_holtz #minihouse #VillageDwellings #falldecor

I had to make sure the outside of the lantern was beautiful too:

http://shrsl.com/iucs-5qd-k1rtqx_1-1
Leaf embellishments are made using the
Oak Leaf 3-D Embossing Impresslits from Sizzix. Love!

I am entering this into The Funkie Junkie Blog "Creating Die-Na-Mite" Challenge. My project definitely utilizes dies! Check out their challenges, they are always fun themes!

Scroll on if you'd like a little tutorial on how I put this together!

The shack is made using some of the Tim Holtz Village Die Series (retired). I didn't really chronicle its construction, Tim has done several videos on how to put them together. I will note that the siding is inked Distress Woodgrain Cardstock cut into strips and the roof is metal tape on cardstock and then embossed with the new Mini Foundry 3-D Embossing Folder (absolutely perfect!!)

On to the base!
Step 1 - I cut a piece foam to fit in the bottom of the lantern and then built up areas of elevation with more foam and cardboard. I usually cover my base with plaster cloth to fill in the contours and make more textures. You can find it in the model/train sections of craft stores.


The tree I made according to a tutorial shared by Lucy Foxworth on her Paper Glitter Glue blog. Her instructions are great and easily adaptable to whatever tree shape you want to make. Check it out! I made my tree tall with arching branches because I knew I wanted to have large leaves hanging down in the foreground of the scene. I was playing with scale and forced perspective so the tree is larger and "out of scale" to the house but I think it works.

Step 2 - I painted the base and then added bits of moss and lichen from my landscaping stuff stash.


The pumpkins are actually seed pods I painted "pumpkin" colors.


Step 3 - Glued the pumpkins into the 'patch'! To help with the illusion of perspective I picked bigger pumpkins for the front and then put the tiniest ones in the back next the shack.


Step 4 - Wired the tree: I used two strands of Tiny Lights to wrap around the branches. My plan was to hide the battery/switch parts in the top of the lantern (photo later).


Step 5 - Leaves: I chose to cut my leaves out of colored coffee filters. I use filters a lot for making foliage and flowers. It dyes readily and has the look of tissue but is stronger. In this case, I wanted a substrate that would also allow the lights to shine through it. Tip: you can cut through several layers of filter paper at a time, both with steel rule and Thinlits dies. That made it easy to cut out lots of leaves at once!


Tree with die cut leaves:


At this stage, I popped the scene back into the lantern. Fortunately, this particular lantern had a metal top that was just screwed on. I was able to take it off and easily lift the scene in and out. I always find it easier to build scenes using a 'top loading' container so you can complete it outside of the container and then just pop it in. It doesn't always work out that way, but it's a plus when it does!

Step 6 - I put the lantern top back on and glued pieces of velcro into the top. I glued matching pieces onto the backs of the light controls. They tuck right in there out of sight!


Last but not least, I'll leave you with a detail photo of the tin roof because I love it so much. Yum!


Thanks for stopping by!!

Supplies used:

Dies:
Tim Holtz Sizzix
3-D Impresslits Folder - Oak Leaf ( Sizzix / SB )
3-D Embossing Folder - Mini Foundry ( Sizzix / SB )
Tattered Leaves - retired
Village Dwelling - retired
Village Surf Shack - retired
Village Fixer Upper - retired

Other:
Tim Holtz Stamp Sets - Falling Leaves, Grunged
Ranger Distress Halloween Mica Set
Distress Collage Medium - Matte
Ranger Heavystock - white
a zillion different Ranger inks and Distress Spray Stains
Distress Resist Spray
Idea-ology Tiny Lights
coffee filters

Some links in this post are affiliate links which do not affect the price you pay but allow me to earn a small percentage of a sale. Thanks! (My husband also thanks you!) 


Monday, November 16, 2020

Celebrate Fall!

Hello there! Before I move onto Christmas projects, I wanted to do one last fall project. Fall is my favorite season! I love the crisp days, golden light and above all the colorful leaves. The bright autumnal hues are totally my jam! I still had a stash of paper leaves I made during the fall Facebook live demonstrations that Tim Holtz did last month so I was able to incorporate them into my little thrift store upcycling project:

Lisa Hoel – upcycled thrift store finds into a fun autumn arrangement, celebrate fall! #creativejuicefreshsqueezed #tim_holtz #timholtzleaflove #mymakingstory

I found the bottom half of a nut dish at the thrift store as well as a pair of cute squirrel salt and pepper shakers (into my basket they went!) Perfect for a fall project!


Lisa Hoel – upcycled thrift store finds into a fun autumn arrangement, celebrate fall! #creativejuicefreshsqueezed #tim_holtz #timholtzleaflove #mymakingstory

I wanted it to look like a forest floor on a fall day. I sprinkled the leaves about along with moss and berry like things. I also discovered that you can use Distress Glaze on the Idea-ology Toadstools and they look great!


Lisa Hoel – upcycled thrift store finds into a fun autumn arrangement, celebrate fall! #creativejuicefreshsqueezed #tim_holtz #timholtzleaflove #mymakingstory

As Tim shared in one of his demos, when applying Glaze to an impervious surface, it works best to coat the surface with Collage Medium and glue the embossing powder to it. When it's dry, you can emboss as usual. It worked perfectly! I painted some spots on afterwards. Love them! I may need to stock up on more Toadstools ha ha.

Thanks for stopping by! I hope you have a great week and get inky!

I am also entering this into the Funkie Junkie Boutique Blog's current challenge, "Celebrate". It runs for another week so you have a chance to enter too.


Supplies used:

Dies:

Tim Holtz Sizzix
Fall Foliage ( Sizzix / SB )

Tattered Leaves 656927 
- retired

Idea-ology Toadstools (in stock here)

Ranger Distress Glaze - Crackling CampfireFired Brick
Ranger Distress Inks - various fall colors
Ranger Distress Oxide Inks - various fall colors
Ranger Distress Spray Stains - various fall colors
Ranger Distress Spray Oxide Stains - various fall colors


Some links in this post are affiliate links which do not affect the price you pay but allow me to earn a small percentage of a sale. Thanks! (My husband also thanks you!) If you shop at Topflight Stamps, use my coupon code LISAHOEL for 12% off your order.

Thursday, November 5, 2020

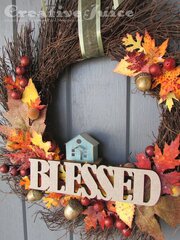
Blessed Home Fall Wreath

Howdy readers! I am on a wreath kick. I had picked up a few wreaths (with re-do possibilities) from the thrift store so I could get a base for the new Halloween wreath I wanted to make this year. I ended up using a black grapevine wreath for the Halloween project so I had a brown twiggy one left. I knew it would make a great fall wreath and the dark brown would make my Tim Holtz #timholtzleaflove challenge leaves really pop! I also had the theme in mind from the current Funkie Junkie Boutique Blog challenge, "Home is Where the Heart Is". 

Lisa Hoel - Blessed Home fall wreath #timholtzleaflove

Home really is where the heart is and I feel very fortunate to be living where I do with my family. We are truly blessed and I am so thankful! We have not regretted moving to our new state for a moment and we are thriving here. It was all the Lord's doing and looking back we can see his plan for us in coming here.

Lisa Hoel - Blessed Home fall wreath #timholtzleaflove

The leaves are cut using various Sizzix leaf dies designed by Tim Holtz. The past two Saturdays Tim has been doing Facebook Live demos showing all sorts of techniques using his products to make fall projects (Fall Vibes and Leaf Love). What fun! I used part of my pile 'o leaves to decorate this wreath. The little house is from his new die set Paper Village (oh I have plans for this set!!)

Lisa Hoel - Blessed Home fall wreath #timholtzleaflove

Thanks for stopping by! I hope you have a great weekend and have a chance to do something crafty and creative. =)

I am also entering this into the Funkie Junkie Boutique Blog's current challenge, "Home is Where the Heart Is". It runs for another week so you have a chance to enter too.


Supplies used:

Dies:

Tim Holtz Sizzix
Paper Village ( Sizzix / SB )
Fall Foliage ( Sizzix / SB )
Layered Leaf 660039 - retired
Tattered Leaves 656927
- retired

Ranger Distress Glaze - Crackling Campfire, Fired Brick
Ranger Distress Inks - various fall colors
Ranger Distress Oxide Inks - various fall colors
Ranger Distress Spray Stains - various fall colors
Ranger Distress Spray Oxide Stains - various fall colors


Some links in this post are affiliate links which do not affect the price you pay but allow me to earn a small percentage of a sale. Thanks! (My husband also thanks you!) If you shop at Topflight Stamps, use my coupon code LISAHOEL for 12% off your order.

Wednesday, October 7, 2020

Autumn Teacup – Eileen Hull's New Sizzix Die


I love fall! It is my favorite season for sure. The colors, the weather, the holidays – what a combination! I am always thankful for the season, especially after a long hot summer. I used Eileen Hull's new Sizzix 3-D Teacup Die to create a little decor piece that really celebrates the season.

New 3-D Teacup Die


It's fall time, hurray!!!

Lisa Hoel for Eileen Hull – Autumn splendor using Eileen's newest Sizzix Die, the #-D Teacup! #eileenhull #mymakingstory #ehinspirationteam #tim_holtz

I also used loads of Tim Holtz Sizzix dies to add the fall flavor to my make. Various leaf dies, the 3-D embossing folder Lumber, and the sentiment die. I also used the retired Tree Rings die (several layers stacked) to create the 'saucer' for the Teacup. The spoon (part of the Teacup Die) I embossed with 3 of Eileen's luscious Molten Dimensions embossing powders.

Thanks for stopping by! Check out Eileen's blog and if you are not already a member, join the Facebook Eileen Hull Fan Club group. It is a warm, supportive group with lots of inspiration and sharing going on. You'll just have to answer a few simple questions when asking to join (to keep out spammers) and then you'll be added. ;-)

I am also entering this into the current Funkie Junkie Boutique challenge, "Fall Foliage". Be sure to check out their challenges, they are always lots of fun!

Supplies used:

Dies:
Eileen Hull Sizzix
Teacup Die  Sizzix / SB ) 

Tim Holtz Dies
3-D Embossing Folder - Lumber  Sizzix / SB ) 
Fall Foliage  Sizzix / SB )
Skeleton Leaves  Sizzix / SB )
Shadow Script #2  Sizzix / SB )
Layered Leaf - retired
Tree Rings - retired
Tapered Fringe Strip Die - retired

Sizzix Mat Board
Eileen Hull's Molten Dimensions Embossing Powder - Goldenrod, Polished Silver, Black Magic
Distress Spray Stain - misc fall colors
Distress Ink Pads - Misc. fall colors
glue gun

Some links in this post are affiliate links which do not affect the price you pay but allow me to earn a small percentage of a sale. Thanks! (My husband also thanks you!) If you shop at Topflight Stamps, use my coupon code LISAHOEL for 12% off your order.

Tuesday, October 28, 2014

Autumn Leaf Card

Hello everyone! Today I am honored to be a guest designer over at the Jillian Vance Design blog. Here's a little peek at the card I created:


Head on over to AJVD to see the whole post and all the details. =) For more information on the leaf printing I used for the circular background piece, check out the tutorial HERE.

Thanks,
Lisa

Thursday, October 23, 2014

Fall ATB and Leaf Printing Tutorial

Hello everyone, I have a fun Artist Trading Block project to share with you today, plus a leaf printing technique I think you will really like. First, the ATB:


(Note on the Harvest Girl image - it can be downloaded from the Graphics Fairy.)

I wanted to make it look like the ATB was unzipping and an explosion of leaves and fall flora was coming out. It is certainly festive!

I also had an idea for making leaf prints using mini Distress Ink pads and the box sides make a perfect canvas. Let's dive in and learn how to do it.

First you need to collect your leaves. They should pliable if you are collecting ones that have already fallen. Crunchy will not work! Lay a leaf down on your craft sheet and dab the back side of the leaf with various colors of Distress ink. The mini pads work well because of their smaller surface area. You can blend more colors on the leaf, especially with a smaller leaf. Full size pads could work too. Mist the leaf once or twice. For me, one spritz gave me a more detailed print and two spritzes gave me a looser, watercolor effect. Don't spray too much on or the water will ooze out the sides in the next step and muddle your print.


Next lay the leaf, ink side down, carefully on the surface you are printing on. (I used tweezers.) Lightly hold the leaf in place and run a brayer over it to transfer the ink to the paper. Carefully lift off the leaf and that's it! You can dab extra ink off of your leaf with a baby wipe or paper towel and use it again for subsequent prints.


I tried watercolor paper, Sizzix matboard, manila folder and a craft tag as substrates while I was experimenting. They all worked very well! Here are samples of my experimenting:

watercolor paper

manila, matboard and kraft
Here is a close up of the printing on the ATB - it is really clear and I love the leaf detail transferred:


I hope you are inspired to give this technique a try. =) Most of the supplies I used for this can be found at Inspiration Emporium. Follow the links below and use my code JUICE to save 10% if you go shopping. I will also point out that US shipping is always $5 and international shipping is just $10. ;-)