Showing posts with label garden. Show all posts

Wednesday, April 26, 2023

Funkie Junkie Focus - Tim Holtz Idea-ology "It's In the Details"

Hello there Funkie Junkie Fans! It's time for a new focus theme on Tim Holtz Idea-ology products and It's In the Details. I always love working with Idea-olgy bits and bobs. They are so much fun. I was really excited about the new Reliquary Dome so I used that as the start of my project.

Lisa Hoel for The Funkie Junkie Boutique - Garden Reliquary Dome   #creativejuicefreshsqueezed  #mymakingstory #tim_holtz #thefunkiejunkieboutique #sizzix

I made it interesting in the back too…

Lisa Hoel for The Funkie Junkie Boutique - Garden Reliquary Dome   #creativejuicefreshsqueezed  #mymakingstory #tim_holtz #thefunkiejunkieboutique #sizzix

The Idea-ology I used is both old and new…

Lisa Hoel for The Funkie Junkie Boutique - Garden Reliquary Dome   #creativejuicefreshsqueezed  #mymakingstory #tim_holtz #thefunkiejunkieboutique #sizzix
Recognize the Urn from Halloween?

Lisa Hoel for The Funkie Junkie Boutique - Garden Reliquary Dome   #creativejuicefreshsqueezed  #mymakingstory #tim_holtz #thefunkiejunkieboutique #sizzix
Distress Paint is great for altering metal Adornments.

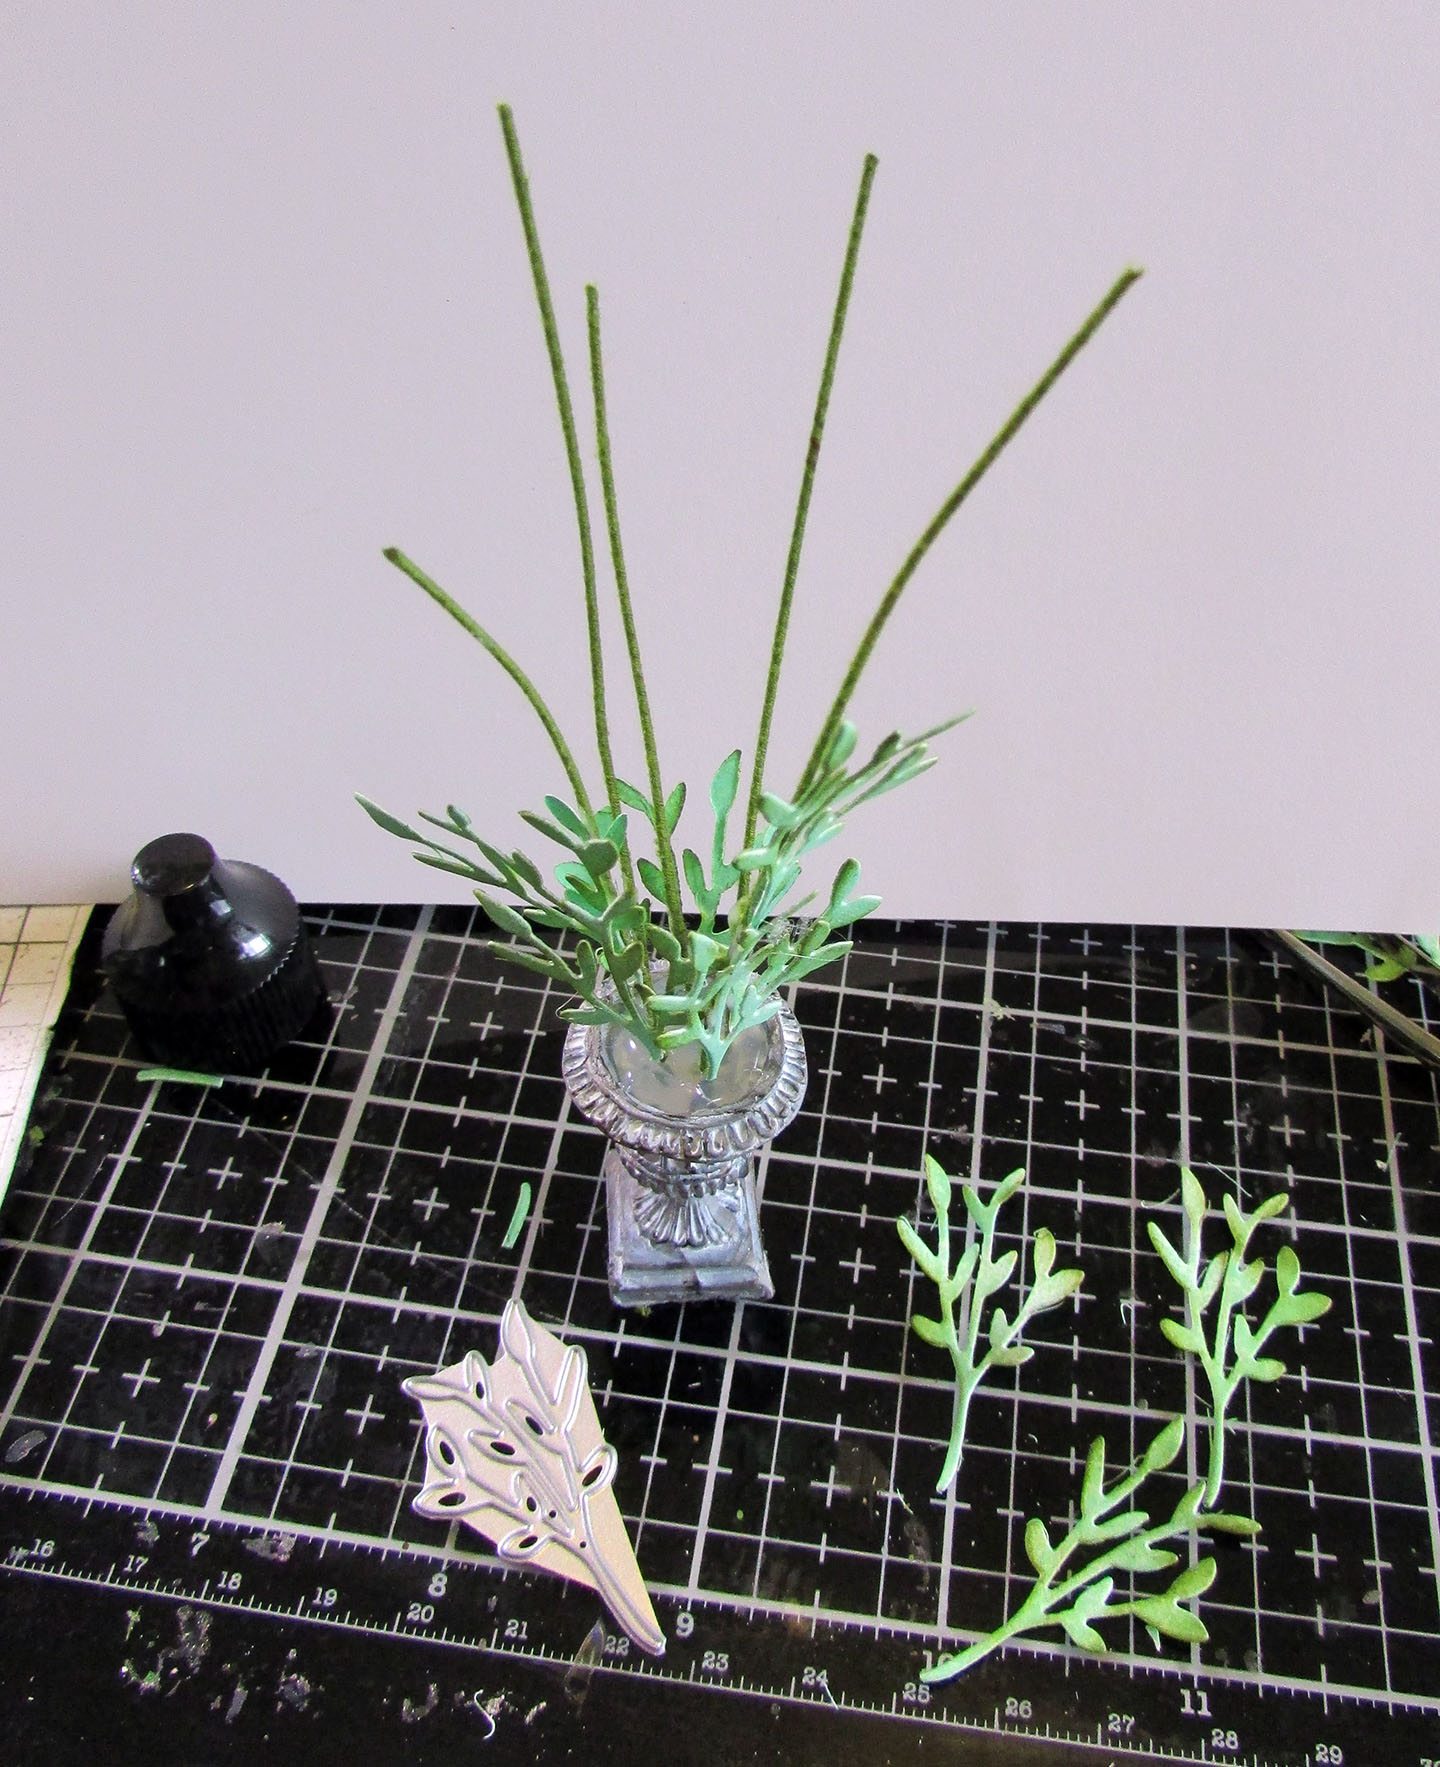
Here are some looks at the how-to…

1) I used various colors of Distress Paint to color the urn and metal embellishments. Tip: clean the metal bits with rubbing alcohol first for better paint adhesion. I also used a brown Distress Crayon to add some grunge.


2) I added the main pieces first to figure out the best spacing.


3) In the model section of hobby stores, you can find supplies for mini landscaping. I got this foam "lawn" material there that added a nice touch of texture to the base.


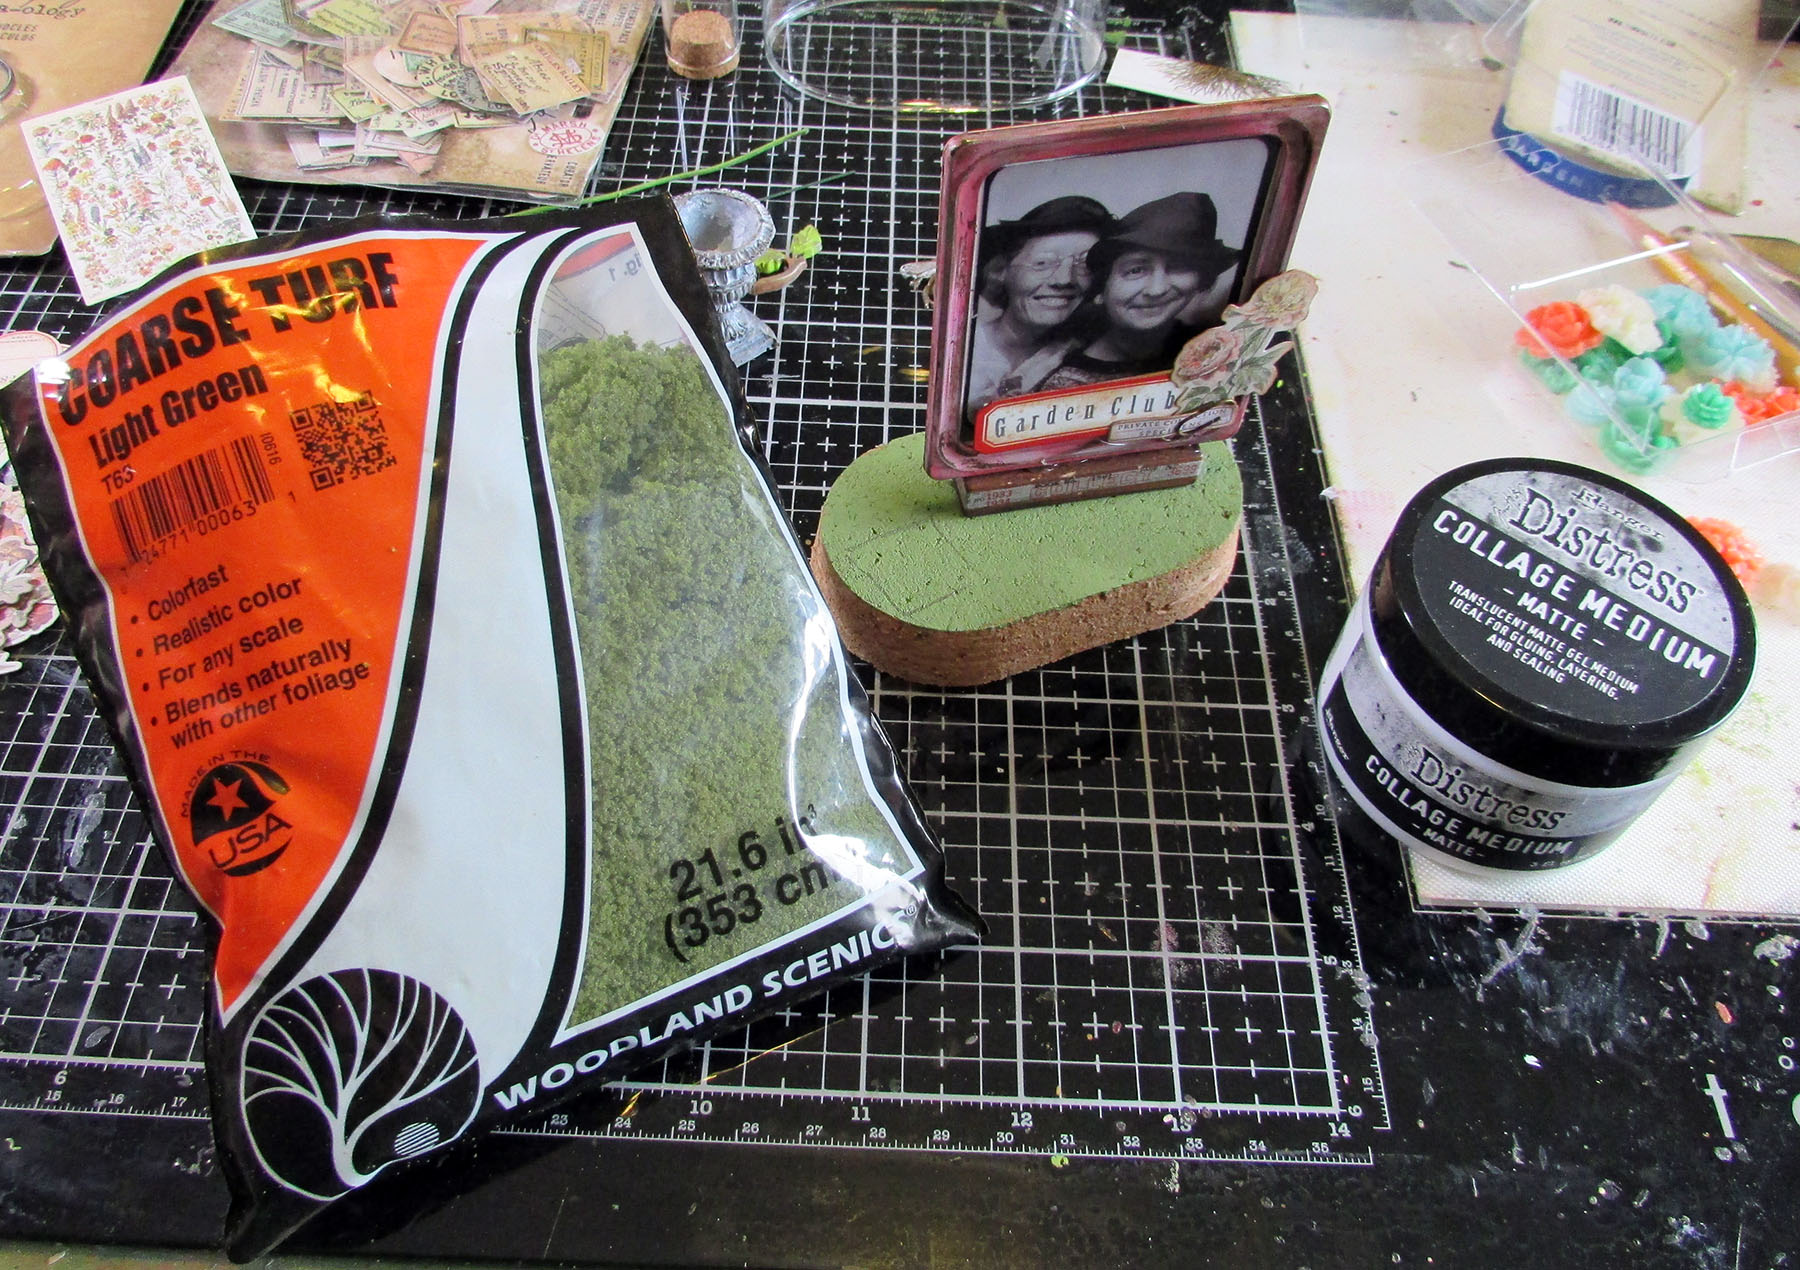
4) I glued die cut leaves and flowers onto floral wire to form the "bush". I painted the hot glue in the urn brown and then glued coffee grounds on top to simulate dirt.


Thanks for stopping by. Keep an eye on the Funkie Junkie Boutique Blog, Inspiration Ave. because you are now getting regular doses of expanded (and inspiring) content each week. Don't miss it…

Supplies used:

Tim Holtz Thinlits Die Set - Funky Florals #2

Tim Holtz Idea-ology: 
Reliquary Dome
Photomatic
Adornments - Entomology
Adornments - Foliage
Urns (Halloween)
Tiny Vials
Tiny Clips
Mini Paper clips
Design Tape - Trims
Ephemera, Field Notes Snippets
Layers - Organic
Classic Label Stickers
Heirloom Florals

Monday, September 30, 2019

Fall Garden Journal with Eileen Hull

Hello there! Happy fall everyone! One of the fall garden tasks that I have is to save seeds from my annuals as they are finishing up blooming for the summer. I thought making a cute journal for keeping those seeds in (and any garden notes!) would be fun. I also managed to use a ton of Eileen's dies and other products in the creation of it! =)


Cover close up!


I put lots of pockets and little tuck spots inside!


The Notebook is permanently glued into the main journal.


And now for a little how-to:

First, the flowers are all created using Eileen's Molten Dimensions embossing powders and an easy embossing technique that makes use of a tool that might just be gathering dust in the back of your craft closet. Check that out here on this past blog post.

Next, I used her Blends 2 Inks to 'marble' the insides of the main journal cover. I wanted to use orange as one of the colors but there isn't a specific orange ink color. No problem! You can mix whatever color you want from the existing inks!


I spread that ink around on my craft mat and added some dots of yellow, then spritzed it with a little water. Then I smooshed one side of the matboard pieces into the ink.


Cool beans!

Assembling the journal:

I laid out all my parts:


I decided I wanted to try to make a case bound mini notebook that fit inside the big journal. I followed this excellent video tutorial by Sea Lemon. So watch that first (and save it!) Below are some step photos from the process but they won't make as much sense if you don't know how to do the case  binding.


Here are the pages all sewn together. I cut the pages using the Passport Book Die. They fit well into the Notebook Die cover!


My solution for a book press (lol) during the gluing step.


The end papers cut and ready to glue onto the page block.


Ready to glue into the cover.

Also, here is a close up of the little label cards that fit into the Giftcard Folder element up above the inner notebook.


Thanks for stopping by! Check out Eileen's blog and if you are not already a member, join the Facebook Eileen Hull Fan Club group. It is a warm, supportive group with lots of inspiration and sharing going on. You'll just have to answer a few simple questions when asking to join (to keep out spammers) and then you'll be added. ;-)

Dies:
Eileen Hull Sizzix
Journal ( Sizzix / SB )
Notebook ( Sizzix / SB )
Gift Card Folder & Label #2 ( Sizzix / SB )
Book & Pages, Trinket Box & Frame Sizzix / SB )
Journaling Cards - Flowers & Leaves ( Sizzix / SB )
Passport Book ( Sizzix / SB )
Flower, Heart & Soul - retired
Starlight Embossing Folder - retired
Phrases, Bloom & Plant Markers, 658445retired 

Other:
Eileen Hull Embossing Powder by Emerald Creek - Golden Rod
Eileen Hull Embossing Powder by Emerald Creek - Aqua Splash
Eileen Hull Embossing Powder by Emerald Creek - Glistening Glass
Eileen Hull Clearsnap Blends Ink - Clear
Eileen Hull Clearsnap Blends 2 Ink - Stop, Sunshine, Coconut, Leaf, Golden
Eileen Hull Easy Cut Adhesive
Rinea Foiled Paper - brown
Rinea Ghost Ink
Sizzix Sizzles Matboard
Tim Holtz Tiny Attacher
Tim Holtz Mini Paper Clips
cardstock
Paper Artsy stamp set - ETS24
Tim Holtz Stamp Set - Entomology + matching die set
Ranger Melting Pot - retired
Potting Soil Archival Ink

Some links in this post are affiliate links which do not affect the price you pay but allow me to earn a small percentage of a sale. Thanks! (My husband also thanks you!) If you shop at Topflight Stamps, use my coupon code LISAHOEL for 10% off your order.

Thursday, August 15, 2019

Let's Do It Again Funkie Junkie Boutique Challenge

Hello! I am honored to be a guest designer today on the Funkie Junkie Boutique Challenge Blog! Their new challenge is Let's Do It Again! in which you 're-do' an old project with a new twist. Back in 2012 I created this little project using an altered Altoid Tin:

The original! You can see the blog post HERE.
I thought it deserved a do-over with more details and more everything Tim Holtz. ;-) I have a large collection of Idea-ology that needs using in projects ha ha. So… I used the old idea and came up with:

New and improved!
More views!


And closeups!


Aaaaaand the back:


I love that Tim has so many different Thinlits dies now. They are perfect for little scenes like this. The Funky Florals sets are especially favorites of mine. All the little Idea-ology bits and bobs really appeal to me as well. I got caught up in the creation of this project and didn't really take step photos except for this one as I was working on the base. (So you get a mini mini tutorial. Or maybe it just counts as a few tips lol.)


Here it goes! The base is the bottom half of an old paper mâché box. I of course had hoarded it because I knew it would come in handy someday. I painted it green and then adhered Botanical Collage Paper to it with Distress Collage Medium. When it was dry, I dry brushed on a lighter color green over parts of the design. Then using more Collage Medium, I glued on the black flower die cuts around the sides. I brushed a layer of Medium over the tops as well to seal them. I glued some moss from the craft store (floral department) to the top and then I was ready to get to work on the scene!

Thanks for stopping by and be sure to check out the Let's Do It Again! challenge! Join in and you'll have a chance to win a gift credit at The Funkie Junkie Boutique store or be a future guest designer.

Dies:
Tim Holtz Sizzix
Wildflower Stems #1 ( Sizzix / SB )
Tiny Tattered Florals Sizzix / SB )
Garden Greens Sizzix / SB )
Funky Floral #2 Sizzix / SB )
Funky Floral #3 Sizzix / SB )

Other:

Tim Holtz mini layering stencils Set 28
Collage Paper - Botanical
Ranger Distress Grit Paste
Distress Crayons - Set 3, Set 1
Ranger Distress Collage Medium - Matte
Distress Markers
Distress Paint - Picket Fence, Fired Brick
Paper Artsy Fresco Paint - Guacamole, Tinned Peas
moss

Tim Holtz Idea-ology:
Paper Dolls
Transparent Wings
Metal Gate
Trinket Tins
Faucet Knobs
Bouquet
Ephemera - Botanical

Store links in this post may be affiliate links which do not affect the price you pay but allow me to earn a small percentage of a sale. Thanks! (My husband also thanks you!) If you go shopping at Topflight Stamps, use my code LISAHOEL for 10% off your order.

Friday, March 28, 2014

Garden Mini Configuration Book

Happy Spring! More of you are experiencing it now, sorry that some of you are still stuck where winter is holding out. I was excited when Tim Holtz debuted the Mini Configurations Book, the configurations products are so much fun and this little book is a perfect size. I knew I wanted to do a spring-themed project, especially with the new Wallflower paper. I think this paper stash is my favorite that Tim has done to date.


I covered the front and back with paper from the Wallflower stack and used Sticky-back Canvas for the spine (after coloring and spritzing with Distress Stains, and stamping with archival ink). The cover embellishment is a Cabinet Card frame with a piece of paper I marbled slid into it. I distressed the metal Ornate Plate and corners using Distress Paint (Picket Fence and Iced Spruce). Distress Paint works really well on metal. You just have to dab it on with the applicator and let it partly dry, then wipe off the extra with a rag. The paint stays in the nooks and crannies. The key is an old vintage one from my stash.


Of course filling the compartments of the configurations is the most fun. I rummaged around and found all sorts of goodies to use. Most of the metal findings I worked over with Distress Paints. The old photos are from scanned family pictures. The little boy in the green frame is my Dad! I even had a mini etching that worked perfectly as a background in the biggest compartment. Here's a better look:


I just loved the Stampendous Daffodil Girl stamp and knew I had to use it in this project. First I stamped it with archival ink onto smooth watercolor paper. Then I "watercolored" it using Distress inks. A super easy way to do this is to swipe your Distress ink pad onto a craft sheet and then pick up the color with a wet brush (or you can use a water brush) and paint onto the image, blending colors as needed.

I hope you are inspired by the colors and views of spring! You still have a few days to enter the Splash of Color challenge at Inspiration Journal. You could have a chance to win $50 to spend at Inspiration Emporium by linking up your project there.

Most of the supplies I used for this can be found at Inspiration Emporium. Follow the links below and use my code JUICE to save 10% if you go shopping.