

It became this…

…with a surprise inside!

Details of the inside scene:


So, let's talk about how this all went together. The cover paper is thinner watercolor paper covered with Distress stain and Perfect Pearls Kiwi mist. After drying it, I rubbed Peeled Paint and Shabby Shutters Distress Ink pads onto the Latticework stencil and misted it with water. Flip it over and press it onto your paper and it leaves an imprint. This happens to be the technique Tim Holtz is featuring in the June tag so you can check that out for more directions.
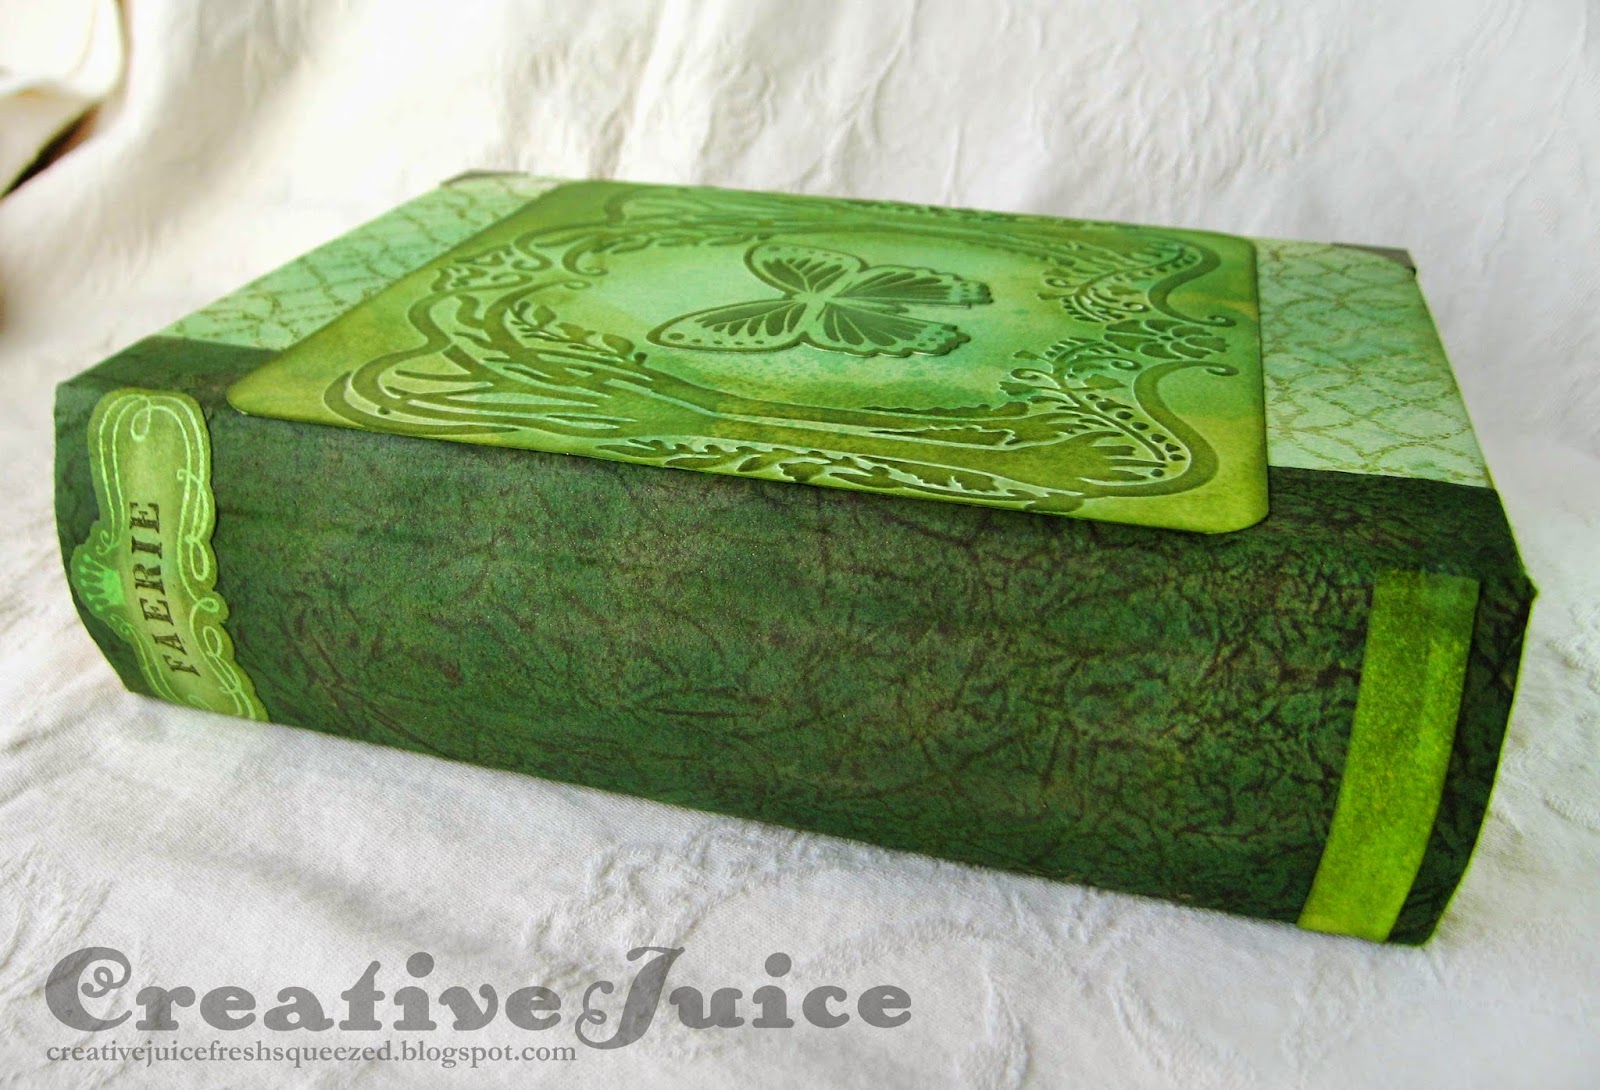
The center panel I embossed using the Vintaj Arching Tree Frame folder and highlighted the embossing with darker green inks. The butterfly is from the framelits die and stamp set, For the Record 2, Tailored. I stamped and embossed the butterfly with clear embossing powder to use as a resist - going back in with darker green ink to make the stamped image really pop.
The spine is covered with paper made to look like faux leather - a technique shared on the Ranger website. (Thanks for the link Shelly!) It didn't look right brown so after I had crinkled it and inked the folds I also added a layer of Mowed Lawn Distress Stain over it all. Perfect!

The base of the inside cover was also colored with mists. I also sprayed mist (Blue Smoke) on the Shatter stencil and impressed it on the background to look like spider webs. The flowers and other images are stamped in archival ink and then watercolored using various Distress re-inkers and ink pads. Here is the finished box, ready to filled!
The flowers are roses made from the Tim Holtz Tattered Pinecone die (see page 65 in A Compendium of Curiosities Vol. 3 to find out how to do it!) Another great way to make flowers is to die cut them out of coffee filters and then mist them to colorize. The yellow flower was made that way. See my flower wreath post for a host of ways to make flowers!
Whew! That is a lot of photos and information. I hope you found it helpful. =) I am entering this into the Compendium of Curiosities 3 Challenge with a thanks to Inspiration Emporium for sponsoring the prize. Linda is hosting this series of challenges on her blog Studio L3. There are many more to come, be sure to check them out!
I am also entering this into a challenge on a new blog, The Mixed Media Monthly Challenge. Their first challenge is all about using spray inks and mists. Inspiration Emporium is also sponsoring this challenge. (Aren't they great? =) )
Most of the supplies I used for this project can be found at Inspiration Emporium. Follow the links below and use my code JUICE to save 10% if you go shopping. I will also point out that US shipping is always $5 and international shipping is just $10! ;-)


This is just so creative and stunning! Thanks for sharing your process. We appreciate you joining us at the first Mixed Media Monthly Challenge!!
ReplyDeleteWhat a cool alteration! I adore the green and the garden inside! The roses are gorgeous, and love that tree stencil too! Thanks so much for joining in on our rosy fun at CC3Challenge!!!
ReplyDeleteStunning! The details are wonderful.
ReplyDeleteFound the link to your page from ATT. love the fairy book!!
ReplyDeletereally lovely stuff!!!! I really like that arching tree die!
ReplyDeleteWhat a wonderful surprise when the book opened! Great idea and inspiration. Thanks for playing along in the CC3 Challenge!
ReplyDeleteYour book box is very sweet, you did a great job!
ReplyDeleteOMGosh!!! This is amazing...beautiful...magical!!!
ReplyDeleteWow! Such an amazing altered project! Love all your techniques. The mini aspen tree stencil is awesome! Thanks for joining us on our first Mixed Media Monthly Challenge!
ReplyDeleteLove your colour choice,very nice! and your roses turned out awesome!
ReplyDeleteThis is stunning! what an amazing idea to alter one of those books. The collage inside is really beautiful. Thank you so much for getting inky with us at the Mixed Media Monthly Challenge!
ReplyDelete-Rachel
rwkrafts.com
What a magical surprise awaits anyone who opens this book Lisa! Love the stencilled background behind the layers of flowers. Jenny x
ReplyDeleteWhat a wonderful transformation! So glad you shared this with us at CC3C... thanks!
ReplyDeleteLove that surprise... this is fabulous... great alteration, so fun !!
ReplyDeleteWow! There are so many wonderfully creative surprises in this project. So inspiring. Such a beautiful project. wonderful. I love birds. Thanks for playing along with the Mixed Media Monthly Challenge!
ReplyDeleteAwesome! I have been meaning to alter a book like this for awhile, you have really inspired me! What a great end result. Thanks for playing along with the Mixed Media Monthly Challenge!
ReplyDeleteThe details are wonderful.
ReplyDeleteSo wonderful! I saw this on scrapbook. com & clicked your link to this page. You are inspiring me, I want to do this.
ReplyDelete