Showing posts with label flowers. Show all posts

Wednesday, October 2, 2024

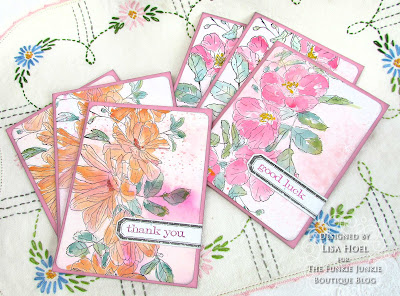
Gel Press Print Fun with Topflight Stamps

This week our Topflight Stamps theme is Anything Goes! These are always fun because I can search through my Topflight stash and use whatever strikes my fancy.

Lisa Hoel for Topflight Stamps #creativejuicefreshsqueezed #topflightstamps

First I rifled through my pile of Gel Press prints to make the card backgrounds. (Trust me, if you try gel printing, you will end up with a pile of prints. It's addicting!) Then I used the Crafty Individuals Tall Wild Flowers Stamp to create the focal images. You could make a whole set of these cards to use as a gift.

Thanks for stopping by and be sure to check out the Topflight Stamps store for a wide selection of different and hard to find stamps, stencils and other paper crafting supplies from all around the world! Also keep an eye on the Topflight Stamps blog. There is new inspiration posted daily!


Topflight Stamps Supplies Used:

Crafty Individuals stamp - CI-185 Tall Wild Flowers
Crafty Individuals stamp - CI-116 Crackle Background 
Versafine Pigment Ink Pad - Onyx Black


Wednesday, May 22, 2024

Funkie Junkie Focus – "Stencil Sensation" Iris Garden Journal

Hello Funkie Junkie fans! Our theme this time is "Stencil Sensation"! I definitely have a love for stencils. They are a handy tool to have in your creative arsenal and you can do so much with them. I created a practical and pretty journal to keep track of my extensive *ahem* bearded iris collection. Using the Eileen Hull Field Notes & Specimen Card Die to create a flip style journal on rings means I can add pages easily. There are several of my iris varieties that I need to get photos of this spring so I can add them to the journal.

Lisa Hoel for The Funkie Junkie Boutique  #creativejuicefreshsqueezed   #tim_holtz #thefunkiejunkieboutique

Of course I used many stencils to decorate the covers and pages! Take a look:

Lisa Hoel for The Funkie Junkie Boutique  #creativejuicefreshsqueezed   #tim_holtz #thefunkiejunkieboutique
I used Gel Press prints on the inside covers.


Lisa Hoel for The Funkie Junkie Boutique  #creativejuicefreshsqueezed   #tim_holtz #thefunkiejunkieboutique

Lisa Hoel for The Funkie Junkie Boutique  #creativejuicefreshsqueezed   #tim_holtz #thefunkiejunkieboutique

Lisa Hoel for The Funkie Junkie Boutique  #creativejuicefreshsqueezed   #tim_holtz #thefunkiejunkieboutique

Lisa Hoel for The Funkie Junkie Boutique  #creativejuicefreshsqueezed   #tim_holtz #thefunkiejunkieboutique

I have some process photos to share:

1) base background - I cut the pages out of heavy mixed media paper and used Antique Linen Distress Oxide Spray plus stencils to create a base texture.


I used a couple of methods to make it easy to do a lot of pages in a short time. First, two pages fit under one of the big stencils. I spritzed through the stencil, set those pages off to dry, and then used the spray left on the stencil to make a monoprint onto two new pages. I could actually get two sets of monoprint pages done with the residual ink from the initial spritz. That saved a lot of time.

Monoprint with stencil - I spritzed the residual ink with water
and then squished onto the pages.


2) More stencils! Over the top of the Distress Spray I used more stencils to add accent layers with acrylic paint. I knew the centers of the pages would be covered by a photo so I concentrated on the edges. I followed up with a bit of stamping with Archival ink.


3) Covers: I forgot to take photos while I was making them, oops! For a first layer, I did the same thing with Antique Linen Distress Oxide Spray as I did with the pages. Over that, I used the Tim Holtz Deco Leaf Layering Stencil to add Translucent Distress Crackle Paste in parts. Once it was dry, I spritzed with various colors of Distress Spray and water to get it to bleed into the crackle and pool around the paste shape edges. It's a great effect!


Thanks for stopping by. Keep an eye on the Funkie Junkie Boutique Blog, Inspiration Ave. to see all the inspiring content each week. Don't miss it…

Supplies used:

Eileen Hull Die - Field Notes & Specimen Card
Tim Holtz Stamp Sets - Halftone & Rings

Stencils:
Tim Holtz Layering Stencils: Sticks, Berry Leaves, Deco Leaf
Dina Wakley Stencils: Pieces, Varied
Dylusions Stencils: Hexicomb, Dot Grid

Sizzix Mat Board
Distress Oxide Spray - Antique Linen
Distress Spray - Twisted Citron, Saltwater Taffy, Speckled Egg
Ranger Archival Ink - Frayed Burlap, Spiced Marmalade, Peeled Paint, Mermaid Lagoon, Picked Raspberry
Acrylic paint (Distress Paint is perfect!)


Wednesday, April 10, 2024

Funkie Junkie Focus – "The Flowers Are Coming"

Happy Spring! Our current Funkie Junkie Focus theme is "The Flowers Are Coming" and they are popping out all over, both in the garden and the craft room. I always think it's nice to have some cards on hand for any occasions that come up so I made a set of spring themed flower cards.

Lisa Hoel for The Funkie Junkie Boutique  #creativejuicefreshsqueezed   #tim_holtz #thefunkiejunkieboutique
Think pink!

The beautiful Floral Trims stamp set from Tim Holtz is perfect for creating a focal image on a card! The Simple Sayings stamp set is also a favorite sentiment set that I use often for my cards.

Lisa Hoel for The Funkie Junkie Boutique  #creativejuicefreshsqueezed   #tim_holtz #thefunkiejunkieboutique

I started off by creating several pages of pink inky backgrounds using Distress Spray Stains and Ranger Distress Watercolor Cardstock. I cut them down into card fronts and stamped with Black Soot Archival ink. I then loosely watercolored over the top to fill in the flowers. Easy!

Thanks for stopping by. Keep an eye on the Funkie Junkie Boutique Blog, Inspiration Ave. because you are now getting regular doses of expanded (and inspiring) content each week. Don't miss it…

Supplies used:

Tim Holtz Stamp Set - Floral Trims
Tim Holtz Stamp Set - Simple Sayings
Ranger Distress Watercolor Cardstock
Ranger Distress Spray Stains - Kitsch Flamingo, Saltwater Taffy, Picked Raspberries
Ranger Distress Oxide Spray Stains - Tattered Rose
Ranger Archival Inks - Black Soot, Picked Raspberries


Tuesday, January 30, 2024

Eileen Hull Sizzix Cantilever Sewing box Die Tutorial

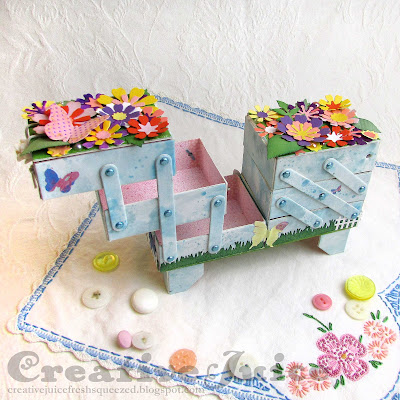
Hello Eileen Hull fans! At the beginning of the month, Eileen released some Classic Sizzix die designs that were brought back due to popular demand. (If you missed the Release Party, you can watch the replay here.) The Inspiration Team had a lot of fun revisiting these old favorites and we've been sharing tutorials for our projects all throughout January. Here is a closer look at one of mine featuring the Scoreboards Cantilever Sewing Box Die:

Lisa Hoel for Eileen Hull - Cantilever Sewing Box Die, January 2024 Sizzix Release  #creativejuicefreshsqueezed #EileenHull  #eileenhulldesigns  #sizzix #mymakingstory #TeamEileen #mysizzixstory

This die design is based on vintage cantilever sewing boxes. You can swing them open just like the originals!


Lisa Hoel for Eileen Hull - Cantilever Sewing Box Die, January 2024 Sizzix Release  #creativejuicefreshsqueezed #EileenHull  #eileenhulldesigns  #sizzix #mymakingstory #TeamEileen #mysizzixstory

Think of all the fun goodies you could stash in one of these cute boxes!


Lisa Hoel for Eileen Hull - Cantilever Sewing Box Die, January 2024 Sizzix Release  #creativejuicefreshsqueezed #EileenHull  #eileenhulldesigns  #sizzix #mymakingstory #TeamEileen #mysizzixstory

Top view:

Lisa Hoel for Eileen Hull - Cantilever Sewing Box Die, January 2024 Sizzix Release  #creativejuicefreshsqueezed #EileenHull  #eileenhulldesigns  #sizzix #mymakingstory #TeamEileen #mysizzixstory

How to assemble:

1) Before I cut all the pieces out, I colored my Sizzix Mat Board with blue Distress Paint on one side and spritzed with Winterberry Mica Spray on the other.


2) On the two boxes I was going to use on the bottom, I added die cut grass around the edges.


3) I used sections of washi tape glued at the corners to assemble all the box parts. A rubber band around the top held it all in place while the glue dried.


4) To help reinforce the base of the box, I cut an extra piece of mat board 21/8" x 6" to glue underneath the two bottom boxes.


5) Using the brads and cross pieces, you just start building up and attaching the other boxes.


These are the new dies released this month:


Thanks for stopping by and be sure to keep an eye on Eileen's blog for more inspiration from the Educator and Inspiration Teams.

Supplies used:

Eileen Hull Die - Cantilever Sewing Box  ( SizzixFJ )
Eileen Hull Die Set - Shadowbox Elements ( SizzixSBFJ )
Eileen Hull Die Set - Birds & Butterflies 661901- retired
Eileen Hull Die Set - Journaling Cards, Flowers & Leaves 662811 - retired

28 1/8" brads
washi tape
Distress Mica Spray - Winterberry
Sizzix Making Tool - Shaping Kit

Some links in this post are affiliate links which do not affect the price you pay but allow me to earn a small percentage of a sale. Thanks! (My husband also thanks you!)

Wednesday, March 23, 2022

Industrial Grunge Challenge on The Funkie Junkie Blog

Hello. It's time for another new challenge over on the Funkie Junkie Challenge Blog! This time the theme is "Industrial Grunge" so pull out all the gears and metal bits.

Lisa Hoel for The Funkie Junkie - Industrial Challenge #creativejuicefreshsqueezed #tim_holtz #sizzix #mymakingstory #thefunkiejunkie #thefunkiejunkieboutique #frillyandfunkie

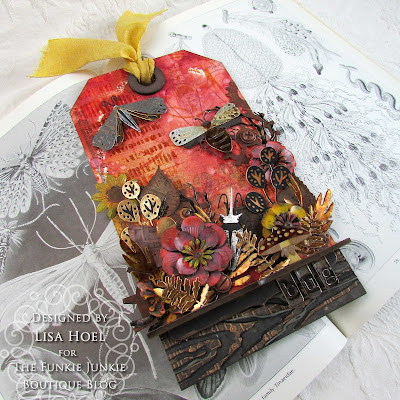
I wanted to combine spring and industrial so I came up with this "mechanized" garden piece. 

Lisa Hoel for The Funkie Junkie - Industrial Challenge #creativejuicefreshsqueezed #tim_holtz #sizzix #mymakingstory #thefunkiejunkie #thefunkiejunkieboutique #frillyandfunkie

The base is a Thickboards tag from Tim Holtz. These super sturdy tags are so fun to create with! 

Lisa Hoel for The Funkie Junkie - Industrial Challenge #creativejuicefreshsqueezed #tim_holtz #sizzix #mymakingstory #thefunkiejunkie #thefunkiejunkieboutique #frillyandfunkie

I also wanted to play with my new Saltwater Taffy Distress products so they are a major part of the color scheme.

Lisa Hoel for The Funkie Junkie - Industrial Challenge #creativejuicefreshsqueezed #tim_holtz #sizzix #mymakingstory #thefunkiejunkie #thefunkiejunkieboutique #frillyandfunkie

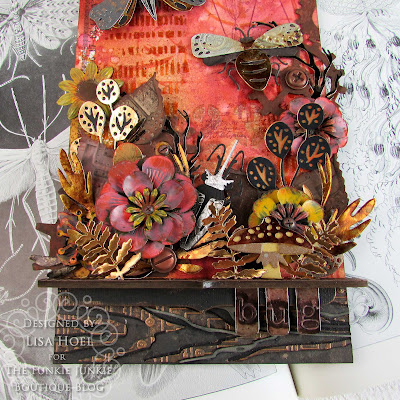
The garden is filled with a combination of metal bits (like the painted flowers) and die cut bugs and foliage. Some parts I embossed with "industrial" folders like CircuitMini Mechanics, and Mini Foundry.

Here's a peek at some the the in-progress steps and tips:

1) First I made a bunch of tag backgrounds to choose from with Distress Spray Stains.


2) I also made a variety of backgrounds from Distress Kraft Metallic cardstock and alcohol inks to die cut elements from.


3) Broke out my Colorize Woodgrain Die Set to make the strip on the bottom of the tag. Sometimes it's hard to visualize how the colorize dies go together and what layer is what color. In those cases I'll make a practice one to keep with the dies for future reference. Here's how it looked for this set:

All the pieces cut out.

Assembled! It helps to have ones to look at 'in person'.

I knew I wanted to have a layer of the plank be embossed with the Circuit embossing folder and making the practice ones helped me decide which plank design and which layer would work best.

Here are the layers of the plank I ended up using in the project.


4) Backgrounds in place on the tag. I stamped and stenciled to add visual interest.


5) I also embossed the background. I used the Code stencil with Transparent Gloss Texture Paste. While still wet, I sprinkled the paste with Rusty Hinge and Saltwater Taffy Glaze embossing powder. Once the paste dried, I heat embossed the powder. It adds great texture!


6) You can buy various Thickboard Trims to go with the Etc Thickboard tags. I used some to make a ledge to build my garden on. There is a die set, Decorative Trims, which makes it super easy to cut paper to cover the raw Thickboard Trim pieces. I've also used the die set to just cut paper for use in card making. It's pretty handy!


Thanks for stopping by! I hope you check out the fun challenges we have on the Funkie Junkie Boutique Blog. They are always good for sparking your creativity! You have two weeks to join the current challenge so I hope you give it a go.

Supplies used:
Tim Holtz die set - Woodgrain Colorize
Tim Holtz die set - Funky Insects
Tim Holtz die set - Decorative Trims
Tim Holtz die set - Funky Foliage
Tim Holtz die set - Funky Floral, Large
Tim Holtz 3-D Embossing Folders - Circuit, Mini Mechanics, Mini Foundry
Tim Holtz Stamp Sets - The Professor, Halftone & Rings, Purveyor, Inventor 2
Tim Holtz layering stencil - Code
Prima stencil - Machinery

Ranger Alcohol Ink

Prima Mechanicals - Metal Blooms
Tim Holtz Type Chips
Tim Holtz Machinery Heads, Hardware Heads

Distress Paint - Fossilized Amber, Saltwater Taffy
Distress Stain - Saltwater Taffy, Vintage Photo, Aged Mahogany, Brushed Corduroy
Distress Oxide Stain - Saltwater Taffy
Distress Glaze - Rusty Hinge, Saltwater Taffy
Ranger Texture Paste - Transparent Gloss


Some links in this post are affiliate links which do not affect the price you pay but allow me to earn a small percentage of a sale. Thanks! (My husband also thanks you!) 

Tuesday, May 12, 2020

May Flowers Pincushions with Eileen Hull

Wow, has it really been almost a month since my last post?? I really have lost all sense of time. Everything is blending together. At least one thing that marks the time is the blooming going on in my garden! More and more flowers are coming up and my irises are going to town.

Bee in the Bachelor's Buttons

The theme over on Eileen Hull's blog this month is May Flowers and the Inspiration Team is off to a great start sharing beautiful projects of all sorts featuring flowers. I created some more embroidered teacup pincushions using wool felt flowers cut out with some of Eileen's dies.


I love finding old teacups at thrift stores and garage sales and upcycling them into something new!


I use cotton flannel for the base and then cut the flowers out of wool felt. Buttons and embroidery are added for detail!


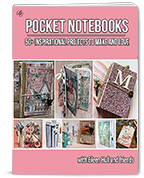
I'd also like to mention that Eileen Hull’s newest e-book, Pocket Notebooks with Eileen Hull & Friends, from Bella Crafts Publishing is now available! Click the photo below to buy yours now to get your creative juices flowing! There are over 50 projects to inspire you, complete with instructions and links to the designer’s blog posts or videos. You will be amazed at the versatility of Eileen’s Pocket Notebook Die and the endless creativity of all the designers’ uses for it. I am very honored to have several projects included. =)

Pocket Notebooks with Eileen Hull

Thanks for stopping by! Check out Eileen's blog and if you are not already a member, join the Facebook Eileen Hull Fan Club group. It is a warm, supportive group with lots of inspiration and sharing going on. You'll just have to answer a few simple questions when asking to join (to keep out spammers) and then you'll be added. ;-)


Dies:
Eileen Hull Sizzix
Heart & Soul Flower Die - retired
Flower & Leaf Stitchlits - retired

Other:
flannel
wool felt
embroidery floss
buttons
stuffing
hot glue gun

Some links in this post are affiliate links which do not affect the price you pay but allow me to earn a small percentage of a sale. Thanks! (My husband also thanks you!) If you shop at Topflight Stamps, use my coupon code LISAHOEL for 12% off your order.

Thursday, June 20, 2019

Mixed Media Card with Eileen Hull

Hello! I've been playing more with Eileen's new Molten Dimensions Embossing Powder and Clearsnap Blends Ink.


The powders are chunky and you get really good coverage and dimension. I discovered that I can use my Melting Pot to easily make all the embossed die cut elements. (The Ranger Melting Pot was designed by Suze Weinberg and they were sadly discontinued a few years ago. You might have one in your craft stash already or be able to find one used on eBay etc.)

I die cut the flower parts, inked them with Eileen's clear (super sticky!) Blends Ink, applied the powder and set it into the pre-heated pot to melt. (It doesn't take long!) I had these non-stick inserts with side flaps that were made to fit into the tray which made it really easy to remove the melted die cut. I just lifted the liner out and let it cool off to the side before handling it. You could do the same thing with a folded piece of foil or paper.


On the large gold flower, I stamped it to give it an embossed texture. The round stamp from the Tim Holtz set The Professor fit perfectly onto the flower tips. While the powder was still molten, I carefully pressed the stamp in place and then left it there until the powder had cooled and solidified. Then the stamp just pops off.


The frame is the front from the Trinket Box die. (See, 3-D dies can be used for 2-D projects too!) I covered the frame with the clear embossing powder, sprinkled on White Wonder powder and then gently knocked some of the powder off by tapping on the back. I wanted some 'gaps' that would give an eggshell, vintage texture after melting. After I embossed it and it was cool, I rubbed Nutmeg Blends Ink all over the frame, working it into the gaps left by the powder I knocked off. I buffed the extra ink off with a soft cloth before it dried. I also added a bit of ink to the flower parts to give them a vintage distressed look too. I had to use a strong liquid adhesive to glue the flowers together because of the slick embossed surfaces. Crafter's Pick The Ultimate! glue is one of my favorites for such jobs.


Thanks for stopping by! Check out Eileen's blog and if you are not already a member, join the Facebook Eileen Hull Fan Club group. It is a warm, supportive group with lots of inspiration and sharing going on. You'll just have to answer a few simple questions when asking to join (to keep out spammers) and then you'll be added. ;-)

Dies:
Eileen Hull Sizzix
Journaling Cards - Flowers & Leaves ( Sizzix / SB )
Book & Pages, Trinket Box & Frame Sizzix / SB )
Flower, Heart & Soul - retired

Other:
Eileen Hull Embossing Powder by Emerald Creek - Golden Rod
Eileen Hull Embossing Powder by Emerald Creek - Aqua Splash
Eileen Hull Embossing Powder by Emerald Creek - White Wonder
Eileen Hull Clearsnap Blends Ink - Clear, Nutmeg, Ebony
cardstock
Tim Holtz Stamp Set - The Professor
Distress Oxides Spray - Cracked Pistachio, Vintage Photo, Fired Brick, Spiced Marmalade
Distress Paint - Antique Linen
Tim Holtz Big Chat Stickers
Ranger Melting Pot - retired
Butterfly metal embellishment 
stencil - TCW169, Kasbah

Sizzix and Scrapbook.com links in this post are affiliate links which do not affect the price you pay but allow me to earn a small percentage of a sale. Thanks! (My husband also thanks you!)


Thursday, March 2, 2017

Welcome Spring! – Frilly & Funkie Guest Post

Hello!! I am very honored to be a Guest Designer on the Frilly & Funkie blog for their current challenge, Welcome Spring! Be sure to head on over and check out all the inspiration. Here you'll find the complete tutorial for my spring decor project (soon to grace my fireplace mantel).


Let's take a look at how this came together:

Step 1 – I used Distress Spray Stains and a leaf stencil to create the background in the arches.


First I misted the heavy mixed media paper (Strathmore brand) with Squeezed Lemonade and Wild Honey, adding misted water to help it blend. After it was dry, I laid down the leaf stencil and misted with Twisted Citron. After removing the stencil and lightly drying the paper with my heat gun, I flipped the inky stencil over and used it to make a monoprint on top. I couldn't let all that stain on the stencil go to waste! ;-) Additional splattering with water added more texture.

Step 2 – I drafted out the arches in a graphics program and printed a template to use as my cutting pattern. Using a sharp craft knife, I cut them out of foam core board and base coated them with gold acrylic paint.


To achieve the mega crackle effect, brush a generous layer of cheap PVC glue (like white school glue, don't use your good stuff!) onto the surface. Let it dry slightly (I only waited a few minutes) and then brush a layer of paint right over the glue. I used a generous amount of glue on my brush and lightly applied it over the glue layer. Don't overwork it. It should start to crack almost immediately. Just leave it alone and let it do its thing.

Step 3 – Blending the Butterflies! I got my hands on the new Distress Oxide Inks and boy are they fun to play with! For the butterflies, I used the blending sponges to apply the ink to the die cut butterflies. (Sizzix Layered Butterfly and Butterfly Duo)


After spritzing them with water to make the ink react, I embossed them in the matching embossing folders and did additional inking with the blending sponges to bring out the embossed designs.

Step 4 – Flowers and more Oxide Ink fun!


To create the swatches I cut the flower parts from, I smooshed the pads onto my craft mat, misted with water and then dragged my paper through the ink. (Tim Holtz did lots of CHA videos explaining the inks.) I misted and sprinkled with water, added more layers of ink and had a blast.


Once I had several inked papers, I used the Jumbo Tattered Florals die to cut them up. I also cut layers out of metal sheets, embossed them, and painted them with Distress Paint. I bent and curled the layers before assembling to give the flowers more volume.


I used a hot glue gun to attach the blooms and butterflies to the arches. 


I'm looking forward to seeing real flowers outside! We'll see how quickly that comes to pass. I think I'll be waiting a month or so. In the meantime, be sure to check out the Welcome Spring! challenge at the Frilly & Funkie blog to catch an eyeful. I hope you'll join in the challenge too. =)


The supplies I used for this project can be found at Sizzix or Simon Says Stamp. Follow the links below and a shopping you may go!