Showing posts with label Basket. Show all posts

Monday, November 19, 2018

Being Thankful Basket

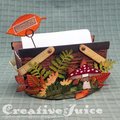
Happy almost Thanksgiving to my USA readers! I always try to be thankful as a matter of course but this time of year gives us extra reason to pause and really take a look at all we have to be grateful for. For my November Eileen Hull project, I created a fall themed Basket as a table decoration. It holds blank cards that people can take out and write what they are thankful for on. I've done this before at Thanksgiving dinners and it makes for a great family snapshot and memories. I have so many things to be thankful for – a snug house, family close by, lots of love… I could fill up a whole basket of cards myself!


Check out the how-to:

Step 1 – I used the Lumber 3-D Texture Fade Embossing Folder to texture the matboard before I cut the basket out of it. First I misted both sides of it with Distress Spray Stain. While it was still a little damp I ran it through my Big Shot in the embossing folder. The texture you get with the folder is amazing!


Step 2 – Tim Holtz has recommended using Distress Crayons as one method of coloring the embossed texture so I gave it a try. I did it in sections so the crayon wouldn't dry before I blended it. I scribbled on Vintage Photo and Walnut Stain crayon and then blended it with a wet finger. When it was all dry I cut out the main parts of the basket.

The top piece has the blended crayon done.
Step 3 – I wanted the handles to be lighter so I used Eileen's Golden ColorBox Blends ink to color another piece of matboard. I stamped it with a  wood grain texture stamp on one side and then cut the handle pieces out of it.


Step 4 – I assembled the basket and glued it onto an oval of patterned paper covered matboard for a base. I added a strip of grass cut with Eileen's Grass die.


Lastly I added all the plants and flowers. I used the Funky Foliage and Funky Floral 3 die sets to cut them all out. I think I am love with the little mushrooms in the Funky Foliage set!

Thanks for stopping by. Be sure to visit Eileen's blog and check out the other posts for this month! I am also entering this in Frilly & Funkie's current challenge, A Harvest of Gratitude. Check out their blog too!

Dies:
Eileen Hull Sizzix
Basket ( Sizzix / SB )
Journaling Cards, Flowers & Leaves ( Sizzix / SB )
Grass ( Sizzix / SB )

Tim Holtz - Funky Foliage Sizzix / SB )
Tim Holtz - Funky Floral #3 Sizzix / SB )
Tim Holtz - Movers & Shapers Sized Ovals Sizzix )

Other:
Eileen Hull ColorBox Blends Ink - Golden
Tim Holtz 3-D Texture Fade Embossing Folder, Lumber ( Sizzix / SB )
Ranger Archival Ink - Pale Ochre
Distress Inks - Forest Moss, Ground Espresso
Distress Spray Stain - Tea Dye, Vintage Photo
Sizzix mat board
Distress Crayons - set 3
Tim Holtz Chitchat Seasonal stickers
Tim Holtz Memo Pins

Sizzix and Scrapbook.com links in this post are affiliate links which do not affect the price you pay but allow me to earn a small percentage of a sale. Thanks! (My husband also thanks you!)
Tuesday, March 14, 2017

Eileen Hull – New Heartfelt Collection Pincushion


Hello! Eileen's new collection, Heartfelt, is soon to be in stores and all this month the Inspiration Team is sharing projects using it! For this project, I transformed the Basket Die into a pincushion:


It's not hard! First I cut the basket parts out of Sizzix matboard and coated them (except the handles) with matte Glue n Seal. Once it was dry, I "base coated" the basket with my Antique Linen Distress Crayon.


Next I embossed the sides and ends of the basket with Eileen's Basket Weave embossing folder. Then came more Distress Crayon fun! I scribbled on Vintage Photo, Rusty Hinge, and Fossilized Amber and blended them together with a wet fingertip.


I assembled the parts using a glue gun and filled it with rice. The little cushion on top was simply a piece of fabric folded in half, right sides together and stitched on three sides. I turned it inside out and stuffed it with a bit of poly fill. I just stitched straight across the end to seal it. I knew the end would get tucked and glued under so I didn't worry about blind stitching it closed.


I used a hot glue gun to glue the cushion on top, making sure to seal all the edges to the sides of the basket so no rice could escape.

I tucked the Butterflies diecut into a memo pin and stuck it into the pincushion. I also used the heart Word Stitchlits die to make a tiny tag to tie onto the handle. The Stitchlits dies make it really easy to add stitched elements to your projects. The dies cut holes and all you do is thread your needle in and out. See this post for another project using the new Word Stitchlits.

Thanks for stopping by for a visit! Please be sure to head on over to Eileen's Blog and see all the wonderful projects the Team is sharing. There is a lot of inspiration to be had! ;-) Each week there will be a new batch to see.


Dies Used:
Sizzix, Eileen Hull: 
Basket (Sizzix)
Word Stitchlits (Sizzix / SSS)
Birds & Butterflies (Sizzix )
Basket Weave Embossing Folder (Sizzix )

Other:
Sizzles mat board
Distress Paint - Spiced Marmelade, Twisted Citron, Vintage Photo
Distress Crayons - set 2, set 3
Idea-ology Hex Fasteners
Tim Holtz fabric
Idea-ology Memo Pin
Archival Ink - Potting Soil

Sizzix & Simon Says Stamp links in this post are affiliate links which do not affect the price you pay but allow me to earn a small percentage of a sale. Thanks! (My husband also thanks you!)