Showing posts with label butterfly. Show all posts

Wednesday, July 9, 2025

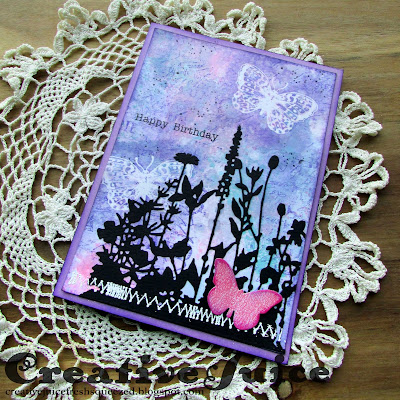
Anything Goes with Topflight Stamps

This week at Topflight Stamps our theme is "Anything Goes". I've been seeing butterflies in my garden so I was inspired by the Katzelkraft Butterfly & Dragon Stamp Set. I added stamped flowers using PaperArtsy Set 24 from Tracy Scott and then embossed them with WOW! embossing powders from the Twinkly Fizz trio.


Lisa Hoel for Topflight Stamps #creativejuicefreshsqueezed #topflightstamps


Thanks for stopping by and be sure to check out the Topflight Stamps store for a wide selection of different and hard to find stamps, stencils and other paper crafting supplies from all around the world! Also keep an eye on the Topflight Stamps blog. There is new inspiration posted daily!


Topflight Stamps Supplies Used:

Katzelkraft Stamp Set - Butterfly & Dragon
PaperArtsy Stamp Set - Tracy Scott 24
Lavinia Stencil - Flourish
WOW! Embossing Powder Trio - Twinkly Fizz
Creative Expressions - Wordies Sentiment Sheets, Birthday
Lavinia Elements Ink Pad - Confetti


Wednesday, June 25, 2025

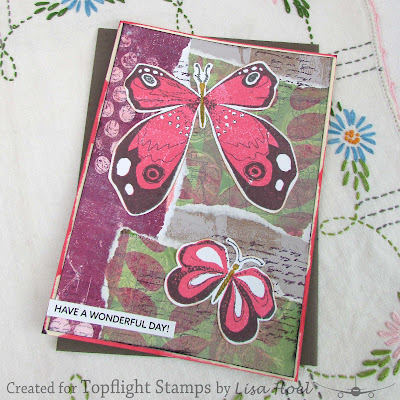
Butterflies Theme Mixed Media Card with Topflight Stamps

This week at Topflight Stamps our theme is "Butterflies". The store has a whole section devoted to Butterflies/Moths so check it out! I created a mixed media card featuring the Studio Light Layered Butterflies stamp set. The background is a collage of gel print pieces.


Lisa Hoel for Topflight Stamps #creativejuicefreshsqueezed #topflightstamps


Thanks for stopping by and be sure to check out the Topflight Stamps store for a wide selection of different and hard to find stamps, stencils and other paper crafting supplies from all around the world! Also keep an eye on the Topflight Stamps blog. There is new inspiration posted daily!


Topflight Stamps Supplies Used:

Studio Light Stamp Set - Layered Butterflies
Studio Light Stamp Set - Grunge Bits
Creative Expressions - Wordies Sentiment Sheets, Birthday
Lavinia Elements Ink Pad - Confetti, Merlot, Graphite, Sahara


Monday, May 12, 2025

Studio Light Butterfly Card with Topflight Stamps

Hello, this week at Topflight Stamps our brand focus is on Studio Light! I made a card using the fab Art by Marlene Layered Butterflies stamp set. I love those bold funky butterflies!


Lisa Hoel for Topflight Stamps #creativejuicefreshsqueezed #topflightstamps


Thanks for stopping by and be sure to check out the Topflight Stamps store for a wide selection of different and hard to find stamps, stencils and other paper crafting supplies from all around the world! Also keep an eye on the Topflight Stamps blog. There is new inspiration posted daily!


Topflight Stamps Supplies Used:

Studio Light Stamp Set- Art by Marlene, Layered Butterflies
AALL & Create Stamp Set - Everyday Sentiments
Clair ink pads - Nocturne, Cheerful
Lavinia Elements ink pad - Confetti
Lavinia Mysticals spray - Pinkella

Wednesday, March 26, 2025

Keep on Hopping & A Stampotique Butterfly Birthday Card

Have you participated in our annual Topflight Stamps Birthday Blog Hop? You'll find loads of inspiration and a chance to win a prize! Check out the main post HERE. I made an additional card for the week and chose the Butterfly & Dragon stamp set to use for this birthday card:


Lisa Hoel for Topflight Stamps #creativejuicefreshsqueezed #topflightstamps


The background is a Gel Press print and I embossed the sentiment with Opaque Bright White embossing powder.


Thanks for stopping by and be sure to check out the Topflight Stamps store for a wide selection of different and hard to find stamps, stencils and other paper crafting supplies from all around the world! Also keep an eye on the Topflight Stamps blog. There is new inspiration posted daily!


Topflight Stamps Supplies Used:

Stampotique by Katzelkraft stamp set - Butterfly & Dragon
Visible Image stamp set - Go To Words
WOW! embossing powder - Opaque Bright White


Wednesday, September 25, 2024

Stampotique Stamps Butterfly Card with Topflight Stamps

This week our Topflight Stamps brand focus is Stampotique by Katzelkraft! This is a newer brand for Topflight to carry so be sure to check out these great new stamps. I chose the Butterfly & Dragon stamp set to use for this birthday card:

Lisa Hoel for Topflight Stamps #creativejuicefreshsqueezed #topflightstamps

Thanks for stopping by and be sure to check out the Topflight Stamps store for a wide selection of different and hard to find stamps, stencils and other paper crafting supplies from all around the world! Also keep an eye on the Topflight Stamps blog. There is new inspiration posted daily!


Topflight Stamps Supplies Used:

Stampotique by Katzelkraft stamp set - Butterfly & Dragon
Visible Image stamp set - Birthday Wishes
Visible Image stamp set - Scripted Streets
Versafine Pigment Ink Pad - Onyx Black
Versafine Clair Ink Pad - Twilight
Stamperia 8x8 Paper Pad - Backgrounds Christmas Greetings


Thursday, September 5, 2024

Beautiful Butterflies with Darkroom Door at Topflight Stamps

Hello, I'm back again with another Topflight Stamps card for you! This week is "Anything Goes" so I had the pleasure of going through my stamp stash to see what tickled my fancy.

Lisa Hoel for Topflight Stamps #creativejuicefreshsqueezed #topflightstamps

Darkroom Door had such wonderful designs (stock up while they are still available!) I went with a favorite, the Butterfly Garden stamp. Used in the background, Tracy Evan's Fern stamp set paired perfectly with it.

Thanks for stopping by and be sure to check out the Topflight Stamps store for a wide selection of different and hard to find stamps, stencils and other paper crafting supplies from all around the world! Also keep an eye on the Topflight Stamps blog. There is new inspiration posted daily!


Topflight Stamps Supplies Used:

Darkroom Door stamp - Butterfly Garden
Tracy Evans stamp set - Fern
Visible Image stamp set - Birthday Wishes
Visible Image stamp set - Scripted Streets
Gel Press Plate
Lavinia Elements Ink Pad - Pine
watercolors
Versafine Pigment Ink Pad - Onyx Black


Thursday, June 20, 2024

Feeling Butterflies with Topflight Stamps

Hello, this week on the Topflight Stamps blog the theme is all about Butterflies! I'm starting to see real butterflies out in my garden and they are always a welcome sight. Of course butterfly stamps, stencils and dies are always popular for us crafters too. Let's take a look at the butterfly card I created:

Lisa Hoel for Topflight Stamps – Butterfly themed cards

I was happy to try out the Crafty Individuals stamp Trio of Inky Butterflies. I stamped it first in blue (Blue Atoll from Lavinia). On another sheet of paper, I stamped it in black permanent ink, watercolored it, and then fussy cut the butterflies out to place over the blue background.

The whole center butterfly portion of the card is adhered to a gel print background I had in my stash.

Thanks for stopping by and be sure to check out the Topflight Stamps store for a wide selection of different and hard to find stamps, stencils and other paper crafting supplies from all around the world! Also keep an eye on the Topflight Stamps blog. There is new inspiration posted daily!


Topflight Stamps Supplies Used:

AALL & Create Stamp Set - Everyday Sentiments
Crafty Individuals Stamp Set - Trio of Inky Butterflies
Crafty Individuals Stamp - Crackle Background

Versafine Ink Pad - Black Onyx
Lavinia Elements Ink Pads - Blue Atoll
watercolors


Tuesday, August 24, 2021

Butterfly Trio Birthday Card

Hello everyone! I'm trying to get some more crafting time in. My art room has been sadly neglected this summer! I needed a birthday card for my aunt, so I decided to join in the current TFJB challenge and make her one. The challenge this go around is "Triple the Heat" and my 'trio'  is the three butterflies I included on the card.

Lisa Hoel #creativejuicefreshsqueezed  Butterfly trio birthday card

I encourage you to go check out The Funkie Junkie Boutique Challenge blog – their challenges are always lots of fun! Thanks for stopping by and I'll have more to see here at the end of the week. 


Supplies used:

Dies:
Tim Holtz Sizzix 
Flower Field Sizzix / SB )

Other:
Tim Holtz stamp sets - Spring Sprung, Tiny Toadstools, Papillon, Flutter
Ranger Distress Inks
Ranger Distress Oxide Inks
cardstock
embossing ink
white embossing powder
clear detail embossing powder

Some links in this post are affiliate links which do not affect the price you pay but allow me to earn a small percentage of a sale. Thanks! (My husband also thanks you!) 

Thursday, March 2, 2017

Welcome Spring! – Frilly & Funkie Guest Post

Hello!! I am very honored to be a Guest Designer on the Frilly & Funkie blog for their current challenge, Welcome Spring! Be sure to head on over and check out all the inspiration. Here you'll find the complete tutorial for my spring decor project (soon to grace my fireplace mantel).


Let's take a look at how this came together:

Step 1 – I used Distress Spray Stains and a leaf stencil to create the background in the arches.


First I misted the heavy mixed media paper (Strathmore brand) with Squeezed Lemonade and Wild Honey, adding misted water to help it blend. After it was dry, I laid down the leaf stencil and misted with Twisted Citron. After removing the stencil and lightly drying the paper with my heat gun, I flipped the inky stencil over and used it to make a monoprint on top. I couldn't let all that stain on the stencil go to waste! ;-) Additional splattering with water added more texture.

Step 2 – I drafted out the arches in a graphics program and printed a template to use as my cutting pattern. Using a sharp craft knife, I cut them out of foam core board and base coated them with gold acrylic paint.


To achieve the mega crackle effect, brush a generous layer of cheap PVC glue (like white school glue, don't use your good stuff!) onto the surface. Let it dry slightly (I only waited a few minutes) and then brush a layer of paint right over the glue. I used a generous amount of glue on my brush and lightly applied it over the glue layer. Don't overwork it. It should start to crack almost immediately. Just leave it alone and let it do its thing.

Step 3 – Blending the Butterflies! I got my hands on the new Distress Oxide Inks and boy are they fun to play with! For the butterflies, I used the blending sponges to apply the ink to the die cut butterflies. (Sizzix Layered Butterfly and Butterfly Duo)


After spritzing them with water to make the ink react, I embossed them in the matching embossing folders and did additional inking with the blending sponges to bring out the embossed designs.

Step 4 – Flowers and more Oxide Ink fun!


To create the swatches I cut the flower parts from, I smooshed the pads onto my craft mat, misted with water and then dragged my paper through the ink. (Tim Holtz did lots of CHA videos explaining the inks.) I misted and sprinkled with water, added more layers of ink and had a blast.


Once I had several inked papers, I used the Jumbo Tattered Florals die to cut them up. I also cut layers out of metal sheets, embossed them, and painted them with Distress Paint. I bent and curled the layers before assembling to give the flowers more volume.


I used a hot glue gun to attach the blooms and butterflies to the arches. 


I'm looking forward to seeing real flowers outside! We'll see how quickly that comes to pass. I think I'll be waiting a month or so. In the meantime, be sure to check out the Welcome Spring! challenge at the Frilly & Funkie blog to catch an eyeful. I hope you'll join in the challenge too. =)


The supplies I used for this project can be found at Sizzix or Simon Says Stamp. Follow the links below and a shopping you may go!