This month the challenge sponsor is
Frantic Stamper which happens to be one of the only U.S. retailers of the U.K. based
Paper Artsy products. The MMM design team got a chance to play with some of their
Fresco Paint and I must say it is cool stuff!
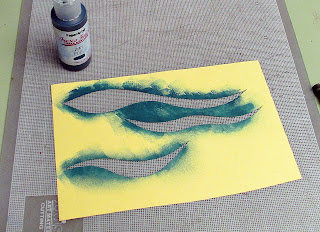
To start, I covered the front of my binder with three layers of black gesso (letting it dry in between layers). I left it "rough" around the edges to blend out into the burlap. The burlap was so coarse that the extra layers were necessary to smooth out the central area a bit and fill in some of the texture. After that I used a sponge brush to add a layer of Captain Peacock Fresco Paint and then a highlight layer of Caribbean Sea. I hand cut a swoosh stencil out of cardstock and used it to stencil the wave shapes with Inky Pool.
 |
| Gesso is your friend! |
 |
| quickie hand-cut stencil |
Next came the fun part – thinking about the elements I wanted to include and playing around with where I wanted them. Often I will make quick mockups or diecuts out of scrap cardstock to use while I'm working out a project. You can see here a bit of my thought process:
 |
Use throw away cardstock to work out your ideas before
cutting into the "good stuff". |
Speaking of "good stuff" I created some "custom" paper to use for the anemone, coral and seahorses. Paper Artsy has several
instructional videos on YouTube; I used the
easy brayer background technique for mine. I love the texture and color blends you get!
 |
| Fresco paint colors: Pumpkin Soup, Cherry Red, Coral, Banana, Snowflake |
For the coral branch, I also added texture by stamping with bubble wrap. I just wrapped a rectangle of bubble wrap around one of my large acrylic stamp blocks and used a brayer to apply paint to it – then stamped onto the coral piece. It adds another great textural layer.
 |
| Fresco Paint colors: Amethyst, Coral, Antarctic, Inky Pool |
The bottle is cut out of scrap plastic packaging covered with Rock Candy Distress Crackle Paint. The trick to using the crackle paint on plastic is to first lay down a base layer of Glue 'n Seal or Multi Medium (let it dry first). Otherwise the crackle paint will flake right off the plastic. I added a bit of Pumice Stone Distress Glitter around the edges while the crackle paint was wet (keeping up with our theme you know). After the crackle paint was dry, I dripped a bit of Mushroom Alcohol Ink around the edges to age it and define the cracks.
Are you still with me? Of course I incorporated all kinds of glitter (which is so hard to capture in photographs). I used coarse Art Ingredients Glass Glitter for the sand, different colors of Stickles Glitter Glue all around and dry glitter for the seahorses and purple coral branches. I managed to get a photo that shows a bit more sparkle, in person it really shines!
I hope that you'll head on over to
MMM and check out all the inspirational projects my teammates have created for the challenge. If you link up your project there you'll be in the running for a $25 gift certificate from our sponsor this month,
Frantic Stamper. We'd love to see you there!
Thanks for stopping by! The supplies I used
for this project can be found at Sizzix, Simon Says Stamp or Frantic Stamper. Follow the links below and a shopping you may go. ;-)


