Wednesday, September 27, 2023

Funkie Junkie Focus – "How Scary Is That?" Halloween Panel

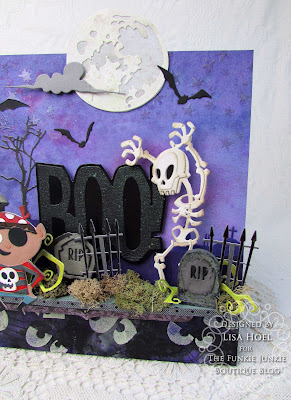
Hello Funkie Junkie fans! We're getting into the spooky season and the current theme of "How Scary Is That?"reflects it. I like to create fun whimsical Halloween makes so I got to work using one of the new Square Etcetera Panels as the base.

Lisa Hoel for The Funkie Junkie Boutique  #halloween #creativejuicefreshsqueezed  #mymakingstory #tim_holtz #thefunkiejunkieboutique #sizzix

Detail photos!

Lisa Hoel for The Funkie Junkie Boutique  #halloween #creativejuicefreshsqueezed  #mymakingstory #tim_holtz #thefunkiejunkieboutique #sizzix

Lisa Hoel for The Funkie Junkie Boutique  #halloween #creativejuicefreshsqueezed  #mymakingstory #tim_holtz #thefunkiejunkieboutique #sizzix
Mr. Bones is awesome.

Here are some step photos of how this all came together:

Step 1 – I started with the 8.5" x 8.5" Etcetera panel and covered the front with an inky Distress background on the top and a painty Distress background on the bottom. The bottom section I also stamped with a spiderweb stamp and embossed with black embossing powder. The Glow Grit Paste is super cool and I applied it using the Peek a boo stencil and the smaller version from the Minis Set 56.


Step 2 – I used the Spellbound stencil to add some stars to the sky. Clear embossing ink (Distress Embossing Dabber) embossed with Lost Shadow Distress Glaze added a subtle touch.


Step 3 – The ledge I made from a strip of foam core board bolstered by a set of Bracket Etcetera Trims. The 
Decorative Trims Die Set makes it really easy to cover all the Etcetera Trim parts with paper. Cut and glue, easy peasy.


Step 4 – The fun part was making all the elements to build on the background. Various Sizzix die sets, new and old, came into play. I also included some of the new Idea-ology headstones from this year's Graveyard set. I added diecut paper elements to them to help them blend into the scene.


Thanks for stopping by. Keep an eye on the Funkie Junkie Boutique Blog, 
Inspiration Ave. because you are now getting regular doses of expanded (and inspiring) content each week. Don't miss it…

Supplies used:  

Tim Holtz Layering Stencil - Peek a boo
Tim Holtz Layering Stencil - Spellbound
Tim Holtz Layering Stencil - Minis Set 56
Tim Holtz Die Set - Big Frights
Tim Holtz Die Set - Graveyard
Tim Holtz Die Set - Moonlight
Tim Holtz Die Set - Edison
Tim Holtz Die Set - Twisted Edge
Tim Holtz Die Set - Ghost Town
Tim Holtz Die Set - Ghost Town #2
Tim Holtz Die Set - Mr. Bones
Tim Holtz Die Set - Trick or Treater
Tim Holtz Die Set - Decorative Trims
Tim Holtz Stamp Set - Shattered
Tim Holtz Stamp Set - Halloween Cutouts
Tim Holtz Idea-ology Backdrops - Halloween 2023
Tim Holtz Etcetera - Square Panels
Tim Holtz Etcetera - Bracket Trims
Tim Holtz Idea-ology - Graveyard
Tim Holtz Idea-ology - Halloween Design Tape

Distress Collage Medium Matte
Distress Halloween Grit Paste - Glow
Distress Halloween Grit Paste - Crypt
Distress Mica Spray - Ominous Twilight and others
Distress Paint - Villainous Potion, Black Soot, Hickory Smoke
Distress Spray - Wilted Violet, Seedless Preserves, Shaded Lavender
Distress Oxide Spray - Shaded Lavender
Distress Glaze Embossing Powder - Lost Shadow
Black embossing powder

Tuesday, September 26, 2023

Box Bonanza with Eileen Hull – Paper Scrap Storage

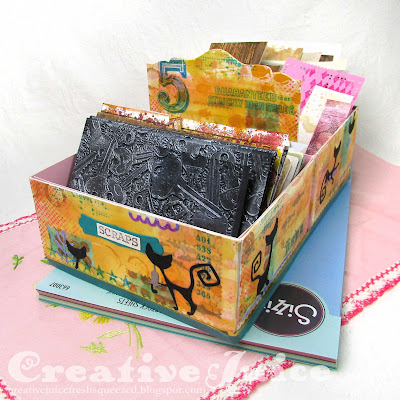
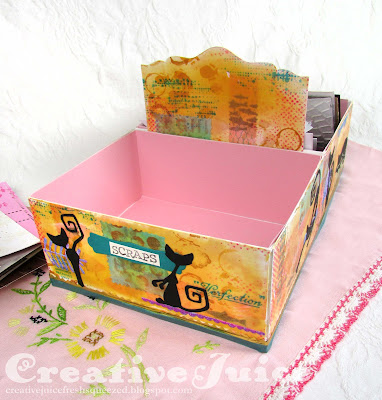
This month Eileen Hull's theme is "Box Bonanza"! Over the years, Eileen has designed many different box/container dies and the Teams were tasked with creating with them for the month of September. I chose to use one of her newest dies, the Slotted Treat Box Die (Plus sized die), to create a caddy to organize scrap paper bits.

Lisa Hoel for Eileen Hull - Box Bonanza! Organizing with a caddy for paper scraps   #creativejuicefreshsqueezed #EileenHull  #eileenhulldesigns  #sizzix #mymakingstory #TeamEileen #mysizzixstory

I used two Slotted Treat Box bases adhered together to form the caddy (scroll down for tutorial).

Lisa Hoel for Eileen Hull - Box Bonanza! Organizing with a caddy for paper scraps   #creativejuicefreshsqueezed #EileenHull  #eileenhulldesigns  #sizzix #mymakingstory #TeamEileen #mysizzixstory

I sandwiched a 'handle' made from a Card Caddy Die cut in between the two boxes.

Lisa Hoel for Eileen Hull - Box Bonanza! Organizing with a caddy for paper scraps   #creativejuicefreshsqueezed #EileenHull  #eileenhulldesigns  #sizzix #mymakingstory #TeamEileen #mysizzixstory

Lisa Hoel for Eileen Hull - Box Bonanza! Organizing with a caddy for paper scraps   #creativejuicefreshsqueezed #EileenHull  #eileenhulldesigns  #sizzix #mymakingstory #TeamEileen #mysizzixstory

Lisa Hoel for Eileen Hull - Box Bonanza! Organizing with a caddy for paper scraps   #creativejuicefreshsqueezed #EileenHull  #eileenhulldesigns  #sizzix #mymakingstory #TeamEileen #mysizzixstory

Lisa Hoel for Eileen Hull - Box Bonanza! Organizing with a caddy for paper scraps   #creativejuicefreshsqueezed #EileenHull  #eileenhulldesigns  #sizzix #mymakingstory #TeamEileen #mysizzixstory

I got into my mixed media groove to decorate the outsides of the caddy and played with a new to me medium, DecoArt Wax Effects Paint. It is a water based paint that looks like encaustic wax when it dries. So cool!

Here is some of the 'how-to':

Step 1 – I cut all the pieces out of mat board. I didn't worry about decorating the two inner sides that were going to be glued together anyway.


Step 2 – I made stamps to collage onto the backgrounds. I used retired Tim Holtz Collage Paper, but you could also use deli sheets or coffee filters. I inked the paper with Distress Spray Stain, did a little stamping/stenciling on it and then cut it with the Slimline & Tickets Die Set. (Later on I did another batch of these with a blue background.)


Step 3 – Here is a look at the all the base layers done. Some stamping, stenciling and collaging. In the next step I added the Aged Beeswax Wax Effects paint with a palette knife over the top of it all.


Most of the stamping I did with Archival ink but I did add a bit with regular Picked Raspberries Distress Ink. I noticed that it was smearing a little underneath the Wax Effects paint. I went back to the sides I hadn't done yet and added a layer of Distress Micro Glaze over those problem areas to seal it. That worked great and the ink didn't smear at all. NOTE: I did not add the Wax Effects paint on the box glue tabs!


Step 4 – Here are all the sides done. When the paint was dry, I glued on die cuts, the blue collage stamps and did some final stamping on top of everything with Mermaid Lagoon Archival Ink.


Step 5 – Assembly! I glued the two boxes together and when they were all dry, glued them together with the handle in between. I also glued the whole unit onto a piece of foam core board to give it added strength and support.


To hide the seam where the boxes were glued together, I filled in the cracks with hot glue and then covered them with extra collage paper.


Probably could have filled the crack even more. Next time!

Thanks for stopping by and be sure to keep an eye on Eileen's blog for more inspiration from the Educator and Inspiration Teams.

Supplies used:

Eileen Hull Plus Die - Slotted Treat Box Die  ( SizzixSB )
Eileen Hull Die Set - Mini Slimline & Tickets ( SizzixSBFJ )
Eileen Hull Die Set - Shadowbox Frames #1 ( SizzixSB )
Eileen Hull Die - Card Caddy ( SizzixSB )
Tim Holtz Die Set - Mischievous ( SBFJ )
Tim Holtz Die Set - Abstract Elements ( SizzixSBFJ )
Tim Holtz Stamp Sets - Mesh & Linen, Halftone & Rings, Grunged, Eccentric, Rockstar
Dina Wakley Stencil - Pointed

Sizzix Mat Board
Tim Holtz Plain Collage Paper - retired
Distress Collage Medium - Matte
Distress Micro Glaze
DecoArt Wax Effects - Aged Beeswax

Some links in this post are affiliate links which do not affect the price you pay but allow me to earn a small percentage of a sale. Thanks! (My husband also thanks you!)


Wednesday, September 13, 2023

Funkie Junkie Focus – "Fall Colors" Photo Flip Album

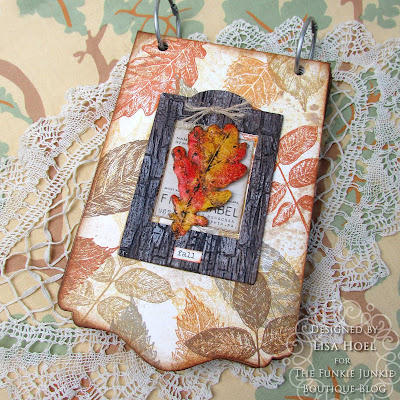
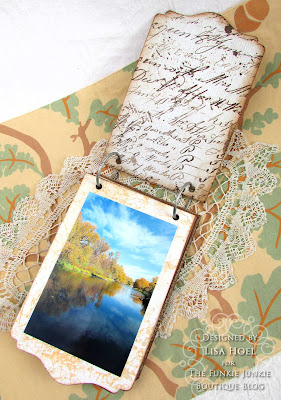
Hello Funkie Junkie fans! Our latest theme is "Fall Colors". I went all in (fall is my favorite season!) and created a flip photo album full of some of my favorite photographs I've taken in seasons past.

Lisa Hoel for The Funkie Junkie Boutique  #creativejuicefreshsqueezed  #eileenhull #mymakingstory #tim_holtz #thefunkiejunkieboutique #sizzix

The covers and pages I cut out using the new Eileen Hull Field Notes & Specimen Card XL Die. I cut off the binding parts of the journal, punched holes and made it a flip style album.

Lisa Hoel for The Funkie Junkie Boutique  #creativejuicefreshsqueezed  #eileenhull #mymakingstory #tim_holtz #thefunkiejunkieboutique #sizzix

Standard 4" x 6" photo prints fit perfectly into the album!

Lisa Hoel for The Funkie Junkie Boutique  #creativejuicefreshsqueezed  #eileenhull #mymakingstory #tim_holtz #thefunkiejunkieboutique #sizzix

Let's take a look at some of the 'how-to' steps…

Step 1 - I used Distress sprays and Mica spray to color sheets of Heavystock Kraft and white heavy mixed media paper for the pages. (I spritzed both sides.) Covers are cut out of Sizzix mat board.


Step 2 - After cutting out the pages, I randomly stamped them with the new Shattered Tim Holtz background stamp. (Love this new stamp!)


Step 3 - The frame on the front is a piece included on the Field Notes die (the Specimen card part!) I covered it with a piece of paper embossed using the 3-D Cracked Texture Fade folder. The vibrant oak leaf was made using an older Tim Holtz 3-D Impresslits folder.


The two leaves on the left are plain white cardstock, cut/embossed with Distress Glazes embossed on top. The two leaves on the right were cut from orange inked paper. I then added the same colors of Glaze on top and embossed. Two different looks!


As a final touch on the leaves, I scribbled Distress Crayon onto them, wet my finger and rubbed the pigment into all the nooks and crannies. I then wiped off most of the crayon.

Lisa Hoel for The Funkie Junkie Boutique  #creativejuicefreshsqueezed  #eileenhull #mymakingstory #tim_holtz #thefunkiejunkieboutique #sizzix


Thanks for stopping by. Keep an eye on the Funkie Junkie Boutique Blog, 
Inspiration Ave. because you are now getting regular doses of expanded (and inspiring) content each week. Don't miss it…

Supplies used:

Eileen Hull Die - Field Notes & Specimen Card XL Die  
Tim Holtz 3-D Texture Fade embossing folder - Cracked
Tim Holtz 3-D Impresslits - Oak Leaf
Tim Holtz Stamp Set - Shattered
Tim Holtz Stamp Set - Sketchy Leaves
Tim Holtz Idea-ology Backdrops - Halloween 2023
Tim Holtz Idea-ology Ephemera - Field Notes

Distress Archival Ink - variety of browns
Distress Mica Spray - Unravelled
Distress Spray - Vintage Photo, Antique Linen, Old Paper
Distress Oxide Spray - Vintage Photo
Distress Glaze Embossing Powder - Fossilized Amber, Fired Brick, Lumberjack Plaid
Ranger Distress Heavystock - Kraft
Distress Embossing Dabber 
Distress Crayon - Vintage Photo, Ground Espresso


Wednesday, September 6, 2023

Eileen Hull Treasure Box Tutorial

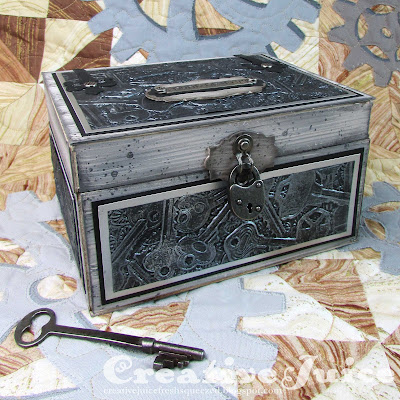
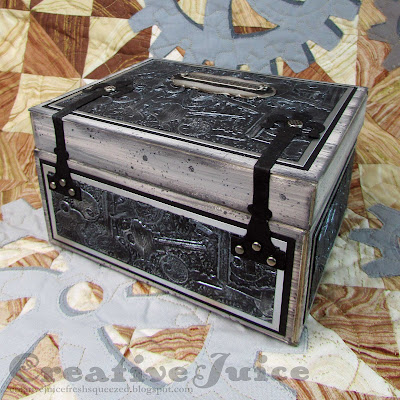
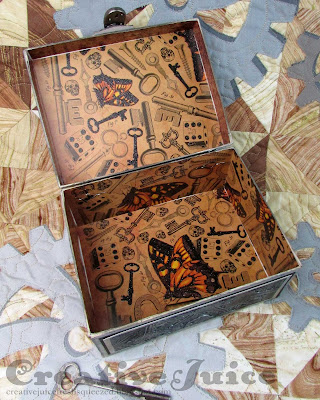
Welcome to September! This month Eileen Hull's Inspiration Team is working with the theme, "Box Bonanza". Over the years Eileen has designed many box dies and no doubt there will be lots of inspiring projects made. To start with, I'm sharing the tutorial for a Slotted Treat Box Plus Die project I made for the new Chapter 3 release.

Lisa Hoel for Eileen Hull - Sizzix Chapter 3 collection 2023, tutorial time!   #creativejuicefreshsqueezed #EileenHull  #eileenhulldesigns  #sizzix #mymakingstory #TeamEileen #mysizzixstory

Top view!

Lisa Hoel for Eileen Hull - Sizzix Chapter 3 collection 2023, tutorial time!   #creativejuicefreshsqueezed #EileenHull  #eileenhulldesigns  #sizzix #mymakingstory #TeamEileen #mysizzixstory

Isn't the new Keys 3-D Embossing Folder wonderful? I highlighted the texture with Sizzix Luster Wax.

Lisa Hoel for Eileen Hull - Sizzix Chapter 3 collection 2023, tutorial time!   #creativejuicefreshsqueezed #EileenHull  #eileenhulldesigns  #sizzix #mymakingstory #TeamEileen #mysizzixstory

The hinges are cut from some Sizzix Texture Roll. It is sort of a cross between paper and fabric so it can hold up to wear and tear.

Lisa Hoel for Eileen Hull - Sizzix Chapter 3 collection 2023, tutorial time!   #creativejuicefreshsqueezed #EileenHull  #eileenhulldesigns  #sizzix #mymakingstory #TeamEileen #mysizzixstory

The lock is more of a handle and there for decoration.

Lisa Hoel for Eileen Hull - Sizzix Chapter 3 collection 2023, tutorial time!   #creativejuicefreshsqueezed #EileenHull  #eileenhulldesigns  #sizzix #mymakingstory #TeamEileen #mysizzixstory

Tutorial Time!

Step 1 - I embossed several pieces of black cardstock using the Keys 3-D Embossing Folder. Using a blending brush,  I lightly brushed on Silver and Charcoal Luster Wax to bring out the detailed texture.


Step 2 - I cut out all the parts needed for the box and created the matted, embossed panels for the sides and top.


Assembly… (you can use wet adhesive or strong dry adhesive like red line tape)


Thanks for stopping by and be sure to keep an eye on Eileen's blog for more inspiration from the Educator and Inspiration Teams.

Supplies used:

Eileen Hull Plus Die - Slotted Treat Box Die  ( SizzixSB )
Eileen Hull 3-D Embossing Folder - Keys ( SizzixSBFJ )

Sizzix Luster Wax - Silver, Charcoal
Sizzix Surfacez Texture Roll - Black

Some links in this post are affiliate links which do not affect the price you pay but allow me to earn a small percentage of a sale. Thanks! (My husband also thanks you!)