Tuesday, November 27, 2018

Robots Wishing a Happy Birthday

Hello! I'm here today to share a birthday card I made for my son using the hilarious Katzelkraft Robot stamps available from Topflight Stamps. As with many of the Katzelkraft stamps, these make me smile and I knew my son would enjoy them too.


The background is metallic cardstock embossed with the Foundry embossing folder. I stamped and fussy cut the robots out to layer over the background. (In case you are rusty on converting numbers to binary, 1111 = 15. ;-)  )

Thanks for stopping by! Below is a list of supplies I used. Be sure to check out the Topflight Stamps blog for more inspiration. There is always something fun to see there! Have a great week and happy Thanksgiving. =)

Topflight Stamps Products:
Katzelkraft - Robots 2
Katzelkraft - Holiday Quotes
That's Crafty - Dinky Stencil, Burst
Paper Artsy Fresco Finish Paint - Coral, Banana

Other:
Tim Holtz Sizzix 3-D Embossing Folder - Foundry ( Sizzix / SB )
Tim Holtz Layering Stencil - Numbered
Tim Holtz Metallic Kraft Stack
Ranger Archival Ink - Jet Black
Ranger Distress Paint - Black Soot
gel pens
watercolors

Scrapbook.com and Sizzix links in this post are affiliate links which do not affect the price you pay but allow me to earn a small percentage of a sale. Thanks! (My husband also thanks you!)

Thursday, November 22, 2018

Eileen Hull & Emerald Creek Blog Hop!

Warm thoughts are unfolding, 

as we begin to enter a festive time of year. Eileen, Kim and The Teams have created a fun blog hop challenge to kick of the American Thanksgiving and Winter festivities.

To play along all you need to do is follow along and comment on every blog. If you play along and link up your own creation using Eileen and Emerald Creek products, you will get 2 bonus entries for the draw. Contest Closes on Sunday November 25th, with the Winner announced Cyber Monday!

Prize includes an Eileen Hull Journal Die and a $50.00 gift certificate to the Emerald Creek Shop.

I created a little Passport Journal using some of Eileen's dies and Emerald Creek's stamps! The snowflake background was stamped and embossed with clear powder before I added the blue ink. Eileen's ColorBox Blends do blend beautifully and the built in sponge applicator is a cinch to use.


Here is the Blog Hop List:

You are here ---> Lisa Hoel 


Thanks for stopping by! Have fun hopping and good luck winning!

Emerald Creek Stamps:
Snowflake
Tiny Tim
Let It Snow

Emerald Creek Embossing Powder:
Allure - Soft Fallen Snow
Allure - Onyx Frost
Clear Fine Gloss

Dies:
Eileen Hull Passport Book Sizzix / SB )
Eileen Hull Bookplate, Hinges & Label Sizzix / SB )
Tim Holtz - Funky Festive Sizzix / SB )

Other:
Eileen Hull ColorBox Blends ink - Uniform, Hydranga
Ranger Archival Ink - Jet Black,
Sizzix mat board
Ranger Texture Paste
Tim Holtz mini Snowcap Layering Stencil from Simon Says Stamp exclusive set
Tim Holtz Idea-ology Snowflake charm
elastic
watercolors
Distress Rock Candy Glitter

Sizzix and Scrapbook.com links in this post are affiliate links which do not affect the price you pay but allow me to earn a small percentage of a sale. Thanks! (My husband also thanks you!)

I'm also entering this into the Mini Album Makers November/December challenge.

Tuesday, November 20, 2018

Christmas Tags with Topflight Stamps

Hello and welcome to the holiday season! Happy Thanksgiving if you are here in the US and hang onto your warm fuzzy hats because Christmas is right around the corner! I have a tag and its tutorial to share with you today. I bleached loads of pine cones to sell at a craft bazaar this fall and I wanted to make tags to put on the bags. I wanted them to be festive but fairly simple since I had to make so many of them! The Darkroom Door Pine Cones stamp set was just what I needed. Added bonus: the bottom part is perforated so you can tear it off and be left with a gift tag for another use.


The bleached pine cones are perfect for decorating with and make a nice change from regular brown cones.


Here's the how-to:

Step 1 – I cut tags out of old manila folders. (You can buy pre-made tags too.) Assembly line tactics are key here. I laid down an initial layer of background color and texture by squishing Antique Linen Distress Stain onto my craft mat and then applying it to the tags with a brayer. It makes a cool streaky effect.


Step 2 –  More texture was added with random stamping with the Crackle Background stamp and Pale Ochre ink.


Step 3 – Mask sheets are a Tim Holtz product that has been discontinued which is too bad because it's really useful! There must be a similar product out there so look around if you can't find these somewhere. I stamped the pine cone onto the mask sheet with archival ink and then cut it out with fine tipped scissors. Then I stamped the pinecone in place on the tag and covered it with the mask in preparation for stamping the needles.


Step 4 – I stamped the pine needles twice with 'full strength' ink and once with the residual ink left on the stamp to make a lighter green area behind the pine cone.


Step 5 – Finishing the tag…
I made the description/price tag using a graphics program and printed them out on kraft label paper. I cut them out and stuck them onto the bottoms of the tags. About an 1/8th of an inch above the edge of the label, I used the perforation tool to inscribe a perforated line. When it's bent at the line it will rip right off so all the 'commercial' stuff is removed.

As a final step, I used a Ground Espresso Distress Marker and the Marker Spritzer to add a splatter of dark speckles over all the tags.

NOTE: All week long Topflight Stamps is having a daily deal sale! Today you can get Gel Printing Texture Plates for 25% off! Check it out and keep an eye on the site to see what the rest of the deals are. ;-)


Thanks for stopping by! Below is a list of supplies I used. Be sure to check out the Topflight Stamps blog for more inspiration. There is always something fun to see there! Have a great week and happy Thanksgiving. =)

Topflight Stamps Products:
Darkroom Door - Pine Cones
Crafty Individuals - Crackle Background


Other:
Tim Holtz Sizzix Die - Tag & Bookplates retired
Ranger Archival Ink - Pale Ochre, Potting Soil, Fern Green, Library Green, Red Geranium
Ranger Distress Stain - Antique Linen
brayer
Tonic Perforator Tool
Ranger Marker Spritzer Tool
Distress Marker - Ground Espresso
red & white bakers twine
Tim Holtz Mask Sheets - discontinued =(

Scrapbook.com and Sizzix links in this post are affiliate links which do not affect the price you pay but allow me to earn a small percentage of a sale. Thanks! (My husband also thanks you!)

Monday, November 19, 2018

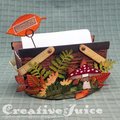
Being Thankful Basket

Happy almost Thanksgiving to my USA readers! I always try to be thankful as a matter of course but this time of year gives us extra reason to pause and really take a look at all we have to be grateful for. For my November Eileen Hull project, I created a fall themed Basket as a table decoration. It holds blank cards that people can take out and write what they are thankful for on. I've done this before at Thanksgiving dinners and it makes for a great family snapshot and memories. I have so many things to be thankful for – a snug house, family close by, lots of love… I could fill up a whole basket of cards myself!


Check out the how-to:

Step 1 – I used the Lumber 3-D Texture Fade Embossing Folder to texture the matboard before I cut the basket out of it. First I misted both sides of it with Distress Spray Stain. While it was still a little damp I ran it through my Big Shot in the embossing folder. The texture you get with the folder is amazing!


Step 2 – Tim Holtz has recommended using Distress Crayons as one method of coloring the embossed texture so I gave it a try. I did it in sections so the crayon wouldn't dry before I blended it. I scribbled on Vintage Photo and Walnut Stain crayon and then blended it with a wet finger. When it was all dry I cut out the main parts of the basket.

The top piece has the blended crayon done.
Step 3 – I wanted the handles to be lighter so I used Eileen's Golden ColorBox Blends ink to color another piece of matboard. I stamped it with a  wood grain texture stamp on one side and then cut the handle pieces out of it.


Step 4 – I assembled the basket and glued it onto an oval of patterned paper covered matboard for a base. I added a strip of grass cut with Eileen's Grass die.


Lastly I added all the plants and flowers. I used the Funky Foliage and Funky Floral 3 die sets to cut them all out. I think I am love with the little mushrooms in the Funky Foliage set!

Thanks for stopping by. Be sure to visit Eileen's blog and check out the other posts for this month! I am also entering this in Frilly & Funkie's current challenge, A Harvest of Gratitude. Check out their blog too!

Dies:
Eileen Hull Sizzix
Basket ( Sizzix / SB )
Journaling Cards, Flowers & Leaves ( Sizzix / SB )
Grass ( Sizzix / SB )

Tim Holtz - Funky Foliage Sizzix / SB )
Tim Holtz - Funky Floral #3 Sizzix / SB )
Tim Holtz - Movers & Shapers Sized Ovals Sizzix )

Other:
Eileen Hull ColorBox Blends Ink - Golden
Tim Holtz 3-D Texture Fade Embossing Folder, Lumber ( Sizzix / SB )
Ranger Archival Ink - Pale Ochre
Distress Inks - Forest Moss, Ground Espresso
Distress Spray Stain - Tea Dye, Vintage Photo
Sizzix mat board
Distress Crayons - set 3
Tim Holtz Chitchat Seasonal stickers
Tim Holtz Memo Pins

Sizzix and Scrapbook.com links in this post are affiliate links which do not affect the price you pay but allow me to earn a small percentage of a sale. Thanks! (My husband also thanks you!)

Monday, November 12, 2018

Sneak Peek!

Good morning! I have a new card posted on the A Jillian Vance Design blog and wanted to tease you with a peek. Head on over to see the whole thing!


Thanks for stopping by and have a great week.