Friday, February 26, 2016

Blog Hop with Eileen Hull & Stampendous!


Hello! All week the Eileen Hull Inspiration Team has been hopping along with the Stampendous Design Team to bring you an eyeful of crafty goodness using the Cottage Home and Mushroom Home Stamps and Dies Sets and Eileen's versatile dies. You will definitely want to head on over to Eileen's blog and the Stampendous blog to catch up on the projects shared so far. Comment along the way for a chance to win one of the prize packs!

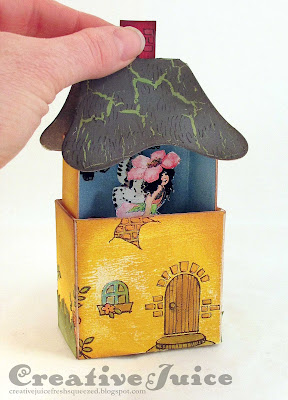
I made a little fairy house using Eileen's re-released Candy Drawer die and the Cottage Home stamp and die set. My house has a little surprise in it! ;-)


Lift out the drawer by the chimney…


A little flower fairy and her garden are inside!


I started out by cutting out the Candy Drawer from matboard and using Fresco Finish Chalk paints to cover the inside and outside of the house. Paper Artsy has a great tutorial on how to get great visual texture using a brayer to apply the paint.

You can see here I already folded up the drawer. Don't forget to prepare a
piece of cardstock to cut for the bottom of the drawer to cover the glue tabs.
Next up is the stamping and coloring on the outside of the house. I stamped with Archival Jet Black ink and then colored the details in with Distress Markers. I also diecut and inked some grass strips to use in the garden and around the sides of the house.


For the roof, I used bristol paper (like very heavy cardstock) and the roof die that comes with the Cottage Home set. To get a full roof, I folded the bristol paper in half and placed the top of the die just off the edge of the fold. That makes it so the die won't cut through the paper and the fold stays intact. More Fresco Paint and Crackle Glaze finished it off.

I base coated the roof with Green Peas and applied the Crackle Glaze over it.
A top coat of Slate was applied and the crackle swiftly made an appearance!

To fill the garden I made a bunch of mini roses with the Tattered Pinecone and Tiny Tattered Florals dies. The fairy is a free download on The Graphics Fairy website.


I printed and fussy cut the fairy out as well as added some butterfly wings (also from The Graphics Fairy website).

Thanks for stopping by and hopping along with us! Join in and comment for chance to win prizes:


Here is the link list for all the hop stops from the week:

The supplies I used for this project can be found at Sizzix or Simon Says Stamp. Follow the links below and a shopping you may go. ;-)


Monday, February 22, 2016

More Glitter with Mixed Media Monthly


There is still time to join us for the February Mixed Media Monthly challenge! You get an extra day to enter this year too. ;-) It's all about glitter this month. You can see my ATC binder project for it HERE. I also made some "matching" ATCs while I was at it.


I used the same techniques as I did for the binder – gessoed burlap for the background covered with (completely awesome) Fresco paint. Glass glitter for the sand and copious amounts of Stickles ramp up the sparkle factor on these textural cards. Head on over to the MMM blog and check out all the inspiration in the challenge post. People are getting very creative! Join in and you'll have a chance to win a $25 gift certificate from Frantic Stamper, our sponsor for the month.

Thanks for stopping by! The supplies I used for this project can be found at Sizzix or Simon Says Stamp. Follow the links below and a shopping you may go. ;-)

Tuesday, February 16, 2016

The 10 Minute Project Challenge

Hello! This month, Eileen Hull challenged the design team to make projects that took only 10 minutes to complete. What?? That's a tough assignment for those of us that like to add layers and generally just make things intricate and complicated. ;-) But we did it!! Check out the results on her blog HERE. Believe it or not, this Valentine project only took me 10 minutes. (I timed it!) I was hustling but squeaked it in.


Let's see how I accomplished this minor miracle. ;-)

First I cut out all my parts. The cover of the Needle Book I cut from matboard and the pages are cut from plain cardstock. (I'm going to fill it with a list of all the things I love about my husband and give it to him for Valentine's Day.) The heart is cut from red felt.

Moving on, I laid the stencil on the cover and misted it with Distress Spray Stain, Hickory Smoke and Old Paper. The Spray Stains are quick and easy! A quick blast with the heat tool and it was dry.

Misting is a quick and easy way to add color!

The inside of the cover I decorated with a layering stencil and Distress Ink. More quick and easy! I dried that with the heat tool so it wouldn't smear (being in a hurry and all ha ha) and then sewed the heart and words to the cover.

Layering stencils are another quick way of adding pattern to your projects.
I bound the pages into the book with a simple tie of baker's twine. Ta - dah!! Done!


Thanks for stopping by! The supplies I used for this project can be found at Sizzix or Simon Says Stamp. Follow the links below and a shopping you may go. ;-)