Showing posts with label home decor. Show all posts

Monday, March 23, 2026

March in Miniature with Eileen Hull

The theme for this month is “March in Miniature” – what fun! Eileen Hull's Creative Team designers are interpreting it in various ways and thinking outside (or inside) of the box. Mine is inside of a book!

Lisa Hoel for Eileen Hull - March in Miniature    #creativejuicefreshsqueezed #EileenHull  #eileenhulldesigns  #sizzix #mymakingstory #TeamEileen #mysizzixstory

I carved out the inside of an old book in which I could build a little mini scene:

Lisa Hoel for Eileen Hull - March in Miniature    #creativejuicefreshsqueezed #EileenHull  #eileenhulldesigns  #sizzix #mymakingstory #TeamEileen #mysizzixstory

In the cover of the book, I cut a shape to match the window die from the Windowsill, Flowers & Vases Die Set. (I traced the die and cut the coverboard with a sharp Xacto knife.)

Lisa Hoel for Eileen Hull - March in Miniature    #creativejuicefreshsqueezed #EileenHull  #eileenhulldesigns  #sizzix #mymakingstory #TeamEileen #mysizzixstory

Eileen has so many fun mini elements in her various die sets. It was fun to build a little scene!

Lisa Hoel for Eileen Hull - March in Miniature    #creativejuicefreshsqueezed #EileenHull  #eileenhulldesigns  #sizzix #mymakingstory #TeamEileen #mysizzixstory


Thanks for stopping by! Be sure to 
check out what my fellow designers have making for the month.

Supplies Used:

Eileen Hull Windowsill, Flowers & Vases Die Set
Eileen Hull Tunnel Arches Die Set
Eileen Hull Home Sweet Home Die Set
Eileen Hull Shadowbox Elements Die Set

Get connected with Eileen:

Find it on the Sizzix Website - the Eileen Hull Hub! Besides inspiration, you will also find die assembly videos and exclusive content. Check it out today and watch it grow!

Are you a member of the Eileen Hull Fan Club? Join the 8700 other members to share ideas, inspiration, sources, challenges and make some fabulous friends. Above all, make sure to answer the questions so we know you are legit! Watch her Lives at Eileen Hull Designs Facebook or her YouTube on Tuesdays at 6:00 Eastern for project ideas, techniques, inspiration and creative community. Additionally, you can also find Eileen on FacebookInstagram and Pinterest.

Tune into Eileen’s live videos! (You can watch the replays on her YouTube channel or Eileen Hull Designs Facebook.)

Monday, November 16, 2020

Celebrate Fall!

Hello there! Before I move onto Christmas projects, I wanted to do one last fall project. Fall is my favorite season! I love the crisp days, golden light and above all the colorful leaves. The bright autumnal hues are totally my jam! I still had a stash of paper leaves I made during the fall Facebook live demonstrations that Tim Holtz did last month so I was able to incorporate them into my little thrift store upcycling project:

Lisa Hoel – upcycled thrift store finds into a fun autumn arrangement, celebrate fall! #creativejuicefreshsqueezed #tim_holtz #timholtzleaflove #mymakingstory

I found the bottom half of a nut dish at the thrift store as well as a pair of cute squirrel salt and pepper shakers (into my basket they went!) Perfect for a fall project!


Lisa Hoel – upcycled thrift store finds into a fun autumn arrangement, celebrate fall! #creativejuicefreshsqueezed #tim_holtz #timholtzleaflove #mymakingstory

I wanted it to look like a forest floor on a fall day. I sprinkled the leaves about along with moss and berry like things. I also discovered that you can use Distress Glaze on the Idea-ology Toadstools and they look great!


Lisa Hoel – upcycled thrift store finds into a fun autumn arrangement, celebrate fall! #creativejuicefreshsqueezed #tim_holtz #timholtzleaflove #mymakingstory

As Tim shared in one of his demos, when applying Glaze to an impervious surface, it works best to coat the surface with Collage Medium and glue the embossing powder to it. When it's dry, you can emboss as usual. It worked perfectly! I painted some spots on afterwards. Love them! I may need to stock up on more Toadstools ha ha.

Thanks for stopping by! I hope you have a great week and get inky!

I am also entering this into the Funkie Junkie Boutique Blog's current challenge, "Celebrate". It runs for another week so you have a chance to enter too.


Supplies used:

Dies:

Tim Holtz Sizzix
Fall Foliage ( Sizzix / SB )

Tattered Leaves 656927 
- retired

Idea-ology Toadstools (in stock here)

Ranger Distress Glaze - Crackling CampfireFired Brick
Ranger Distress Inks - various fall colors
Ranger Distress Oxide Inks - various fall colors
Ranger Distress Spray Stains - various fall colors
Ranger Distress Spray Oxide Stains - various fall colors


Some links in this post are affiliate links which do not affect the price you pay but allow me to earn a small percentage of a sale. Thanks! (My husband also thanks you!) If you shop at Topflight Stamps, use my coupon code LISAHOEL for 12% off your order.

Thursday, November 5, 2020

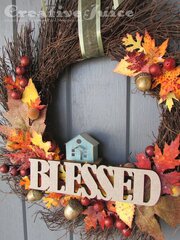
Blessed Home Fall Wreath

Howdy readers! I am on a wreath kick. I had picked up a few wreaths (with re-do possibilities) from the thrift store so I could get a base for the new Halloween wreath I wanted to make this year. I ended up using a black grapevine wreath for the Halloween project so I had a brown twiggy one left. I knew it would make a great fall wreath and the dark brown would make my Tim Holtz #timholtzleaflove challenge leaves really pop! I also had the theme in mind from the current Funkie Junkie Boutique Blog challenge, "Home is Where the Heart Is". 

Lisa Hoel - Blessed Home fall wreath #timholtzleaflove

Home really is where the heart is and I feel very fortunate to be living where I do with my family. We are truly blessed and I am so thankful! We have not regretted moving to our new state for a moment and we are thriving here. It was all the Lord's doing and looking back we can see his plan for us in coming here.

Lisa Hoel - Blessed Home fall wreath #timholtzleaflove

The leaves are cut using various Sizzix leaf dies designed by Tim Holtz. The past two Saturdays Tim has been doing Facebook Live demos showing all sorts of techniques using his products to make fall projects (Fall Vibes and Leaf Love). What fun! I used part of my pile 'o leaves to decorate this wreath. The little house is from his new die set Paper Village (oh I have plans for this set!!)

Lisa Hoel - Blessed Home fall wreath #timholtzleaflove

Thanks for stopping by! I hope you have a great weekend and have a chance to do something crafty and creative. =)

I am also entering this into the Funkie Junkie Boutique Blog's current challenge, "Home is Where the Heart Is". It runs for another week so you have a chance to enter too.


Supplies used:

Dies:

Tim Holtz Sizzix
Paper Village ( Sizzix / SB )
Fall Foliage ( Sizzix / SB )
Layered Leaf 660039 - retired
Tattered Leaves 656927
- retired

Ranger Distress Glaze - Crackling Campfire, Fired Brick
Ranger Distress Inks - various fall colors
Ranger Distress Oxide Inks - various fall colors
Ranger Distress Spray Stains - various fall colors
Ranger Distress Spray Oxide Stains - various fall colors


Some links in this post are affiliate links which do not affect the price you pay but allow me to earn a small percentage of a sale. Thanks! (My husband also thanks you!) If you shop at Topflight Stamps, use my coupon code LISAHOEL for 12% off your order.

Thursday, January 14, 2016

Winter Time

Hello everyone, I'm here today to share a winter themed decor project that I made for the DecoArt Media Winter Wonderland Challenge! My entryway has been feeling rather sad since I put all my Christmas decorations away so I wanted to dress it up again with a project that is wintry but not necessarily Christmassy. I think this fits the bill!


I used loads of DecoArt Media Fluid Acrylics and other DecoArt products. I'll give you a run down and some closeups:


The arches are shapes I cut out of foam core board. (Tip: always use a super sharp X-acto blade when cutting foam core!) I base coated them with Prussian Blue Hue and then covered them with Crackle Paint. Remember thicker paint makes bigger crackles, so I tried to vary the thickness a bit for variety. When the paint was dry I gave the frames a light wash of Medium Grey to bring out the cracks and textures.

The deer were painted with Burnt Umber with a bit of Titan Buff mixed in (plus Gold for the antlers). When dry, I coated them with Glue 'n Seal and sprinkled on dry Rock Candy Distress Glitter.


The blue background in the arches is the result of a little experiment I did. I used illustration board as a substrate, wet it first and loosely applied watered down Cobalt Blue Hue, Cerulean Blue, and few splatters of Paynes Grey. I wanted it to look blotchy so I didn't overwork the colors. I was wondering what would happen if I sprinkled salt all over it while it was still wet. This is a tried and true technique when watercoloring – you get a gorgeous, feathery pattern when it all dries. I wasn't sure how it would react with acrylics. I sprinkled the table salt on and let it sit until the board dried. It didn't react like watercolor paint does at all but I was very pleased with the speckle pattern it left. I think it's perfect for a snowy background!

The full board of the sky background. I also splattered some White Shimmer Mist here and there.
 After cutting out the arch shapes to go behind the frames, I stamped the treelines and stamped and embossed the snowflakes.

I also similarly used Fluid Acrylics to create a sheet of paper to cut up for the trees.

The full sheet of "tree" paper.
I used smooth bristol board and Sap Green and Veridian to make the mottled texture. I splattered on lots of paint as it was drying so it was more speckled and textured looking. Once my trees were constructed, I dry brushed on Interference Green paint to highlight the branches and add a surprising glimmer.

If you are still here I'm almost done lol. The snowflakes were die cut out of scrap packaging plastic and embossed with the folder that comes with the die (Snowflake Duo by Sizzix) I dabbed one side with watered down Silver paint and then applied Crackle Glaze to the opposite side once it was dry. While the glaze was wet I sprinkled on a touch of Ultra-fine Art Sugar glitter. Last but not least, the base of the project is covered with Snow Tex paint with Rock Candy glitter sprinkled on while the paint was wet. You can see I am a fan of sparkle.

Whew that was long! I hope you've been inspired and maybe picked up a few things to try yourself. For even more inspiration, head on over to The Mixed Media Monthly Challenge Blog and check out our current challenge, Time Flies. (You can see my original post and more details HERE.) You have until the end of the month to join in and link up your projects!

Time Flies MMM challenge

Thanks for stopping by! The supplies I used for this project can be found at Sizzix, Simon Says Stamp or Amazon. Follow the links below and a shopping you may go. ;-)


Friday, December 26, 2014

Christmas Nativity Lantern

Well, this will be my last Christmas project posted for the year. There were still some ideas on my list I couldn't get to so I'll just have to start earlier next year. ;-) At the beginning of the month I shared this Christmas lantern project which I planned as a gift for my mother-in-law (she loved it!) I also made a lantern for my Mom and I couldn't show it here until after Christmas because my Mom is an "on-the-net" kind of gal and regularly reads my blog lol. (Hi Mom!) So now I can finally share it with you:


My mom loves poinsettias (as do I) so I wanted to incorporate them into the scene. I love the Tattered Poinsettia die! Did you know that the Textured Poinsettia embossing folder is made to fit the diecuts from it so you can emboss a pattern into the petals if you want? Some I embossed and most I left plain for this project. I incorporated lots of glimmery mists and glitter into the flowers and foliage also. Here are some more details:


From this angle you can see how I stamped the three wise men on the background paper. They are on their way to visit! I embossed them with clear embossing powder to give them a bit of shine and match the embossed designs that were already printed on the background paper I used.


Of course I had to embellish the top with dyed Crinkle Ribbon, Holiday Greenery diecuts and other festive odds and ends I have in my stash.

Thanks for checking out my project. Also, don't forget the Inspiration Journal December Challenge, Sing, Sing It Loud! You have until the end of the month to link up your own project and have a chance to win $50 to spend at Inspiration Emporium.

I am also going to enter this into the December Mixed Media Monthly Tic-Tac-Toe Challenge. This is super fun challenge this month. I made the following tic-tac-toes from the board: Bow, Glitter, Ribbon; Die, Stamp, Ribbon; and Tape, Glitter, Stamp. Check out their challenges each month!

Most of the supplies I used for this project can be found at Inspiration Emporium. Follow the links below and use my code JUICE to save 10% if you go shopping. I will also point out that US shipping is always $5 and international shipping is just $10. ;-)