|
| The cover had a perfect open spot to add a die cut and owl adornment. |
 |
| I used wax to highlight the embossed design & color the silver owl. |
 |
| Ta-dah! |
 |
| See that rose tag? |


The inside cover is layered with paper from the Abandoned Paper Stash, Worn Wallpaper, lots of crackle paste, inks, paints, ephemera etc.

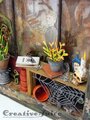
The scene is staged as if you are inside the greenhouse looking out the glass wall to the house in the background. Elmira is creeping around outside!
Details:
 |
| Creepy! |


 |
| Scroll on to see how I made the plant stand! |

Here's a bit of how-to and in progress photos:

I decorated the inside front cover first after covering the endpapers with black gesso. Then I moved onto the niche part. I started playing around with the placement of the elements.
 |
| I colored some Mummy Cloth to layer over the foreground. |
I cut a piece of manila folder to fit the background and inked it up with Distress Oxide Inks and stamping (Haunted House set). I also glued two strips of painted wood on either side to be spacers for when I glued in the greenhouse glass wall panel.

The wall panel is a sheet of thick acetate I cut to size. The cobwebs I stamped onto the back with archival ink. I covered the front with Matte Collage Medium to frost it a bit and provide a surface for the Distress Crackle Rock Candy to stick to. The sashing is strips of thin chipboard glued on. I added the crackle paint along the sashing and let it pool in the corners. Once it was dry I added the alcohol ink to grunge it up.

I was inspired by Stacy Hutchinson's candle tutorial she shared with us a few weeks ago. I made my own version. =)

I wanted to make a plant stand to raise up my pot of Death Bells for more visual interest. I thought one of the Thimbles would work but it needed something more. I poked through my stash of odds and ends and came up with a thick plain washer and a lock washer to glue onto the thimble. Perfect!
Well thanks for sticking in with this reeeeally long blog post! I hope you've enjoyed all the details of my project. I have lots of ideas for other projects so we'll see how many I can actually get done before Halloween. ;-)
I am also entering this into the September Vintage Journey challenge, Box it Up. My project is a bit out of the box for the theme (see what I did there?? =D ) but I maintain that I made the book into a box of sorts when I hollowed it out. It can close and it contains stuff. See, box! ;-)
Supplies used:
Dies:
Tim Holtz Sizzix
Bat Crazy ( Sizzix / SB )
Frightful Things ( Sizzix / SB )
Regions Beyond ( Sizzix / SB )
Funky Floral #2 ( Sizzix / SB )
Labels ( Sizzix / SB )
Tattered Leaves - retired
Twisted Edge - retired
Strip Die - Brick Wall - retired
Village Graveyard - retired
Branch Tree - retired
Stamps:
Tiny Toadstools
Haunted House
Life of the Party
Other:
Tim Holtz layering stencil - Falling Stars
Ranger Distress Crackle Paste
Distress Crayons - Set 3, Set 2
Ranger Distress Collage Medium - Matte
Distress Oxide Inks
Distress Paint - Peeled Paint, Forest Moss
Art Alchemy - Métallique Wax, Aged Brass
Art Basics - Heavy Gesso, Black
Emerald Creek Quarry Gemstones, Pyrite
iCraft Decofoil Metallix gel - Glazed Pewter
Ranger Alcohol Ink - Pebble, Mushroom, Rust, Blending Solution
Distress Crackle Paint - Rock Candy
Abandoned Halloween 8x8 Paper Stash
mini terracotta pots from craft store
Tim Holtz Idea-ology:
Halloween 2018: Clippings, Ephemera, Worn Wallpaper, Remnant Rubs, Skulls
Halloween Accents
Halloween Layers & Baseboard Frames
Halloween Paper Dolls
Mummy Cloth
Bitty Bats
Creepy Eyes
Thimbles
Mini Paper Clips
Keys
Store links in this post may be affiliate links which do not affect the price you pay but allow me to earn a small percentage of a sale. Thanks! (My husband also thanks you!) If you go shopping at Topflight Stamps, use my code LISAHOEL for 10% off your order.