Showing posts with label Rinea. Show all posts

Thursday, February 20, 2020

Rinea Foil Paper, Steampunk Style

Good evening! I have been having more fun playing around with Rinea Foil Paper and their new 2.0 Ghost Ink. (Lots of fun, trust me on that!) I was experimenting with 'steampunk' styles and ended up making a pair of cards that are perfect for a man's birthday.

I gave one of these to my Dad for his birthday.

I also used Sizzix dies and 3-D embossing folders, stamp sets from Tim Holtz and a Xyron machine to make these cards. Let's take a look:

Step 1 - I used my Xyron Creative Station to apply adhesive to the back of a piece of glossy black Rinea foil paper. Then I used a 3-D embossing folder (Mechanics) to emboss the gear design. (The foil paper embosses beautifully!)


Step 2 – Rinea Ghost Ink is formulated to remove the color from the foil paper to reveal the silver metal base. You can stamp with the Ink pad and in this case I used just the reinker bottle for this technique.


I put a drop of ink on my craft sheet and used a make up wedge sponge to lightly brush it on the raised portions of the embossed foil. It started to take off the color right away. I buffed off the rest of the ink with a paper towel or rag and it really removed the color. Easy peasy!


I tried it with other folders and colors of foil paper.

I ended up not using this one for a card.


These are the two background I used, on brown and black foil. Having the Xyron adhesive on the back made it really easy to attach them to the card base. I layered diecuts and fussy cut stamped images on the top to complete the card. It's a quick and easy technique that looks really cool!

Thanks for stopping by! I hope you have a great weekend. ;-)

Dies:
Tim Holtz Sizzix
3-D Embossing Folder, Mechanics Sizzix / SB )
3-D Embossing Folder, Foundry Sizzix / SB )
Gearhead Sizzix / SB )
Baroque ( Sizzix / SB )


Other:

Rinea Foil Paper - CopperBlack, Brown
Tim Holtz stamp set - Purveyor
Tim Holtz stamp set - Simple Sayings
Archival ink - Jet Black, Carnation

Some links in this post are affiliate links which do not affect the price you pay but allow me to earn a small percentage of a sale. Thanks! (My husband also thanks you!) If you shop at Topflight Stamps, use my coupon code LISAHOEL for 12% off your order.


There is a big sale at Sizzix going on now through the 25th. Use the code GRAS30 for 30% off your order and shipping is free over $65!


Monday, February 10, 2020

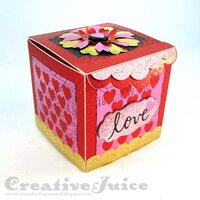
Valentine Gift Box with Power Team Eileen Hull, Rinea Foil Paper and Xyron!


Happy Valentine's Day! It is nearly upon us! I made a cute (and quick) gift box that can hold delightful gifts such as – dark chocolate! (My vote.) I suppose you could substitute some other sweet but really, what would the point be? (ha ha, jk)


I used Eileen Hull's new Sizzix Gift Box with Scallop Edges Die for the structure and decked it all out with Rinea Foil Paper and more of Eileen's dies to create a festive and glam little box that you can use for all sorts of lovely gifts (not just dark chocolate.)


I also used my Xyron Creative Station Lite machine to quickly and neatly add adhesive to the back  of all my foil paper. It made this project fast to make! Read on for a quick tutorial.


I used Sizzix Sizzles Matboard for the substrate (two pieces). On one side of each piece, I spritzed on some Candied Apple spray stain. While that was drying, I cut strips of Rinea's Ruby Star Foil Paper to the width of the board and ran it through my Creative Station. The Creative Station makes it so easy to apply adhesive to papers etc. All I had to do then was peel off the backing sheet and adhere the foil paper to the other sides of the matboard pieces. Then I die cut the box parts.

I also cut smaller rectangles of pink foil paper and ran those through the Creative Station too. (Did I mention it was easy?) All I had to do then was use the Hearts Journaling Cards Die to cut the side panels and then stick them on the box sides.


The Rinea Foil Paper is also an excellent choice for using in embossing folders. The Gold Foil in the 3-D Impresslits Embossing folders is especially nice – it looks just like vintage Dresden Scrap! I made box trim using the 3-D Mini Scallop folder.

Hot tip: stamp on the Foil Paper using Staz On ink.

Once again, by using the Xyron machine to put adhesive on the strips of gold foil before embossing, it made it quick and easy to apply to my box afterwards.


The Gift Box is easy to assemble. Fold on the score lines and glue the tabs to the insides of the box. (Except for the top!)


I also embellished the top of the box with a flower with a large brad center. The Rinea Foil Paper is easy to bend into a desired shape and then it stays put! I die cut the flower layers and then shaped the petals.


Thanks for stopping by! I hope the rest of your week is a good one and that you have a chance to get crafty. ;-)

Dies:
Eileen Hull Sizzix
Gift Box with Scallop Edges Die Sizzix / SB )
Journaling Cards, Hearts Sizzix / SB )
Flower, Heart & Soul - retired
Journaling Words - retired

Tim Holtz Sizzix
3-D Embossing Folder, Mini Scallop Sizzix / SB )
Labels Sizzix / SB )

Other:
Distress Spray Stain - Candied Apple
Staz On Ink - Jet Black

Some links in this post are affiliate links which do not affect the price you pay but allow me to earn a small percentage of a sale. Thanks! (My husband also thanks you!) If you shop at Topflight Stamps, use my coupon code LISAHOEL for 12% off your order.

Friday, March 8, 2019

Space Adventure in a Box

To infinity and beyond… (or at least Arizona). When I was at Creativation this past January, I was introduced to a product that was new to me – Rinea foil paper. It is a crafting paper that is foiled on both sides. The thing I really like about it is that it is pliable like a metal foil and will hold its shape when you manipulate it. They are having a contest and I cooked up this out of this world Treasure Box project to showcase their products. (Grab a drink, this is a long post and tutorial! ;-) )

I wanted the outside to be grey and monochromatic, like a lifeless moon or asteroid.


Then, when opened, you see a colorful and shiny alien landscape:


… and a few resident aliens:


A few more landscape details:


All the foliage was cut using Tim Holtz's Funky Florals type die sets and the Rinea foil paper. (It cuts well.) I could easily 'style' the plants by curling leaves etc. and they stayed put.


On to the tutorial!!

Step 1 - I die cut the pieces for the box out of matboard and assembled them. I coated the outside with clear gesso to help seal the matboard from the moisture of the Stone Effect Paste I was planning to cover it with. I was hoping it would help keep the box from warping too much. I think it did help a bit but I still got warping. At this stage I also prepared the front panel graphic. I matted the rocket image with some of the black Rinea foil (it has little stars on it, perfect!)


Step 2 - I searched for vintage space artwork. Some I found free online and the figure is scanned from an old sci fi paperback book we have. I did some Photoshop work to remove text and fill in areas to make it big enough to work as my background.


In a graphics program (Adobe Illustrator) I laid the graphics out to fit the inside of the box.


Don't glue them in yet!

Step 3 - I used some of Finnabair's Prima products to add that cool texture! The paste is the 'Concrete' jar from the Stone Effect Pastes trio. While it was wet I sprinkled on the different sizes of Art Stones. Once it was all dry I tried to bend the box back to straight sides as best I could. ;-) I also used DecoArt Media Fluid Acrylics to add a wash of color over the paste and stones.


I attached the lid to the base at this stage using some hinges I had in my stash. I also added the Hitch Fasteners for the closure.

Step 4 - I glued in the background and added the sleeve for the drawer (cut using Eileen's Stacking Drawer die). I cut separate matboard pieces to fit the bottom of the lid and top of the drawer and gave them the 'rock' treatment too. Once dry and painted, I glued them in place.


Step 5 - Ghost Inking! I'm really excited to play more with this technique. Rinea has a great video on their website to show how to do it. (It's easy!) For the drawer front, I embossed a piece of foil paper, rubbed the Ghost Ink pad over the embossed areas, dried it with a heat gun and then (here's the magic), wiped it with a paper towel dampened with alcohol and the color lifts right off. Cool!! (The black piece was a practice one I did.)


Step 7 - Sculpting the aliens! I used to do a lot of work with polymer clay but not as much in recent years. It was fun to dust off those skills again with some Sculpey Souffle clay samples I also got at Creativation. I wanted the big alien to look like it was crawling out of the drawer so I actually baked it in another drawer I cut out so the hands etc. would be in the right places.

Messy desk lol!

Step 8 - Finally it was time to put all the insides together. I die cut a whole bunch of 'plant material' from various colors of the Rinea foil paper so I'd have a lot to work with. I then just used quick grabbing glue to start placing the different parts into the interior.


Thanks for stopping by! Check out Eileen's blog posts and if you are not already a member, join the Facebook Eileen Hull Fan Club group. It is a warm, supportive group with lots of inspiration and sharing going on. You'll just have to answer a few simple questions when asking to join (to keep out spammers) and then you'll be added. ;-)

Dies:
Eileen Hull Sizzix
Stacking Drawer ( Sizzix / SB )
Treasure Box ( Sizzix / SB )

Tim Holtz Sizzix
Funky Florals 2 ( Sizzix / SB )
Funky Florals 3 ( Sizzix / SB )
Funky Festive ( Sizzix / SB )
Tiny Tattered Florals ( Sizzix / SB )
Iron Gate & Starry Night Texture Fades set - retired

Other:
Rinea Foil Paper
Rinea Ghost Ink
Prima - Finnabair Stone Effect Pastes - Concrete
Prima - Finnabair Art Stones - Mega, Regular, Mini
Prima - Finnabair Clear Gesso
Prima - Finnabair Mica Powder
Sizzix mat board
Xyron 3in Sticker Maker
Sculpey polymer clay
DecoArt Media Fluid Acrylics - Paynes Grey, Dark Grey Value 3
DecoArt - Extreme Sheen Gold paint
Tim Holtz Idea-ology Hitch Fasteners
Hobby Lobby - Spaceship Pendant

Sizzix and Scrapbook.com links in this post are affiliate links which do not affect the price you pay but allow me to earn a small percentage of a sale. Thanks! (My husband also thanks you!)