Showing posts with label masculine card. Show all posts

Wednesday, June 17, 2026

Father's Day Card with Topflight Stamps

This week at Topflight Stamps our theme is Anything Goes! I made a Father's Day card to give to my husband. Blue is one of his favorite colors. Surprisingly, I used no stamps for this card – just stencils and die cuts. ;-)


Lisa Hoel for Topflight Stamps #creativejuicefreshsqueezed #topflightstamps


Thanks for stopping by and be sure to check out the Topflight Stamps store for a wide selection of different and hard to find stamps, stencils and other paper crafting supplies from all around the world! Also keep an eye on the Topflight Stamps blog. There is new inspiration posted often!

Topflight Stamps Supplies Used:

AALL & Create stencil - Components
AALL & Create die set - Skycrossed Paradise
Studio Light Grunge mask - X background
PaperArtsy Fresco paint - Twilight
Creative Expressions Wordies Sentiment Sheets - Birthday
Ranger Tim Holtz Distress Grit Paste Glow


Wednesday, June 3, 2026

Steampunk Father's Day Card with Topflight Stamps

This week at Topflight Stamps our brand focus is on IndigoBlu! I appreciate the variety of detailed stamp designs they have. I created this steampunk card to use as a Father's Day card. (It will be here before we know it!)


Lisa Hoel for Topflight Stamps #creativejuicefreshsqueezed #topflightstamps

The base is a grungy Gel Press print from my stash. The focal image is the Steam Cottage stamp.

Thanks for stopping by and be sure to check out the Topflight Stamps store for a wide selection of different and hard to find stamps, stencils and other paper crafting supplies from all around the world! Also keep an eye on the Topflight Stamps blog. There is new inspiration posted often!

Topflight Stamps Supplies Used:

IndigoBlu stamp - Steam Cottage
IndigoBlu stamp - Wrapped
Lavinia stamp set - Light Bulbs
AALL & Create stamp set - Everyday Sentiments
AALL & Create die set - Holey Fun
Paper Rose die set - Cog Frame
Lindy's Stamp Gang Starburst Sprays - Industrial Chic
VersaFine Clair ink pad - Nocturne
Gel Press print
watercolors


Wednesday, February 28, 2024

Funkie Junkie Focus – "Hats Off to Our Men!"

Sometimes it's hard to come up with ideas for masculine cards or gifts but we'll have plenty of inspiration for you with our current Funkie Junkie theme, "Hats Off to Our Men". The challenge was to celebrate the men in our life with a card or gift. I decided to go with a card:

Lisa Hoel for The Funkie Junkie Boutique  #creativejuicefreshsqueezed  #mymakingstory #tim_holtz #thefunkiejunkieboutique #sizzix
You can't go wrong with steampunk!

This was a fun card to put together and it gave me a chance to play more with Distress Watercolor Pencils.

First I stamped the background of Mixed Media Heavystock with a grid of stamps from the Creative Blocks set in Hickory Smoke Archival Ink. Leaving the stamped paper in place on my stamping platform, I colored the stamped details with the pencils and then blended them out with a brush.


After the paint was dry, I re-stamped over the top of it all with more Hickory Smoke Archival Ink. This brought back the detail of the stamped images.


I also used the pencils to color the Paper Dolls Portraits ephemera piece. (Distress Crayons work pretty well too.)


Thanks for stopping by. Keep an eye on the Funkie Junkie Boutique Blog, Inspiration Ave. because you are now getting regular doses of expanded (and inspiring) content each week. Don't miss it…

Supplies used:

Tim Holtz Stamp Set - Creative Blocks
Tim Holtz Stamp Set - Grunged
Tim Holtz Die - Gadget Gears - retired
Tim Holtz Die - Gadget Gears #2 - retired
Tim Holtz Die - Industrial - retired

Tim Holtz Idea-ology Paper Dolls - Portraits
Distress Watercolor Pencils
Tim Holtz Kraft Stock - black
Tim Holtz Mixed Media Heavystock
Sizzix Textured Cardstock Pack
Distress Ink - Scorched Timber, Lost Shadow, Vintage Photo, Black Soot
Distress Archival Ink - Hickory Smoke

Some links in this post are affiliate links which do not affect the price you pay but allow me to earn a small percentage of a sale. Thanks! (My husband also thanks you!)

Wednesday, June 15, 2022

Stuck in the Middle - Another Funkie Junkie Challenge!

Hello there, time for a new challenge! Suzanne Czosek is our hostess this go around. Here is what she has to say about the theme "Stuck in the Middle":

For this challenge I want you to showcase something in the middle. It can be a pop up card with a surprise in the middle, it can be a mini journal with pages inside, it can be anything that highlights the middle of something!

I created a Father's Day card for my husband with a computer theme and "things in the middle".

Lisa Hoel for The Funkie Junkie "Stuck in the Middle" Challenge #creativejuicefreshsqueezed #tim_holtz #sizzix #mymakingstory #thefunkiejunkie #thefunkiejunkieboutique #frillyandfunkie

The base is a piece of mat board with a shaker card front mounted on it. (Shaker bits - in the middle #1 part) The background is a piece of 3-D embossed cardstock ( Circuit ) and I filled it with 1's and 0's, glitter and metal gears. There is another surprise though, the shaker flips open to reveal…
Lisa Hoel for The Funkie Junkie "Stuck in the Middle" Challenge #creativejuicefreshsqueezed #tim_holtz #sizzix #mymakingstory #thefunkiejunkie #thefunkiejunkieboutique #frillyandfunkie

… a pop up sentiment on a wobbler spring inside! (in the middle part #2) I had a lot of fun making this card. Let's take a look at the how to.

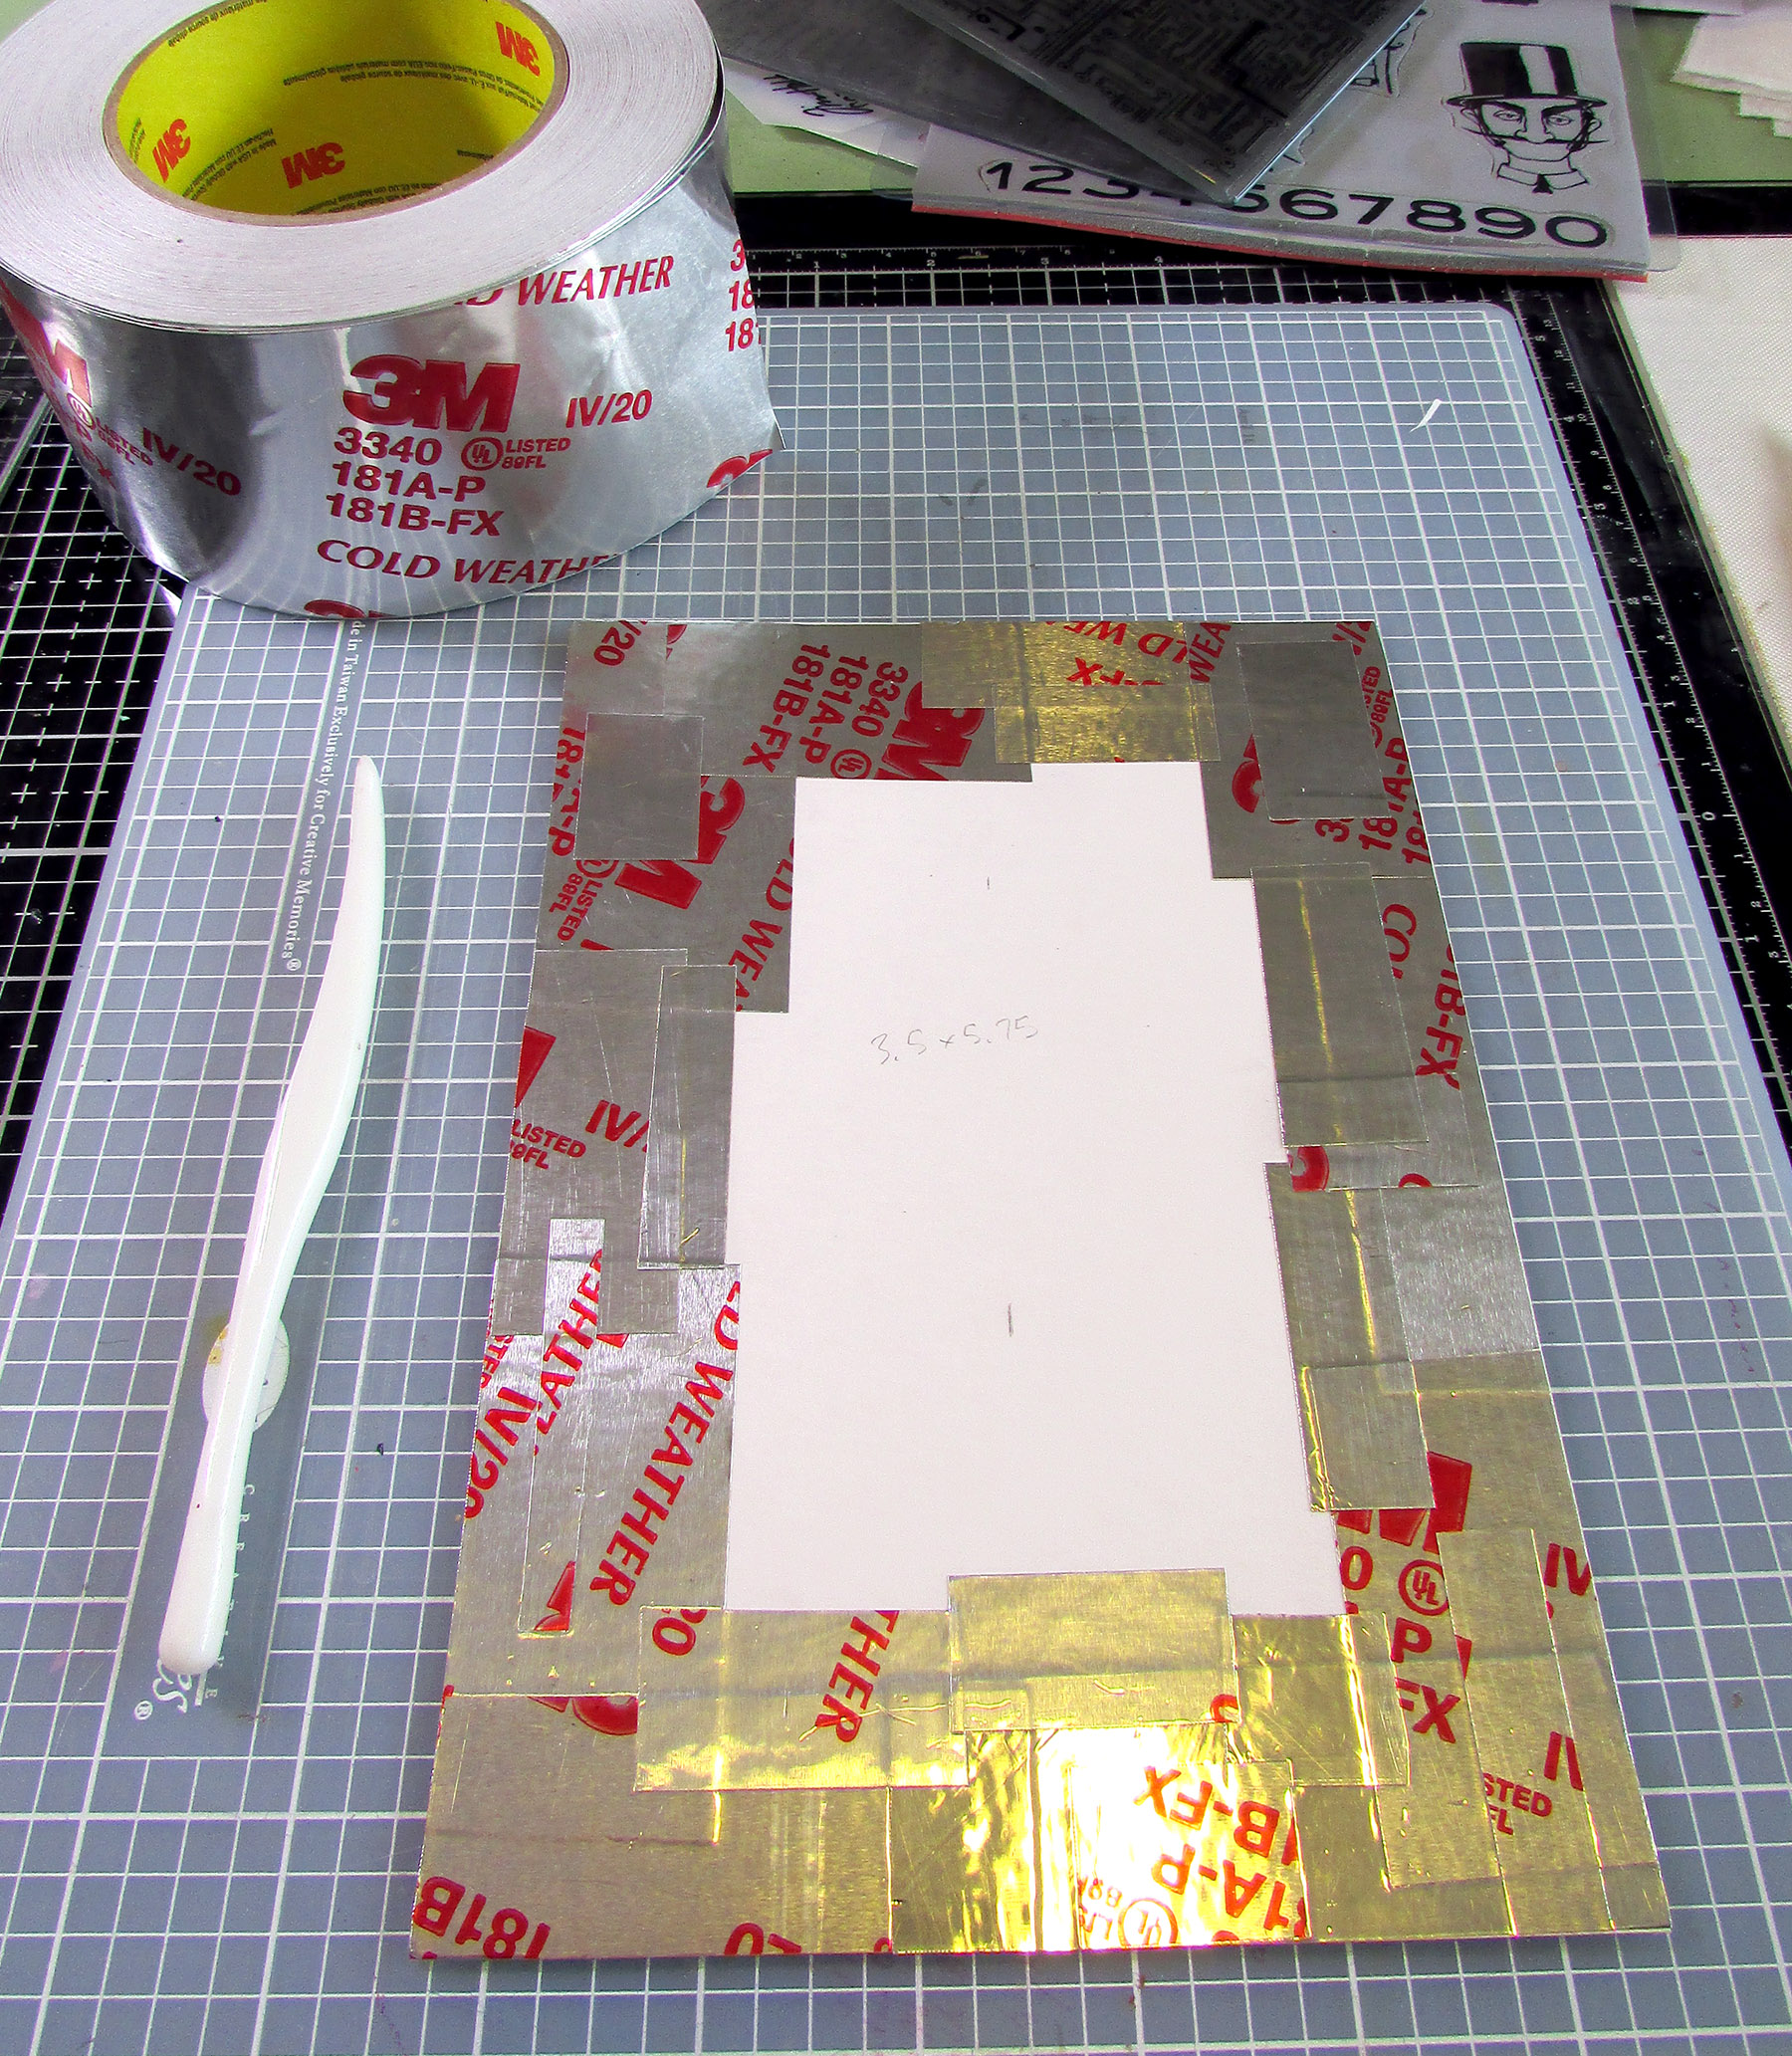
Step 1 - I started by adhering pieces of aluminum tape to the base of mat board. I discovered my new roll of tape has printing on the whole thing which is a bit of a bummer. Good thing I was adding a painted layer to this.


Step 2 - Painting! I base coated with different colors of Distress Paint and let it dry.


Added some washes of black and rusty red:


Added some distressing with a sanding block to reveal the metal underneath.


Step 3 - Backgrounds done:


Step 4 - I used Foundry Wax to highlight the raised areas of the circuit background. The Wax is fun to play with and looks amazing when you heat set it! I need to experiment more with it. You can find out how to use it from Tim Holtz's thorough video.


Step 5 - I cut a frame of foamcore board so I'd have plenty of depth in the shaker box. I also embossed a piece of matboard using the 3-D Foundry embossing folder and dry brushed on Mined Foundry Wax to highlight the details.


I glued a piece of clear plastic behind the embossed topper frame and then glued and filled the shaker.


Step 6 - Ready for assembly! Note that on the mat board base I added (with stencils) a final layer of copper embossing powder covered Transparent Gloss Texture Paste. I glued the shaker box to the front of the inside card and then glued that to the mat board base.


Thanks for stopping by! I hope you check out the fun challenges we have on the Funkie Junkie Boutique Blog. They are always good for sparking your creativity! You have two weeks to join the current challenge so I hope you give it a go.

Supplies used:
Tim Holtz die set - Alphanumeric Bold
Tim Holtz 3-D Embossing Folder - Circuit
Tim Holtz 3-D Embossing Folder - Foundry
Tim Holtz stamp sets - Inquisitive, Glitch 1, Glitch 2, Mini Glitch
Tim Holtz layering stencils - Digits, Circuit

Distress Ink - Vintage Photo, Black Soot
Distress Oxide Ink - Crackling Campfire
Ranger Archival Inks - Crackling CampfireBlack Soot
Distress Spray Stains - Mowed Lawn, Forest Moss
Distress Paint - Black Soot, Pumice Stone, Iced Spruce, Weathered Wood, Twisted Citron
Foundry Wax - Mined, Statue
Copper embossing powder

Tim Holtz Hitch Fasteners
wobbler
metal tape
foamcore board
mat board
clear acrylic sheet for shaker box window

Thursday, February 20, 2020

Rinea Foil Paper, Steampunk Style

Good evening! I have been having more fun playing around with Rinea Foil Paper and their new 2.0 Ghost Ink. (Lots of fun, trust me on that!) I was experimenting with 'steampunk' styles and ended up making a pair of cards that are perfect for a man's birthday.

I gave one of these to my Dad for his birthday.

I also used Sizzix dies and 3-D embossing folders, stamp sets from Tim Holtz and a Xyron machine to make these cards. Let's take a look:

Step 1 - I used my Xyron Creative Station to apply adhesive to the back of a piece of glossy black Rinea foil paper. Then I used a 3-D embossing folder (Mechanics) to emboss the gear design. (The foil paper embosses beautifully!)


Step 2 – Rinea Ghost Ink is formulated to remove the color from the foil paper to reveal the silver metal base. You can stamp with the Ink pad and in this case I used just the reinker bottle for this technique.


I put a drop of ink on my craft sheet and used a make up wedge sponge to lightly brush it on the raised portions of the embossed foil. It started to take off the color right away. I buffed off the rest of the ink with a paper towel or rag and it really removed the color. Easy peasy!


I tried it with other folders and colors of foil paper.

I ended up not using this one for a card.


These are the two background I used, on brown and black foil. Having the Xyron adhesive on the back made it really easy to attach them to the card base. I layered diecuts and fussy cut stamped images on the top to complete the card. It's a quick and easy technique that looks really cool!

Thanks for stopping by! I hope you have a great weekend. ;-)

Dies:
Tim Holtz Sizzix
3-D Embossing Folder, Mechanics Sizzix / SB )
3-D Embossing Folder, Foundry Sizzix / SB )
Gearhead Sizzix / SB )
Baroque ( Sizzix / SB )


Other:

Rinea Foil Paper - CopperBlack, Brown
Tim Holtz stamp set - Purveyor
Tim Holtz stamp set - Simple Sayings
Archival ink - Jet Black, Carnation

Some links in this post are affiliate links which do not affect the price you pay but allow me to earn a small percentage of a sale. Thanks! (My husband also thanks you!) If you shop at Topflight Stamps, use my coupon code LISAHOEL for 12% off your order.


There is a big sale at Sizzix going on now through the 25th. Use the code GRAS30 for 30% off your order and shipping is free over $65!


Thursday, June 8, 2017

Father's Day Card with Darkroom Door

Father's Day is coming right up! I finished the last card I need today. Whew! I like not being last minute. ;-) I used the Tool Shed stamp set from Darkroom Door and a bunch of Tim Holtz products:


The background is stamped with a wood grain pattern and I also embossed some card stock with the Rulers embossing folder (along with adding copper embossing powder to the raised areas). I stamped a manila tag with various Distress Ink colors and all those great tool stamps from the Tool Shed stamp set.

Topflight Stamps is having a flash sale on masculine stamps that is running through TONIGHT, 12am EST (June 8th) I'm just catching the tail end of the sale, but if you hurry you can take advantage of it still. ;-)

https://topflightstamps.com/


Most of the supplies I used for this project can be found at Sizzix or Simon Says Stamp. Follow the links below and a shopping you may go. ;-) Some links are affiliate links and there will be no additional cost to you but they help support my art endeavor. Thanks!