Showing posts with label alcohol ink. Show all posts

Wednesday, June 19, 2024

Funkie Junkie Focus – Ranger Alcohol Inks

Our current Funkie Junkie Focus is on Ranger's Alcohol Inks. They really are a lot of fun to play with! (Check out the demo videos Tim Holtz has done for lots of great techniques.) I first made several backgrounds on Ranger Yupo White Cardstock using the inks (pearl and regular).

Lisa Hoel for The Funkie Junkie Boutique  #creativejuicefreshsqueezed   #tim_holtz #thefunkiejunkieboutique

I die cut through the alcohol inked backgrounds to reveal the card base color. (Tip: using the metal Precision Plate in my Sizzix Big Shot helped the Thinlit dies to cut through the Yupo paper)

Lisa Hoel for The Funkie Junkie Boutique  #creativejuicefreshsqueezed   #tim_holtz #thefunkiejunkieboutique

I also used Alcohol Lift Ink and the new Paint By Number stamp set to add a number to each card.

Lisa Hoel for The Funkie Junkie Boutique  #creativejuicefreshsqueezed   #tim_holtz #thefunkiejunkieboutique

When stamping over alcohol ink, Archival Inks work best! I also added some abstract die cut shapes to embellish the cards.

Here are a few of the "in process" photos:

The inks work so well on the Yupo paper! You can really get it to move around.


Finished backgrounds!

Thanks for stopping by. Keep an eye on the Funkie Junkie Boutique Blog, Inspiration Ave. to see all the inspiring content each week. Don't miss it…

Supplies used:

Tim Holtz Die Set - Specimen
Tim Holtz Die Set - Mixed Media #2
Tim Holtz Die Set - Mixed Media #3
Tim Holtz Die Set - Mixed Media #6
Tim Holtz Die Set - Abstract Elements
Tim Holtz Die Set - Media Marks
Tim Holtz Die Set - Abstract Faces

Tim Holtz Stamp Sets - Paint By Number, Faded Type, Halftone & Rings, Grunged, Psychedelic Grunge, Slight Alterations, #Hashtags

Ranger Distress Archival Ink - Basics 4 Pk.
Ranger Archival Ink - various colors


Saturday, March 12, 2022

Saturday Showcase Over on the Funkie Junkie Blog!

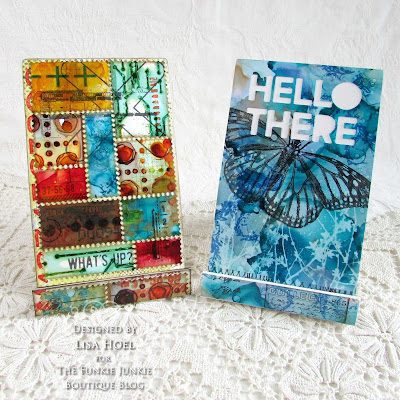
Hello, today you can find a tutorial post for these phone stands over on The Funkie Junkie Boutique blog! For our current challenge, "A Blustery Day", you are supposed to focus on a technique, supplies, etc. that you find challenging. I chose to focus on Alcohol Inks for my challenge and I'm continuing that theme for the Saturday Showcase! I used the alcohol ink backgrounds I created to decorate two phone stands made with Eileen Hull's new Phone Stand Die.

Lisa Hoel for The Funkie Junkie Blog challenge – alcohol ink Phone Stands made using Eileen Hull's Phone Stand Die #creativejuicefreshsqueezed #tim_holtz #sizzix #mymakingstory #thefunkiejunkie #thefunkiejunkieboutique #frillyandfunkie

Lisa Hoel for The Funkie Junkie Blog challenge – alcohol ink Phone Stands made using Eileen Hull's Phone Stand Die #creativejuicefreshsqueezed #tim_holtz #sizzix #mymakingstory #thefunkiejunkie #thefunkiejunkieboutique #frillyandfunkie
These stands are so quick to make and are great for gifts!


Head on over to the blog to check it out and see all the details. Have a great weekend!


Wednesday, March 9, 2022

The Funkie Junkie - "It's a Blustery Day" Challenge

Hello there – we have a new challenge beginning today. Our hostess is Suzanne Czosek this time around and this is what she has to say about it:

"I am inspired by Pooh Bear's quote from A. A. Milne of "It's a rather blustery day." Pooh Bear struggled against the windy day and you can share something you struggle with in your art! It can be a technique, color palette, tools, or supplies that you find difficult to use. Share them with us along with your story on what you struggle with! I can't wait to see your blustery day!"

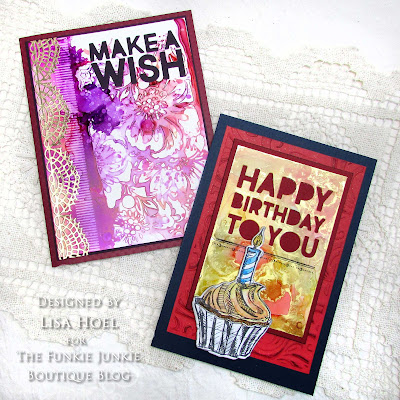
Lisa Hoel for The Funkie Junkie Blog challenge #creativejuicefreshsqueezed #tim_holtz #sizzix #mymakingstory #thefunkiejunkie #thefunkiejunkieboutique #frillyandfunkie – alcohol ink birthday cards

For my project, I chose to go down an alcohol ink rabbit hole. I've always had trouble getting into using the medium and found it a bit intimidating. So this was a great challenge to just read up on it, jump in and play! I started off by watching again some of Tim Holtz's educational videos (soooo informative!). You can find two here and here. Then I got out all my supplies and played around. I used Yupo cardstock for my substrate. Yupo is a non-porous synthetic paper that is perfect for alcohol ink. I have a list of other supplies used at the bottom of this post but you can browse products here in the Funkie Junkie store.

Here are some photos of the results of my experiments:


LOVING the Alloys

For these backgrounds I used Metallic Kraft Stock for the substrate. I like how they turned out, especially when I used a bit of Snow Cap Mixative with the ink (red ones on lower left and upper right corners). I'm going to try embossing some of these backgrounds - I think they'd look cool!


Here's one technique that Tim shared that I really liked. He showed us how to make prints with stencils.

stencil prints, yeah!


Mist a stencil with isopropyl alcohol and "stick" it down onto the Yupo. Drip various colors of ink onto the stencil/paper. It will wick under the stencil but that is what you want it to do. Let it sit there until all the ink dries underneath the stencil.

Peel off the stencil and you get your first generation print!


You can create several successive prints with the ink left on the front of the stencil. Mist it with more isopropyl alcohol and lay it on a new sheet of Yupo. Let it dry and peel it off. Repeat!

cool backgrounds!!

So there is a little look at my alcohol ink fun. I will have to play around some more. ;-) I'll be on the Funkie Junkie blog this Saturday with more alcohol ink projects! Stay tuned…

Thanks for stopping by! I hope you check out the fun challenges we have on the Funkie Junkie Boutique Blog. They are always good for sparking your creativity! You have two weeks to join the current challenge so I hope you give it a go.

Supplies used:
Tim Holtz die set - Bold Text #1
Tim Holtz die set - Crochet
Tim Holtz Multi Level Embossing Folder - Swirls
Tim Holtz Stamp Set - Ornate Trims
Tim Holtz layering stencils - Bouquet, Doodle Art 2

Ranger Alcohol Ink
Ranger Alcohol Ink Pearls
Ranger Alcohol Ink Alloy
Ranger Alcohol Ink Mixatives
Ranger Lift-Ink
Ranger Archival Ink -  Black Soot
stamping platform
91% Isopropyl rubbing alcohol (from drug store/grocery store)
Yupo cardstock

Some links in this post are affiliate links which do not affect the price you pay but allow me to earn a small percentage of a sale. Thanks! (My husband also thanks you!) 


Tuesday, March 17, 2020

Get Your Green On! Happy St. Patrick's Day!

Hello and welcome to the blog! St. Patrick's Day is always a fun day for us because it is also my mom's birthday. I usually make her a appropriately themed birthday card too and here is the one I made for her this year:


Ann Butler Designs has some new stamp sets out from the Unity Stamp Company. They are strip background builder sets and you can do a lot of neat things with them! Read on to see…

The four leaf clover is cut out of Yupo paper and colored with alcohol inks. I used the Strip stamps and Alcohol Lift-Ink to create the pattern.


To first color my Yupo paper, I dripped various green alcohol inks onto one piece of the Yupo and then smooshed the second piece into all the drips on the first. I squished the ink around between the two pieces and then pulled them apart. I lightly sprinkled a few more drops of one of the green inks on them to get some speckles.


Next I built the Strip stamps into a herringbone pattern on my stamp blog and used Lift-Ink to stamp the pattern into the alcohol ink. Basically you just ink up the stamp, stamp it onto the alcohol inked surface and then buff it with a soft cloth to reveal the stamped pattern. While the lifted ink is still on your rubber stamp, you can also stamp that off onto another piece of paper:


After my initial stamping, I kept stamping with individual strip stamps to continue to build the herringbone pattern:

It was easy to line up the stamps!
I was able to cut two heart "clover leaves" from each sheet of Yupo. I folded them in half so they would have a crease and a bit of dimension. When cutting, I lined up the heart die so the "points" of the herringbone would be in the center of the leaf.


For the background, I first used a brayer to lightly apply white Fresco chalk paint to the kraft cardstock card base. Then I used the strip stamps to stamp a rainbow up the side:


A banner with the gold tinsel embossed sentiment and a gold cord tied around the card fold completed the festive St. Patrick's Day look.

Thanks for stopping by. I hope the rest of your week is a good one and that you have a chance to relax and get crafty amidst all the disruption that is going on. Stay safe and healthy!

Dies:
Crealies Nested Heart Die Set - XXL Heart 29

Stamps:
Unity Stamp Co - Ann Butler Designs Strips Background Builder Set 1
Unity Stamp Co - Ann Butler Designs Strips Background Builder Set 2

Other:
Distress Ink - Cracked Pistachio
Distress Oxide Ink - Lucky Clover, Wilted Violet, Blueprint Sketch, Fossilized Amber, Carved Pumpkin, Candied Apple
Ranger Yupo paper
Ranger Alcohol Lift-Ink
Ranger Alcohol Inks - Limeaide, Willow, Meadow, Clover, Botanical
gold tinsel embossing powder
embossing ink
PaperArtsy Fresco paint - Cloud 9
Tim Holtz Cling Foam Stamps - Cutout Script

Some links in this post are affiliate links which do not affect the price you pay but allow me to earn a small percentage of a sale. Thanks! (My husband also thanks you!) If you shop at Topflight Stamps, use my coupon code LISAHOEL for 12% off your order.