Showing posts with label sewing. Show all posts

Monday, April 20, 2026

"Let's Get Sewing" with Eileen Hull Sizzix Dies

The theme for this month is “Let's Get Sewing” and I am totally on board for that! I love incorporating sewing and embroidering in my Eileen projects. For this month, I made two decorative pillows that Eileen will be able to use in her new vintage trailer.


Lisa Hoel for Eileen Hull - Let's Get Sewing  decorative pillows#creativejuicefreshsqueezed #EileenHull  #eileenhulldesigns  #sizzix #mymakingstory #TeamEileen #mysizzixstory

These are covers made for 12 and 8 inch pillow forms. For the larger pillow, I made a pieced quilt block strip to applique onto the base fabric.

Lisa Hoel for Eileen Hull - Let's Get Sewing  decorative pillows#creativejuicefreshsqueezed #EileenHull  #eileenhulldesigns  #sizzix #mymakingstory #TeamEileen #mysizzixstory


On the 8 inch pillow, I was inspired by Madeline Arendt to make a woven heart applique using two cuts from the Tunnel Arches Die Set. I first ironed light interfacing on to the fabric pieces to give them more support and to keep the edges from fraying. Then I cut the arches shapes with the die set. After marking the lines with an erasable fabric pen, I cut the "weave" strips carefully with scissors and then interwove them together before sewing it onto my pillow cover base.


Lisa Hoel for Eileen Hull - Let's Get Sewing  decorative pillows#creativejuicefreshsqueezed #EileenHull  #eileenhulldesigns  #sizzix #mymakingstory #TeamEileen #mysizzixstory

The tongues on the side were cut from felt using the Tunnel Arches Die Set. I used several of Eileen's retired flower dies to cut shapes from felt with I embroidered and stitched onto the pillow cover.

Lisa Hoel for Eileen Hull - Let's Get Sewing  decorative pillows#creativejuicefreshsqueezed #EileenHull  #eileenhulldesigns  #sizzix #mymakingstory #TeamEileen #mysizzixstory


Thanks for stopping by! Be sure to 
check out what my fellow designers have making for the month.

Supplies Used:

Eileen Hull Tunnel Arches Die Set
Eileen Hull Stitchy Flowers Die Set
Eileen Hull Flower, Layers w/ Heart Petals Die
Eileen Hull Flower, Heart & Soul Die
Eileen Hull Flower, Romance Die
Eileen Hull Spring Leaves Die

Get connected with Eileen:

Find it on the Sizzix Website - the Eileen Hull Hub! Besides inspiration, you will also find die assembly videos and exclusive content. Check it out today and watch it grow!

Are you a member of the Eileen Hull Fan Club? Join the 8700 other members to share ideas, inspiration, sources, challenges and make some fabulous friends. Above all, make sure to answer the questions so we know you are legit! Watch her Lives at Eileen Hull Designs Facebook or her YouTube on Tuesdays at 6:00 Eastern for project ideas, techniques, inspiration and creative community. Additionally, you can also find Eileen on FacebookInstagram and Pinterest.

Thursday, August 29, 2024

Creative Expressions with Topflight Stamps – ATCs

Hello, this week at Topflight Stamps our brand focus is Creative Expressions. I also shared a card yesterday which you can see here! I used the Sewing stamp set again to create a pair of ATCs.

Lisa Hoel for Topflight Stamps #creativejuicefreshsqueezed #topflightstamps

The backgrounds are created using Lavinia and PaperArtsy Infusions ink powders. (Fun stuff!) The sewing theme is completed with the addition of more vintage buttons. (Told you I have a hoard of them!)

Thanks for stopping by and be sure to check out the Topflight Stamps store for a wide selection of different and hard to find stamps, stencils and other paper crafting supplies from all around the world! Also keep an eye on the Topflight Stamps blog. There is new inspiration posted daily!


Topflight Stamps Supplies Used:

Creative Expressions stamp set - Sewing
Lavinia Ink Pad - Blue Atoll
Versafine Pigment Ink Pad - Onyx Black
Lavinia Dinkles Ink Powder - Sea Blue
PaperArtsy Infusions Ink Powder - Terracotta


Wednesday, August 28, 2024

Creative Expressions with Topflight Stamps – Sewing Themed Card

Hello, this week at Topflight Stamps our brand focus is Creative Expressions. They have loads of cool stamp designs! I used the Sewing stamp set to create this card:

Lisa Hoel for Topflight Stamps #creativejuicefreshsqueezed #topflightstamps

The "lace" under the focal image is stamped onto a colored coffee filter and fussy cut out. Of course I had to add some real vintage buttons to embellish it.

Thanks for stopping by and be sure to check out the Topflight Stamps store for a wide selection of different and hard to find stamps, stencils and other paper crafting supplies from all around the world! Also keep an eye on the Topflight Stamps blog. There is new inspiration posted daily!


Topflight Stamps Supplies Used:

Creative Expressions stamp set - Sewing
Versafine Pigment Ink Pad - Onyx Black


Tuesday, February 20, 2024

Embroidered Needle Book with Eileen Hull Dies

Hello Eileen Hull fans! At the beginning of the January, Eileen released some Classic Sizzix die designs that were brought back due to popular demand. (If you missed the Release Party, you can watch the replay here.) The Inspiration Team had a lot of fun revisiting these old favorites and we've been sharing tutorials for our projects. Here is a closer look at one of mine featuring the Scoreboards Needle Book Die.

Lisa Hoel for Eileen Hull - Cantilever Sewing Box Die, January 2024 Sizzix Release, Needle Book Diea  #creativejuicefreshsqueezed #EileenHull  #eileenhulldesigns  #sizzix #mymakingstory #TeamEileen #mysizzixstory

I cut the cover out of thick felt and added embroidered accents. I also used some of my mixed media "stamps" stash I made back in June. Perfect!

Back:

Lisa Hoel for Eileen Hull - Cantilever Sewing Box Die, January 2024 Sizzix Release, Needle Book Diea  #creativejuicefreshsqueezed #EileenHull  #eileenhulldesigns  #sizzix #mymakingstory #TeamEileen #mysizzixstory

Inside I stitched some pages cut from more felt to hold pins and needles.

Lisa Hoel for Eileen Hull - Cantilever Sewing Box Die, January 2024 Sizzix Release, Needle Book Diea  #creativejuicefreshsqueezed #EileenHull  #eileenhulldesigns  #sizzix #mymakingstory #TeamEileen #mysizzixstory

Lisa Hoel for Eileen Hull - Cantilever Sewing Box Die, January 2024 Sizzix Release, Needle Book Diea  #creativejuicefreshsqueezed #EileenHull  #eileenhulldesigns  #sizzix #mymakingstory #TeamEileen #mysizzixstory

Thanks for stopping by and be sure to keep an eye on Eileen's blog for more inspiration from the Educator and Inspiration Teams.

Supplies used:

Eileen Hull Die - Needle Book  ( SizzixFJ )
Eileen Hull Die Set - Snail Mail ( SizzixSBFJ )
Eileen Hull Die Set - Envelope, Folder & Flowers ( SizzixSBFJ )

felt
embroidery floss
Tim Holtz Mini Stapler

Some links in this post are affiliate links which do not affect the price you pay but allow me to earn a small percentage of a sale. Thanks! (My husband also thanks you!)


Sunday, May 5, 2019

Sewing Box Notebooks with Eileen Hull

Hello! This tutorial has been a long time in the works and I've finally gotten it done! When Eileen's new dies were released and we shared the projects we had made for Creativation, many were very curious about how I put a zipper onto one of the notebooks from the sewing kit. So read on to find out!


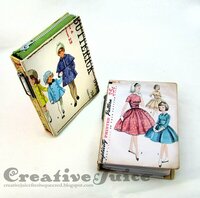
I used vintage patterns for the covers of the books.


The zippered book holds a needle book and other notions.


The Notebook Die makes books that fit perfectly into the Treasure Box! Check out this post from last month to see how to put the box together. Here is the whole kit and caboodle together with my mom's little Singer sewing machine from when she was a girl. (A gift from her grandmother who was a dressmaker.)


Now for THE TUTORIAL!  Putting the zipper in is challenging in parts and requires patience. Just a heads up. ;-)

Step 1 – I prepared the covers first of course. On the outsides I used vintage pattern packet graphics. One had a horizontal format and fit perfectly right off the bat. For the other I scanned additional patterns and sized them to fit on the cover. On the cover insides, I collaged torn pieces of the sewing pattern tissues (not the vintages ones ;-) ).


Step 2 – I used a die pick and the Tim Holtz ruler that has holes along the edge to punch stitching holes through the edges of the cover. (An old foam mouse pad makes a handy punching surface.)


Step 3 – I glued sections of an old measuring tape to the spines of both notebooks and punched holes for the binding.


Step 4 –  Did you know you can use your dies to make foam stamps? Buy adhesive backed fun foam (or make your own), die cut your shape, and apply it to a piece of scrap plastic packaging. Here I used Eileen's retired Doily Bigz die to make one and stamped the insides of the notebooks with acrylic paint.


Step 5 – The stitching begins! I held the zipper in place as I stitched along the edge with heavy duty thread (buttonhole thread). Having a piece of rubber balloon or a fat rubber band handy is helpful in gripping the needle and pulling it through if it is being a bit stubborn.


Step 6 – Getting around the corner is a bit tricky but I just eased the zipper tape in.


Step 7 – The zipper I had was too long so I had to shorten it. I stitched multiple times with the thread before the point where I wanted to cut it and also added a dab of glossy accents to hold the thread in place. NOTE: by ending the zipper right where the cover meets the spine, how far you can open the book is a bit hampered. (As in, you can't open it very wide.) In hindsight, I think I should have stitched it off another 1/2 - 3/4 inch or so beyond this point and tucked the extra zipper length into the book to lay alongside the spine.


Step 8 – See the trimmed zipper (and see note above in Step 7). I wanted to make sure the stitching was very secure so I stitched back to the beginning to make it stronger.


Step 9 – First half of the zipper is done! This part isn't too hard. It gets trickier sewing the second half because I couldn't open the book up very far. (See Step 7.)


Step 10 – I had to stitch loosely so I had room to maneuver the needle in and out. Once I got a few inches out I tightened the thread. I stitched all the way around and back again to double up the stitches. At the very end I had to use a pair of needle nose pliers to get the needle in and out.


Step 11 – I made a little needle book to fit inside of the notebook. I used the Passport Journal Die to cut the pages. (They fit perfectly in the Notebook die!) One page of felt and a cardstock cover.


Step 12 – I decorated the inside of the cover with stamping and a cut from Eileen's Credit Card Sleeve Die to hold a tag of buttons and needle threader.


Thanks for stopping by! Check out Eileen's blog and if you are not already a member, join the Facebook Eileen Hull Fan Club group. It is a warm, supportive group with lots of inspiration and sharing going on. You'll just have to answer a few simple questions when asking to join (to keep out spammers) and then you'll be added. ;-)

Dies:
Eileen Hull Sizzix
Notebook ( Sizzix / SB )
Treasure Box ( Sizzix / SB )
Journaling Cards - Flowers & Leaves ( Sizzix / SB )
Credit Card Sleeve & Tags Sizzix / SB )
Passport Book Sizzix / SB )
Doily - retired

Other:
Sizzix mat board
Tim Holtz ruler
Piercing tool
adhesive backed fun foam
elastic
vintage zipper - I shortened a 15 in one
Kunin felt
button hole thread

Sizzix and Scrapbook.com links in this post are affiliate links which do not affect the price you pay but allow me to earn a small percentage of a sale. Thanks! (My husband also thanks you!)

Tuesday, March 26, 2019

Sewing Box with Eileen Hull's New Dies

If you are looking for the Topflight Stamps Birthday Blog Hop go HERE.

**********************************************************
The fun continues with Eileen Hull's newest Sizzix dies!


You may have seen my sneak peeks of the sewing box I made with the Treasure Box Die for Creativation. Following are how-to tips for this project. (I'll share the tutorial for the Notebooks inside in April.)


I used Eileen's Flowers & Leaves Die Set to cut blossoms to embellish the top:


The flowers were cut from felt, cardstock and sewing pattern tissue collaged onto cardstock.

I made some matching books to go inside using her new Notebook Die:

Tutorial for the notebooks coming in mid April!


The boxes are easy to put together. You cut out the die pieces twice to get all the parts you need. I decided to make life interesting and hand sew some lace around the top edge of the box base. I used my Tim Holtz ruler with the guide holes in the edge and my sharp needle tool to punch holes through the matboard. (Do it before gluing the box together!)


Next, I went ahead and assembled the box. A strong liquid glue or super score tape works well. You can use a hot glue gun too if you work fast. Sometimes it's hard to get parts lined up right before the glue cools. Once the base was all put together I stitched on the lace trim.


To make the closure for the box, I punched two holes in the front part of the lid edge and installed eyelets. Hot tip, do this before you assemble the lid. It is much easier to do on a flat piece of board! I threaded a piece of elastic through it and made a loop that goes around a button I fastened to the base.


Thanks for stopping by! Check out Eileen's Spring Things blog posts and if you are not already a member, join the Facebook Eileen Hull Fan Club group. It is a warm, supportive group with lots of inspiration and sharing going on. You'll just have to answer a few simple questions when asking to join (to keep out spammers) and then you'll be added. ;-)

Dies:
Eileen Hull Sizzix
Treasure Box ( Sizzix / SB )
Journaling Cards - Flowers & Leaves ( Sizzix / SB )

Other:
Sizzix mat board
lace
elastic
eyelets
Kunin felt

Sizzix and Scrapbook.com links in this post are affiliate links which do not affect the price you pay but allow me to earn a small percentage of a sale. Thanks! (My husband also thanks you!)

Sunday, September 9, 2018

Frilly & Funkie Haberdashery Challenge

Hello there! I hope you had a good weekend. I've been super crafty myself. ;-) I saw that the latest Frilly & Funkie challenge is Haberdashery and I have a big soft spot for (and stash of) vintages sewing goodies and notions. I couldn't resist pulling them all out and coming up with a project.

I have a few of the old Tim Holtz burlap panels in my closet so out one came. I also raided my quilting scraps. Here is the result:


There isn't too much of a tutorial since it is mainly arranging do-hickies and parts in a pleasing manner. But here are a few tips.

I covered the printed section of the burlap panel with gesso first; it took a few coats to cover it all up. Then I used Collage Medium and pieces of sewing pattern tissue to collage over it.

I used the Vintage Collage Medium over the top to "vintage" it up.
The quilt blocks were extras I had left over from a quilt I made a few years back. I had some scraps of batting so I made a "mini quilt" so it would have some body to it. I also sewed a vintage zipper on the side.

After finishing these foundation pieces I just played around with my goodies to see what looked right.


Things get a little messy at this stage! It's one of those craft explosions that can happen all over your desk ha ha.


Here things were a little more solidified as far as what I was using. I started gluing the pieces down.

Another detail:


The bottom layer of the flower is cut from some old cross stitch cardstock that I had.

Thanks for stopping by and be sure to check out the challenge at Frilly & Funkie. You still have a few days left to join in too. =)

Dies:
Flower, Heart & Soul (Sizzix )
Leaves, Spring (Sizzix / SB)
Bigz L Die, Tag - retired

Other:
Tim Holtz Stamp Set - Inventor 3
Tim Holtz Stamp Set - Haberdashery
Ranger Archival Ink - Potting Soil, Pale Ochre
Distress Inks - Ground Espresso, Pine Needles, Vintage Photo
Distress Oxide Inks - Wild Honey, Tea Dye, Antique linen, Old Paper
Distress Spray Stain - Tea Dye, Fossilized Amber
Idea-ology Quote Chips
Ranger Distress Collage Medium - Matte, Vintage
gesso

Sizzix and Scrapbook.com links in this post are affiliate links which do not affect the price you pay but allow me to earn a small percentage of a sale. Thanks! (My husband also thanks you!)

Saturday, May 6, 2017

Sewing Themed Pincushion

Hello! Today I have a fun (and useful!) project to share with you using Eileen Hull's always popular Cookie Box Die and a bunch of Tim Holtz goodies. I made another pincushion:

It is my opinion that you cannot have too many cute pincushions.
Plus, I made it for my Mom.

It's easy to make! Take a look:


I cut out my cookie box pieces from mat board (you don't need a top) and inked them with the new Distress Oxide Inks (love them!) The On the Edge Sewing die parts I cut out of my hoarded Grunge Paper. In retrospect, I could have also used Paper Leather because both have the sturdiness and flexibility to wrap around the box and take the media I painted them with.

I also stamped on the sides of the box.

Sides are ready to get wrapped and glued!

The "cushion" part is just a circle of fabric with a running stitch around the perimeter. I pulled the stitch tight while filling it with batting. Then I stitched the hole closed so it wouldn't come undone.


To weight the pincushion down, I filled the box with rice. I also made the top more "cushion-like" with a button in the center and heavy thread to divide it into sections.


All that was left to finish it was to use my hot glue gun to glue on the top. I made sure I applied glue all around the edge so no rice could escape. =)

Thanks for stopping by! I am entering this project in the Frilly and Funkie Challenge Blog's current 'Put Your Inking Cap On' challenge. No patterned paper used here! ;-)


Dies Used:
Sizzix: 
Eileen Hull, Cookie Boxl (Sizzix )
Sewing Edge - retired 

Stamps Used:
Tim Holtz (S.A) - Haberdashery
Prima - Seamstress Vintage, 9607801

Other:
Distress Oxide Ink - Vintage Photo, Walnut Stain, Iced Spruce, Cracked Pistachio
Ranger Archival Ink - Potting Soil
Tim Hotz fabric
Sizzles mat board

Sizzix & Simon Says Stamp links in this post are affiliate links which do not affect the price you pay but allow me to earn a small percentage of a sale. Thanks! (My husband also thanks you!)

Thursday, July 24, 2014

Artist Trading Block - Sewing Tower

I have been having so much fun lately making ATBs! I had another idea for "tower style" ATB using a sewing theme. I love vintage sewing notions and themed supplies. I'm always on the lookout for them when we go to garage and estate sales. This is a special project that I have made for a friend to commemorate her late mother's love of sewing. I hope it will spark many fond memories for her!


I used the main ATB block die and the die that cuts a set of three smaller blocks. (I did not use the smallest block in this tower.) Here's a peek into the little shadowbox on the bottom, largest block (construction details later):


And here is a closer look of the four sides:


This is a pretty straightforward build but I did get a little tricky with the bottom block. After cutting out the panels using matboard, I glued on pieces of actual pattern paper tissue using Multi Medium. 


When that was dry and trimmed, I also put on a thin layer of Iced Spruce paint. Then it was time to build the little shadow box. I wasn't super precise and neat because I knew it would be hidden. I glued all the items in before gluing it to the ATB panel. It's much easier to arrange it without reaching through the oval frame! 


For the pincushion side I used the middle sized oval from the Movers & Shapers oval set to cut an oval out of scrap matboard. I cut off the tips so it would fit the ATB  panel. A small wad of batting covered with a swatch of fabric did the trick for making a "puff". I wrapped the margin of the fabric (trim to shape) around the back of the matboard and glued it in place. (Clothespins work great to hold it in place while it dries.) 


Once that was all dry, I pressed it behind the second ATB panel so the puff pushed through the smaller oval. More glue and clothespin clamps held everything in place. Then I put the whole box together when it was dry.


I hope I've inspired you to try your own ATB creation! They are quite addictive, I can assure you. ;-) Be sure to check out The Artists On the Block for even more inspiration. The projects there will knock your socks off!

Most of the supplies I used for this project can be found at Inspiration Emporium. Follow the links below and use my code JUICE to save 10% if you go shopping. I will also point out that US shipping is always $5 and international shipping is just $10!