Hello,
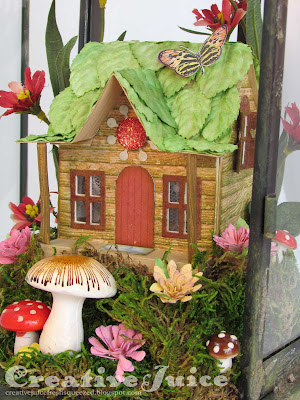
I'm honored to be a guest on the A Vintage Journey blog today and to help celebrate its 3rd birthday! If you came from there, welcome and here's the scoop on how I put this all together. My wee little fairy house is tucked in so nicely in its woodland lantern home.

Top view:
To add the texture to the plain, boring metal lantern, I brushed on Prima's Clear Crackle Texture Paste. When it was dry I used a combination of different green Distress Paints and a wash of watered down DecoArt Media Fluid Acrylic Sap Green to make it look mossy and worn. The wash soaks into all the crackle texture and makes it stand out.
The house is created with Tim Holtz's Village Collection dies. I love these little houses! You start out with the base Village Dwelling and then there all sorts of accessory dies to change it up. I used the Village Surf Shack die for the porch and the Village Gingerbread and Village Bungalow for the window treatments. For the siding, Tim Holtz has an excellent video tutorial on how to make it from the Distress Woodgrain Cardstock. It's at the end of his Halloween Village Manor video but it worked perfectly for this project with more fairy appropriate colors of course (pink, brown, green and Perfect Pearls mist for shimmer).
The roof I made from some white paper Prima leaves I colored with Distress Sprays. There were three different sizes in the package so I just played around with placement and where to trim to make everything fit.
Inside the lantern I made a base of styrofoam and foam core board pieces to build up the "fairy hill".
I used pieces of sheet moss (purchased at the craft store) to fill in the gaps and cover the base. I worked from back to front adding the moss (glue gun made it easy!) and the little flowers, mushrooms and other details.
 |
| Can't get to the back once the house is in! |
Here all the rear elements were in place so I glued the house in. I started working on the sides and then finished with the front. Here are some more final details of the interior (warning, a bunch more photos!):
 |
| The flowers are a combo of silk flowers, Prima paper flowers and handmade ones cut with the Tiny Tattered Florals dies. |
 |
| I added little lace curtains in the windows. |
 |
| The vintage mushrooms are from my stash. |
Wait, there's more! (Lots to see. ;-) )


Whew, that was a long post! Thanks for hanging in there. If you haven't already, be sure to check out the A Vintage Journey March Challenge "All Aboard". There is no theme this time, they just want you to join in and help them celebrate their birthday. =)
I'm also entering this into the Simon Says Stamp Monday Challenge, Handmade Flowers (for the little Tiny Tattered Florals my fairy is growing) and the Simon Says Stamp Wednesday Challenge, Bit O' Green (lots of green here and I'm sure the fairy has leprechaun friends).
The supplies I used
for this project can be found at Sizzix or Simon Says Stamp. Follow the links below and a shopping you may go!


Simply amazing to look at!!
ReplyDeleteCheers
Dr Sonia
Lisa, this is adorable! I could live in your little cottage! I love mini scenes, and this one just tugs at my heart! So many wonderful details to love! Thank you for sharing your process and the wonderful photos! Congratulations on your Pinworthy feature at A Vintage Journey! Hugs!
ReplyDeleteWow! What a scenario! I love this piece of art and the red flowers are absolutely amazing! Thank you for handmaking flowers with Simon Says Stamp Monday Challenge!
ReplyDeleteLOVE! LOVE! LOVE!! This is fabulous!! So very sweet!! Awesome work!
ReplyDeleteThank you very much for joining us this week at the Simon Says Stamp Wednesday Challenge Blog!
hugs...
Melissa