Tuesday, May 29, 2018

May Flowers with Eileen Hull – Embroidered Teacup Pincushions

Hello there everyone! After April showers come May flowers so all month long Eileen Hull's Inspiration Team has been sharing projects made with her flower and other dies on her blog. This week I indulged in my love of wool felt and used Eileen's Heart & Soul Flower and Flower Layers with Heart Petals dies to cut flower layers out of my felt stash. I had previously picked up these two Blue Willow cups at an estate sale and I knew they would be perfect for making into teacup pincushions!


I used white cotton flannel for the base and stretched it into an embroidery hoop before beginning all my embroidery. I made it up as I went along!


When all the stitching was done, I trimmed the flannel into a circle and ran a gathering stitch all around the outer edge. I half gathered the 'pouff' and used stuffing to fill it. Crushed walnut shells would be more practical for a fully functional pincushion but I don't have any right now (Put that on my list!) so stuffing it is!

I used 3 strands of floss for all the stitching.


Once it was stuffed, I pulled the running stitch tight and tied it off. I used hot glue to fasten it into the teacup. I think I'm going to find some decorative cording to run around the edge to finish it off better. Can you believe I didn't have any in my stash? What? ;-)

Thanks for stopping by! Be sure to head on over to Eileen's blog and see what all my team mates have been up to this month. You will be inspired! Have a great week. =)


Other:
embroidery floss
wool felt
white cotton flannel (base)
stuffing

Sizzix & Simon Says Stamp links in this post are affiliate links which do not affect the price you pay but allow me to earn a small percentage of a sale. Thanks! (My husband also thanks you!)

Monday, May 28, 2018

AJVD Sneak Peek!

Hello there! I hope you are having a lovely day so far. I have a card on the A Jillian Vance Design blog today. Here's a little sneaky peek…


Head on over to see the whole thing. ;-) Thanks for stopping by and have a great week!

Monday, May 21, 2018

Topflight Stamps – Mermaid Passport Book

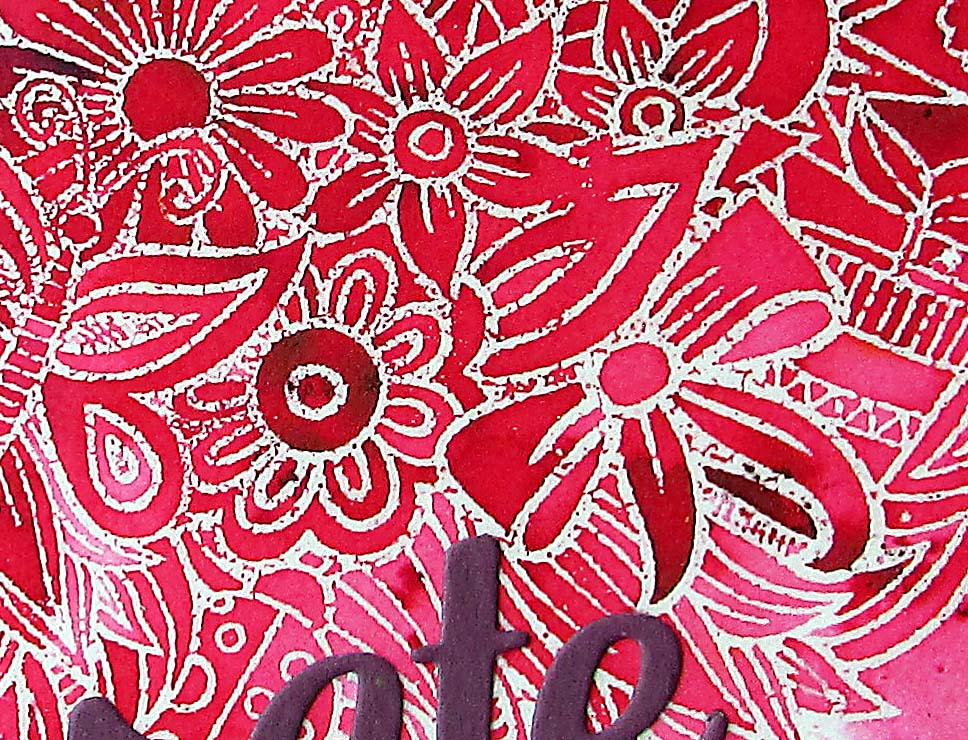
Hello there! I have a little Passport Book project to share with you today that I decorated with the Carabelle stamp set Zinouk of the Ocean. This whimsical set can be found at Topflight Stamps – your go to online store for unique art stamps and products sourced from companies worldwide.


When stamping the covers, I first created a base layer of Distress Oxide Inks and then tried a different stamping technique on top of it. Stacy at Tattered Nest Designs recently shared some Oxide techniques she saw Tim Holtz demo at a stamp show and I wanted to try the 'Smudging' technique on this cover. Basically, you stamp with Oxide ink and then immediately use a clean blending sponge to smudge the stamped image. It gives you a really soft look and I love how it turned out on my book covers. Perfect for 'underwater'. See Stacy's post for more info.

On to the main tutorial now…

Step 1 – I used Paper Artsy Infusions Dye to create some background sheets that I could cut up for the interior. I also used them to color the spine piece of the book.


Infusions Dye is a super concentrated dye in a granular form. It basically explodes with color when it comes into contact with water. I spritzed water onto mixed media paper and then sprinkled a little bit of powder onto it. A little goes a long way! I also sprayed a bit of Broken China Distress Spray Stain onto the pages to add a bit more blue.  The paper on the far right also has salt sprinkled on it. There is a technique in watercoloring where you sprinkle salt onto your wet wash and the crystals cause some very interesting effects as it dries. I wanted to see how they would react with the Infusion Dye. It turned out cool and added a speckled texture.

Not all the salt crystals brushed off when it was dry. Some
stuck tight but it added an interesting sparkle to the paper.
Step 2 – Decorating the spine. I wanted the outer edges to remain free of texture because that was where the front and back covers were going to be attached. I masked them off using washi tape. I then spritzed the spine with Resist Spray. (NOTE: When using Resist Spray you must spray it in a box or well protected area. The Spray sticks to everything. You will have trouble getting it off surfaces, even your non-stick craft mat.)


While the Spray was still wet, I sprinkled it with Deep Sea Baked Texture embossing powder, then heat set it.

Step 3 – I had heard that the Dollar Tree store was carrying mini composition books that fit perfectly into the Passport Book. I found some and they do! You can get a three pack of them for $1.00. Sold! I used my paper from Step 1 to cover the little books.


I made a little cardstock template to use as a pattern.
Step 4 – Assemble the cover. Easy peasy! I just glued the covers onto the edges of the spine piece right at the score folds.


Step 5 – String the cover and add the inserts. I used elastic cord. (NOTE: The Passport Die also includes a part where you can cut out pages to fit in your book. It cuts holes in the pages that correspond to the holes in the spine. See this past tutorial of mine to see how binding your book with this method works.)

Because I used the mini composition books as inserts, I couldn't use the center holes like normal because the inserts were too tall. I fiddled around with my elastic cord until I figured out a way to fasten it and have the cord run the whole height of the spine on the inside of the book.

I did trim those tails! ;-)
By using elastic cord, all you have to do to put in the inserts is to slide them under the elastic.


Whew! Did you make it through all of that? ;-) Thanks for stopping by! Check out Topflight Stamps and all the cool stuff they carry. My wish list is pretty long ha ha. They also regularly share fabulous projects done by the design team on their blog so don't miss out on that inspiration.

I am also adding this to the May challenge over at Mini Album Makers. Check out the good stuff to see there!


Dies:
Eileen Hull Sizzix - Passport Book Die 

Stamps:
from Topflight Stamps:
Carabelle - Zinouk of the Ocean

Rubber Dance - Vintage Script

Other:
mat board
Baked Texture embossing powder - Deep Sea
Visible Image Stencil - Fibres
PaperArtsy Infusions Dye - A Bit Jaded, Terracotta
Ranger Distress Resist Spray

Ranger Distress Spray Stains - Broken China
Ranger Distress Oxide Ink - Aged Mahogany, Broken China, Forest Moss, Bundled Sage, Antique Linen, Fossilized Amber
Ranger Distress Ink - Stormy Sky, Vintage Photo, Tea Dye
Ranger Archival Ink - Jet Black
elastic cord
charms/beads
AJVD black pear pins
ribbon


Sizzix & Simon Says Stamp links in this post are affiliate links which do not affect the price you pay but allow me to earn a small percentage of a sale. Thanks! (My husband also thanks you!)

Monday, May 14, 2018

Mid-Month May Inspiration for Mixed Media Monthly

Hello there everyone! Our "Rust" challenge for Mixed Media Monthly is ongoing and we want to see your rusty projects! The sponsor for May, Emerald Creek, is giving away a gift pack of their unique embossing powders to a lucky winner. Don't miss out…

For my project I created a card with a faux rusty background and die cut flowers embossed with several varieties of Emerald Creek embossing powders.


The background is embossed multi-media paper stock that I smeared with Distress Paint (Ripe Persimmon, Gathered Twigs, Aged Mahogany, and Vintage Photo) and then misted with water so it would marble together and mimic the look of rust.

The flowers I cut out of plain cardstock and then embossed with the various powders. It was easy to use the Emboss It Dabber to apply ink to the cut flowers and then sprinkle with powder.

Also, over at Eileen Hull's blog, the theme this month is 'May Flowers'! All of the flowers are cut using some of Eileen's flower dies. They are so versatile! Head on over to check out the flowery inspiration the team is sharing all month long.

Thanks for stopping by! Have a great week. =)

Dies:
Eileen Hull Sizzix -
AJVD: Stitched Sentiment Trio

Emerald Creek Supplies:
Verdigris Sparkle Embossing Powder
Onyx Frost Embossing Powder
Dirty Sand Baked Texture Embossing Powder
Chic Camo Embossing Powder
Heart Brad

Other:
Distress Paint – Ripe Persimmon, Gathered Twigs, Aged Mahogany, Vintage Photo
Ranger Emboss It Dabber
Moroccan Fresco Embossing Folder - retired

Sizzix & Simon Says Stamp links in this post are affiliate links which do not affect the price you pay but allow me to earn a small percentage of a sale. Thanks! (My husband also thanks you!)

Sneak Peek!

Howdy all! I have a little slice for you to see of a card I made for A Jillian Vance Design. You can see the whole thing on the AJVD blog here. Need a quick and easy card? ;-)


Thanks for stopping by and I hope you have a great week!

Monday, May 7, 2018

Frilly & Funkie Challenge

Hello there and happy Monday! ;-) I created this journal project for the current Frilly & Funkie Challenge, A Neutral Point of View. It was fun to work only with neutral colors, in this case mostly browns and tans.


I used Eileen Hull's popular Sizzix Journal Die to cut the covers for my traveler's style notebook. I didn't make my own insert this time but used these which can be found on amazon.

For the base color, I spritzed Antique Linen and Tarnished Brass Distress Stain onto my craft sheet and  smooshed the journal covers around in it. It has a nice shimmer that you can't really see in the photo. I used my oval die to make an oval shaped stencil to paint the tan oval in the middle of the cover. When it was dry, I used different acrylic paint colors and the Cutout Floral foam stamps to stamp around the edges.

Some stamping, Paper Dolls and Snarky Stickers completed the look! This would make a great gift.

Thanks for stopping by! There is always something going on behind the scenes here so stay tuned for more projects soon.

I am also entering this in the May Mini Album Makers Challenge. Be sure to check them out too!


Dies:
Eileen Hull Sizzix - Journal Die (Sizzix / SSS )
Stitched Oval (Sizzix / SSS)
Tim Holtz Strip Die - Butterfly Frenzy retired

Stamps:
Tim Holtz Cling Foam - Cutout Floral
Tim Holtz - Ornate Trims

Other:
mat board
Ranger Distress Spray Stains - Antique Linen, Tarnished Brass
Ranger Distress Paint - Antique Linen, Brushed Corduroy, Picket Fence
misc. brown/ tan acrylic paints
Ranger Archival Ink - Tree Branch, Coffee
Ranger Distress Crayon - Vintage Photo
elastic
ready made Midori size insert
Tim Holtz Idea-ology - Paper Dolls, Small Talk Snarky Stickers


Sizzix & Simon Says Stamp links in this post are affiliate links which do not affect the price you pay but allow me to earn a small percentage of a sale. Thanks! (My husband also thanks you!)
SaveSave

Tuesday, May 1, 2018

May Challenge at Mixed Media Monthly!

Good morning and happy May! April showers bring… rust? Ha ha, it just might. ;-) We want to see projects using rusty colors, faux rust techniques, rust mediums – any or all of the above. You can see all the details and projects from the design team on the Mixed Media Monthly challenge post.

Image may contain: text

Our sponsor this month is Emerald Creek, creator of unique embossing powders and other cool crafty supplies. They very kindly sent some of their embossing powders, including the Baked Texture powder Chunky Rust, to the design team so we could give them a try on our projects.


I created a junk journal with Eileen Hull's Journal Die to hold my collection of art mail I've received from all my ATC trading.


Check out that rust on the metal tag! ;-)

The focal image is a stamp from a Lynne Perrella set from Paper Artsy. I stamped it on Mixed Media Heavystock, watercolored it, and then embossed layers of Vintage Beeswax powder over the top. It's mounted on a cardstock tag that I covered with metal foil tape and distressed with paint and Chunky Rust embossing powder.

back of journal

I covered mat board with adhesive backed cloth paper and then cut the covers out of it with the Journal Die. After that I used a brayer to apply a bit of Fresco paint to the covers and also used the paint to stencil. When the paint was dry I used various Distress Spray Stains to spritz all over the front and then stamped with archival ink.

Check out that Chunky Rust covered plane!


Let's take a peek at the inside:

My "flyleaf envelope" has Viva Rusty Paper paint on it with a stenciled
design over it embossed with Ancient Amber powder. 

I love all the bright envelopes. Happy mail indeed!


Here's a bit more "how to"…

Inside covers with elastic binding.

I knew my art envelopes were going to be bulky (and I have a large stack of them!) so I made this journal extra thick. Normally you overlap part of the spine and glue it so you can have either two or three signatures fastened into the cover. I butted the spine edges together and glued an extra piece of mat board I had cut over the inside of the spine to hold it all together. I then used my Crop-o-dile tool to punch through the extra mat board piece so I could string my elastic binding to hold four signatures.


I made four "stubby" signatures of six sheets of light cardstock each. They slide easily under the elastic binding.


I used a "stubby" page as a tab to slide into each envelope (a little glue kept the envelope in place). I just used pointy scissors to trim down each page to fit into the envelope if it was a smaller one. I actually ended up not using one of my signatures in the middle because the whole journal was getting so fat! I was still able to incorporate many of my art envies though.

Thanks for stopping by and making it through my loooong post! Be sure to head on over to the MMM Challenge post and check out what the design team has been up to! Join in the challenge and you'll be in the running to win our sponsor prize!

I am also adding this to the May challenge over at Mini Album Makers. Check out what their design team made for it! Awesome stuff as always. =)


Emerald Creek embossing powders:
Baked Texture - Chunky Rust
Baked Texture - Vintage Beeswax
Baked Texture - Deep Sea
Baked Texture - Ancient Amber


Dies:
Eileen Hull Sizzix - Journal Die (Sizzix / SSS )
Tim Holtz Mover & Shaper Mini Airplane & Cloud - retired

Stamps:
from Topflight Stamps:
Paper Artsy, Lynne Perrella LPC034
Visible Image - Scripted Streets
Crafty Individual - CI-185
Rubber Dance - Vintage Script

Tim Holtz - Postcards, Documented

Other:
mat board
Tim Holtz Paper Stash - Correspondence
Ranger Mixed Media Heavystock
Ranger Wood Grain Cardstock
adhesive backed fabric paper
Ranger Emboss It Dabber
Ranger Distress Grit Paste
Ranger Distress Collage Medium Crazing
Tim Holtz Layering Stencils - Numbered, Crossed, Rays, Industrial, Rosette
Viva Rusty Paper paint
Ranger Distress Spray Stains - Tea Dye, Fossilized Amber, Pumice Stone, Barn Door
Ranger Distress Paint - Walnut Stain, Black Soot, Ripe Persimmon
Paper Artsy Fresco Chalk Paint - Pumpkin Soup
Ranger Archival Ink - Jet Black, Coffee
elastic
Tim Holtz Idea-ology - Mini Fasteners, Stencil Mark, Swivel Clasp, Philosophy Tags, Jump Rings, Tag Labels, Typed Tokens
Tim Holtz Remnant Rubs - Special Delivery

Sizzix & Simon Says Stamp links in this post are affiliate links which do not affect the price you pay but allow me to earn a small percentage of a sale. Thanks! (My husband also thanks you!)

SaveSaveSaveSave