Monday, October 31, 2022

The Haunted Mansion Lantern – Tim Holtz Village Die Set

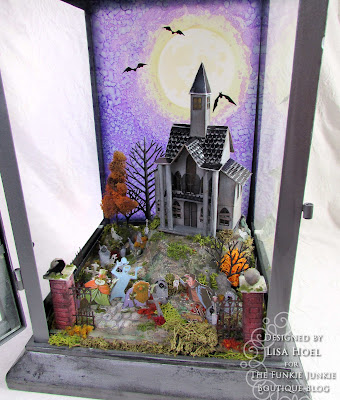
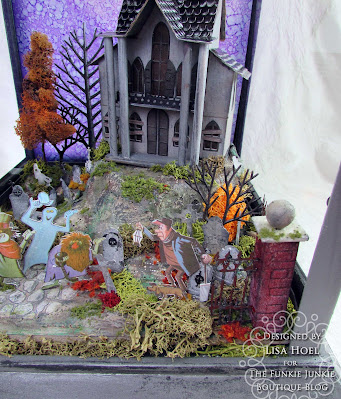
Happy Halloween! I have one last make for the season to share with you and it's a pretty big one. It's been awhile since I created village scene in a lantern so I made this one as a birthday gift for some friends of ours.

Lisa Hoel for The Funkie Junkie Blog - Halloween Journal #creativejuicefreshsqueezed #tim_holtz #sizzix #mysizzixstory #mymakingstory #thefunkiejunkie #thefunkiejunkieboutique #frillyandfunkie

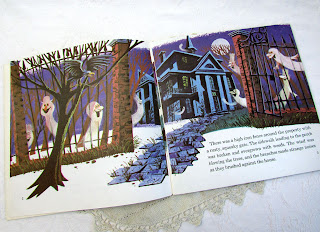
I based the design on the Disney Haunted Mansion book/ride. (Our friends are classic Disney fans.)


The house itself is loosely based on the illustration in the book:

Lisa Hoel for The Funkie Junkie Blog - Halloween Journal #creativejuicefreshsqueezed #tim_holtz #sizzix #mysizzixstory #mymakingstory #thefunkiejunkie #thefunkiejunkieboutique #frillyandfunkie

Last fall Tim Holtz released an 87 piece Thinlits die set, Christmas Village, that was based on his wildly popular (and retired) steel rule Village die collection. This new set has much more flexibility with mix and match doors, windows, additions etc. so you can cobble together your own versions of mini houses. Check out Tim's excellent video where he explains his thoughts on this set and all the ins and outs. (More on how I constructed my mansion below.)
https://www.youtube.com/watch?v=GstjNChz7zo&t=963s

The background is alcohol ink on a large sheet of translucent Yupo.

https://www.youtube.com/watch?v=GstjNChz7zo&t=963s

The mansion grounds are filled with gravestones, ghosts and the frightened caretaker.

https://www.youtube.com/watch?v=GstjNChz7zo&t=963s
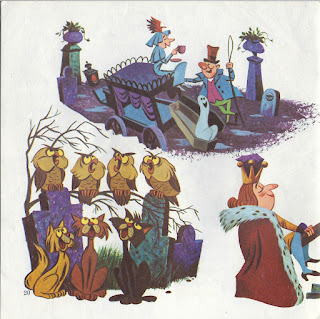
I scanned and printed pages from the book to fussy cut out the figures.

Of course there are also Halloween Tiny Lights as part of the scene.

https://www.youtube.com/watch?v=GstjNChz7zo&t=963s

The vignette on the top of the lantern echoes details from the story (and a delightfully detailed Idea-ology Tombstone).

https://www.thefunkiejunkie.com/ProductDetails.asp?ProductCode=TH94173
Arthur the owl and the Mischievous cats are stars.


Let's take a look at some of the how-to:
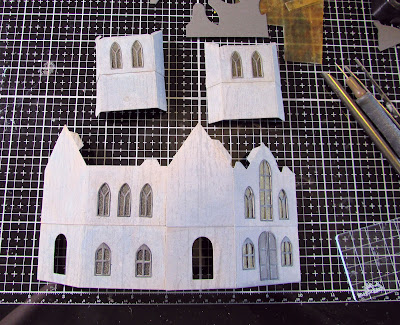
1) First off the bat was making the house. I cut the pieces out of Kraft Heavystock paper and inked them with Distress Oxide Pumice Stone and Hickory Smoke ink. I stacked the sides to make a multi-story structure.


2) The background is a large piece of Yupo paper I alcohol inked as a night sky. (You can get large sheets of Yupo at art stores. Ranger sells smaller sheets of Yupo cardstock packs that are perfect for card making etc. I also used the Moon Masks set to mask the moon while making the background and then adding the moon shadow details on the face of it.


3)  To add the tiny lights, I left a hole in the base of the house and hot glued several loops of lights onto the landscape platform. I then ran the wire with the rest of the lights around the front and tacked it into position with hot glue. I disguised the wire with paint and placed the bulbs behind bushes and gravestones.


4) The gravestones were die cut out of heavy cardstock coated with grit paste and painted. I used the Halloween 2022 Remant Rubs to add details.


5) The structure the top vignette is built on is an Etcetera Trims piece I hot glued onto the lantern.


Thanks for stopping by and Happy Halloween!! Time to pivot to Christmas LOL.

Supplies used:
Tim Holtz die set - Christmas Village
Tim Holtz die set - Mischievous
Tim Holtz die set - Vault Series Halloween 2021 #665563
Tim Holtz die set - Decorative Trims
Tim Holtz die set - Ghost Town #2 #665560
Tim Holtz die set - Arthur, Colorize #664730
Tim Holtz die - Branches #663138
Tim Holtz 3D Embossing Folder - Lumber
Tim Holtz 3D Embossing Folder - Mini Brickwork
Tim Holtz 3D Embossing Folder - Mini Cobblestone
Tim Holtz Layering Mask Set - Moon Masks

Ranger Archival Inks - Hickory Smoke
Distress Oxide Ink - Pumice Stone, Hickory Smoke
Distress Grit Paste - Crypt
Idea-ology Tombstones
Stampers Anonymous Etcetera Trims, Bracket

Sunday, October 30, 2022

Halloween Journal - the Final Tutorial!

Hello and happy Halloween! I've been working on a big Halloween journal project over the course of the past several weeks. It started with the creation of the cover using Eileen Hull's Sizzix Full Size Journal Die. Two subsequent posts centered on all the inside pages - find those posts with tutorials here and here. I really had a lot of fun first going back through all my Halloween family photos from years past and then getting out all my Tim Holtz Halloween dies, stamps and media and going to town!

Lisa Hoel for The Funkie Junkie Blog - Halloween Journal #creativejuicefreshsqueezed #eileenhull #tim_holtz #sizzix #mysizzixstory #mymakingstory #thefunkiejunkie #thefunkiejunkieboutique #frillyandfunkie

Lisa Hoel for The Funkie Junkie Blog - Halloween Journal #creativejuicefreshsqueezed #eileenhull #tim_holtz #sizzix #mysizzixstory #mymakingstory #thefunkiejunkie #thefunkiejunkieboutique #frillyandfunkie

Lisa Hoel for The Funkie Junkie Blog - Halloween Journal #creativejuicefreshsqueezed #eileenhull #tim_holtz #sizzix #mysizzixstory #mymakingstory #thefunkiejunkie #thefunkiejunkieboutique #frillyandfunkie

Here's a video flip-through of the journal (my rookie attempt lol):


A last piece of the construction of the journal is how I made the binding and attached the pages. Let's take a look…

Step 1

Eileen Hull's Bookbinding & Label Die Set is perfect for making ---- bindings for journals. It is sized to fit perfectly in her Folio Journal Die but it can be easily adapted to other cover sizes. The die cuts and scores the spine pieces so you can quickly fold them up. (No laborious measuring and scoring!)


Step 2

Once the paper was folded, I put red-line tape in place to adhere the 'peaks' together. (The peak forms a tab that you then attach your page to.)


Step 3

I used a quick grab wet glue to adhere my tab pieces in place on the spine block. I wanted it to be really strong!


For the final page installation, I first glued each front/back set of pages together but DID NOT put glue on the edges that would fit over each spine tab. When all the page sets were dry, one set at a time, I added glue inside that 'spine edge' and slipped it over a tab. A couple of clothespins and my fingers held it in place for a moment while the glue set.

Thanks for reading and keep an eye on the 
Funkie Junkie Inspiration Ave blog for loads of creative projects and techniques shared. Happy Halloween!


Wednesday, October 26, 2022

Funkie Junkie Focus - New Sizzix Chapter 4 Dies!

Hello Funkie Junkie fans, we have a new product inspiration theme for you – a look at the Sizzix Chapter 4 release.  

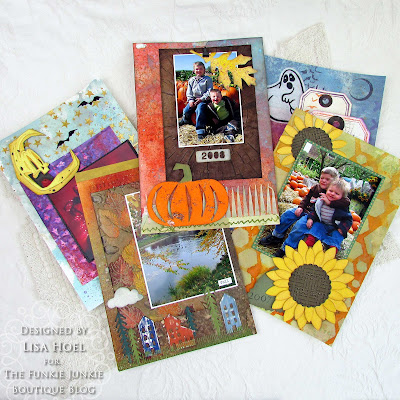
For a past Saturday Showcase, I shared the cover (and how-to) of a Halloween journal project I was working on. I continuing the project with the Inky in October product focus by creating delightfully inky pages to go inside!  (See that post here.) This go round I have the rest of the journal pages that I made for it that feature Chapter 4 dies and embossing folders!

FYI, we will no longer be having bi-weekly challenges on the Funkie Junkie blog but there is still a chance to win a $25 gift certificate at the Funkie Junkie Boutique! Just create a project using the products from each product showcase cycle, share it on social media and tag us at #thefunkiejunkie. You can read all about it here.

Lisa Hoel for The Funkie Junkie Blog - Halloween Journal #creativejuicefreshsqueezed #eileenhull #tim_holtz #sizzix #mysizzixstory #mymakingstory #thefunkiejunkie #thefunkiejunkieboutique #frillyandfunkie

Let's take a look at each page in detail. Get comfy, there is a lot to see!

Page 1

This is one of my favorite photos of my boys. This page features the new Eileen Hull Sunflower Die and a background monoprinted using a Dina Wakley stencil and seasonal Distress Mica Stains.

Lisa Hoel for The Funkie Junkie Blog - Halloween Journal #creativejuicefreshsqueezed #eileenhull #tim_holtz #sizzix #mysizzixstory #mymakingstory #thefunkiejunkie #thefunkiejunkieboutique #frillyandfunkie

Lisa Hoel for The Funkie Junkie Blog - Halloween Journal #creativejuicefreshsqueezed #eileenhull #tim_holtz #sizzix #mysizzixstory #mymakingstory #thefunkiejunkie #thefunkiejunkieboutique #frillyandfunkie
The lower flower flips open to reveal a photo!

The sunflowers are cut out of yellow cardstock that I sprayed with Harvest Moon Mica Stain. The centers are cut out of brown paper that I embossed using the Woven Leather 3-D Embossing Folder (great texture!)


Page 2

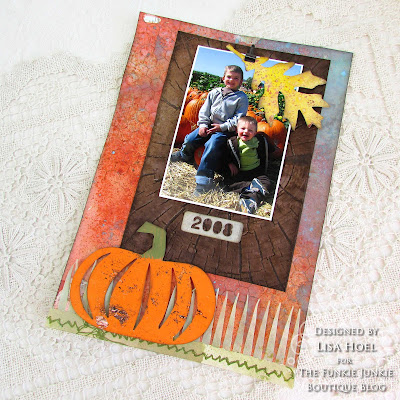
Another photo from the pumpkin patch! The photo is mounted on cardstock embossed with the new Tim Holtz Chapter 4 Tree Rings 3-D Embossing Folder (a new favorite!)

Lisa Hoel for The Funkie Junkie Blog - Halloween Journal #creativejuicefreshsqueezed #eileenhull #tim_holtz #sizzix #mysizzixstory #mymakingstory #thefunkiejunkie #thefunkiejunkieboutique #frillyandfunkie

The detail in this folder is AMAZING! I started out with Mixed Media Heavystock paper colored with Distress Spray Stains. 


I used a favorite (and simple) technique for embossing the background. All you have to do is rub the front half of the folder with Archival ink and then emboss! The ink transfers from the folder to the debossed areas of the paper and really makes the embossing detail pop. 


Page 3

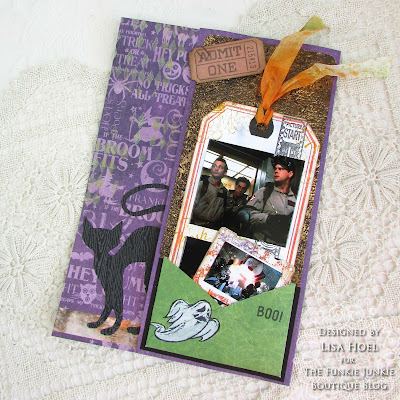
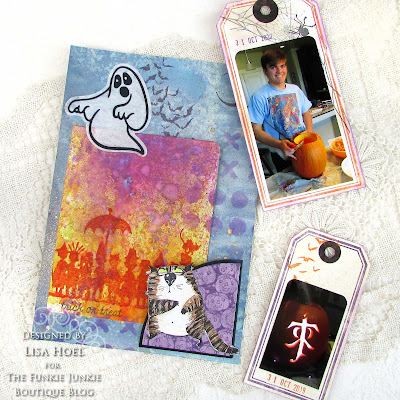
In 2014 we started a new tradition of watching a special 'Halloween movie' instead of going out trick or treating. Our first movie was Ghost Busters! It was a big hit. 

Lisa Hoel for The Funkie Junkie Blog - Halloween Journal #creativejuicefreshsqueezed #eileenhull #tim_holtz #sizzix #mysizzixstory #mymakingstory #thefunkiejunkie #thefunkiejunkieboutique #frillyandfunkie

The new Tim Holtz Chapter 4 Framed Tags Die Set made a great page pull out tag and I tucked it into a holder made using the Postale Thinlits Die Set. You will also spy a slide mount made using the Specimen Set.

Lisa Hoel for The Funkie Junkie Blog - Halloween Journal #creativejuicefreshsqueezed #eileenhull #tim_holtz #sizzix #mysizzixstory #mymakingstory #thefunkiejunkie #thefunkiejunkieboutique #frillyandfunkie

Outer flap has a layer embossed using the Industrious 3-D Embossing Folder. (love it!) Papers used are the Halloween Distress Woodgrain (cat die cut) and background papers are from the Graphic 45 Charmed collection.

Lisa Hoel for The Funkie Junkie Blog - Halloween Journal #creativejuicefreshsqueezed #eileenhull #tim_holtz #sizzix #mysizzixstory #mymakingstory #thefunkiejunkie #thefunkiejunkieboutique #frillyandfunkie

I used the inking techniques shared by Tim Holtz to ink the colored border as I cut the tag.


Page 4

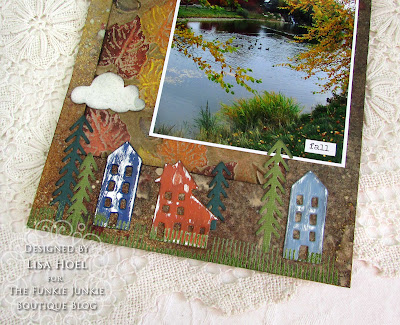
This page shows some fall views from around our new neighborhood in Idaho. There is real fall here! The Chapter 3 Acorns 3-D Embossing Folder pairs wonderfully with the new Tim Holtz Chapter 4 Christmas Cutouts Die Set (see, not just for Christmas!)

Lisa Hoel for The Funkie Junkie Blog - Halloween Journal #creativejuicefreshsqueezed #eileenhull #tim_holtz #sizzix #mysizzixstory #mymakingstory #thefunkiejunkie #thefunkiejunkieboutique #frillyandfunkie

Lisa Hoel for The Funkie Junkie Blog - Halloween Journal #creativejuicefreshsqueezed #eileenhull #tim_holtz #sizzix #mysizzixstory #mymakingstory #thefunkiejunkie #thefunkiejunkieboutique #frillyandfunkie
The houses are cut out of cardstock covered with foil tape,
painted with Distress Paint, and then sanded.

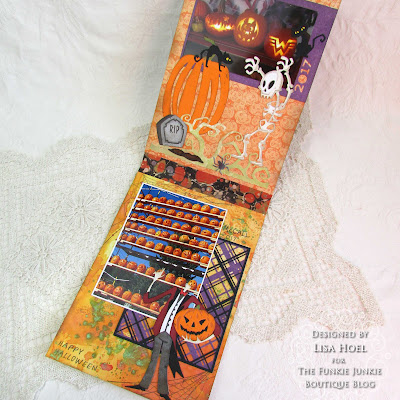
This page flips up to reveal more Halloween fun!

Lisa Hoel for The Funkie Junkie Blog - Halloween Journal #creativejuicefreshsqueezed #eileenhull #tim_holtz #sizzix #mysizzixstory #mymakingstory #thefunkiejunkie #thefunkiejunkieboutique #frillyandfunkie

Lisa Hoel for The Funkie Junkie Blog - Halloween Journal #creativejuicefreshsqueezed #eileenhull #tim_holtz #sizzix #mysizzixstory #mymakingstory #thefunkiejunkie #thefunkiejunkieboutique #frillyandfunkie

Lisa Hoel for The Funkie Junkie Blog - Halloween Journal #creativejuicefreshsqueezed #eileenhull #tim_holtz #sizzix #mysizzixstory #mymakingstory #thefunkiejunkie #thefunkiejunkieboutique #frillyandfunkie

The Tim Holtz Chapter 4 die set Layered Plaid isn't just for Christmas either. You'll see it's great for this Halloween page.

I used regular and Halloween Distress Crayons (from 2021 and 2022) to add color to the embossed leaves and acorns. It blended beautifully and the pearl shimmer is awesome.


Page 5

A single layer of the Layered Plaid makes a nice accent too. Otis is up there in the corner looking fab as well. Don't forget the Mischievous Cats too!

Lisa Hoel for The Funkie Junkie Blog - Halloween Journal #creativejuicefreshsqueezed #eileenhull #tim_holtz #sizzix #mysizzixstory #mymakingstory #thefunkiejunkie #thefunkiejunkieboutique #frillyandfunkie

Page 6

Last page! More Framed Tags and a little ghostie made using Retro Halloween Die Set.

Lisa Hoel for The Funkie Junkie Blog - Halloween Journal #creativejuicefreshsqueezed #eileenhull #tim_holtz #sizzix #mysizzixstory #mymakingstory #thefunkiejunkie #thefunkiejunkieboutique #frillyandfunkie

Lisa Hoel for The Funkie Junkie Blog - Halloween Journal #creativejuicefreshsqueezed #eileenhull #tim_holtz #sizzix #mysizzixstory #mymakingstory #thefunkiejunkie #thefunkiejunkieboutique #frillyandfunkie

Whew! You made it to the end! Thanks for reading and keep an eye on the Funkie Junkie Inspiration Ave blog for loads of eye candy and techniques.


Tuesday, October 25, 2022

Eileen Hull Sizzix Chapter 4 Release - Halloween Geometric Box Tutorial!

Hello Eileen Hull fans! Did you catch the Sizzix Chapter 4 Release Party at the beginning of the month? We also had a blog hop full of inspirational makes from the Teams! The designers have been sharing tutorials for their projects throughout the month and today it's my turn. 

Lisa Hoel for Eileen Hull - Sizzix 2022 Chapter 4 Release! Tutorial time! #creativejuicefreshsqueezed #EileenHull  #eileenhulldesigns  #sizzix #mymakingstory #TeamEileen #mysizzixstory

Lisa Hoel for Eileen Hull - Sizzix 2022 Chapter 4 Release! Tutorial time! #creativejuicefreshsqueezed #EileenHull  #eileenhulldesigns  #sizzix #mymakingstory #TeamEileen #mysizzixstory

First a reminder of this awesome new release from Eileen:


Chapter 4 Tutorial Time…

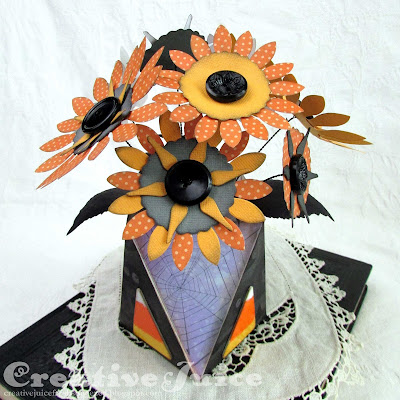
My first project uses the Geometric Box and Sunflower Dies. I went with a Halloween theme (hey, it's October!) Let's see how it came together.

Lisa Hoel for Eileen Hull - Sizzix 2022 Chapter 4 Release! Tutorial time! #creativejuicefreshsqueezed #EileenHull  #eileenhulldesigns  #sizzix #mymakingstory #TeamEileen #mysizzixstory

Lisa Hoel for Eileen Hull - Sizzix 2022 Chapter 4 Release! Tutorial time! #creativejuicefreshsqueezed #EileenHull  #eileenhulldesigns  #sizzix #mymakingstory #TeamEileen #mysizzixstory

Step 1 – I cut all the pieces out of Sizzix mat board. (I ended up not using top triangle pieces.) I really like how the Sizzix brand takes various inks and media - it has a great surface.


Step 2 – I inked and stamped alternating sections of the Geometric Box side pieces. After that, I glued pieces of patterned Halloween paper on the other sections.


Step 3 – I turned the smaller triangles into "candy corn" pieces. Using Eileen's Blends embossing ink (retired), I first dabbed the tops of the pieces with the ink and then embossed with yellow embossing powder. I repeated by inking the middle section and embossing with orange. Lastly I embossed the tip with white powder.


I used Archival Ink to distress the edges of the pieces.


Step 4 – Box assembly is easy! You can use wet or dry adhesive. (I recommend a very strong dry adhesive like red line tape or Eileen's Red Liner Tape.) Glue the sides together and then pop the base piece into place.


Step 5 – Next part, flowers! I used the Sunflower Die and cut parts out of various colors of cardstock and patterned paper. This die isn't just for 'sunflowers'. You can make all sorts of flower types!


Step 6 – Eileen's Twist & Style Tool is a tried and true way to make flower stems. Eileen just demoed this in her Live from last Thursday. You can see that here.


I used vintage black buttons for the flower centers.


Step 7 – I cut a piece of styrofoam to fit inside the box base and glued it in. I covered the surface with a bit of cotton batting to hide the styrofoam. It was easy to poke the flower stems through the batting into the foam.


Project #2

Eileen Hull's new Silverware 3-D Embossing Folder has amazing detail! I used it to create the background for this 'invitation to tea' card.

Lisa Hoel for Eileen Hull - Sizzix 2022 Chapter 4 Release! Tutorial time! #creativejuicefreshsqueezed #EileenHull  #eileenhulldesigns  #sizzix #mymakingstory #TeamEileen #mysizzixstory

Step 1 – I used a favorite (and simple) technique for embossing the background. All you have to do is rub the front half of the folder with Archival ink and then emboss! The ink transfers from the folder to the debossed areas of the paper and really makes the embossing detail pop. I used a piece of silver metallic kraft paper for my substrate.


Take a look at that detail!


Step 2 – For the teacup, I decoupaged a section of a decorative napkin to the mat board before cutting.

  Step 3 – After cutting out the cup, I coated it with a gloss varnish to give it the look of china.


Thanks for stopping by and be sure to keep an eye on Eileen's blog for more inspiration from the Educator and Inspiration Teams!

Some links in this post are affiliate links which do not affect the price you pay but allow me to earn a small percentage of a sale. Thanks! (My husband also thanks you!)