Monday, May 27, 2019

Sending Cheer with Topflight Stamps

Hello and happy Tuesday! Today I have a great all-purpose cheerful card you could use to send to a friend. It can be for a birthday or just because. ;-)


The Magenta Rustic Window stamp is such a great focal image! I stamped, watercolored, and fussy cut it out to apply over a stone wall background (more on that in a minute). I slightly bent the shutters out from the window and didn't adhere them to the background so they would add some dimension.


For the card background, I used a combination of the new Distress Oxide Spray Stains and the original Spray Stains to make the grey 'stone' background and the 'stucco' layer I diecut. Together the layers made a perfect base for the stamped window image.

Thanks for stopping by! Below is a list of supplies I used. Be sure to check out the Topflight Stamps blog for more inspiration. There is always something fun to see there! 

Topflight Stamps Products:
Magenta Stamp - Rustic Window
Darkroom Door - Happy Birthday Sentiment Stamps
IndigoBlu - Floral Fantasy

Other:
Sizzix Tim Holtz die - Mixed Media #4 ( Sizzix / SB )
AJVD die - Stitched Sentiment Trio
Ranger Archival Ink - Jet Black
Distress Oxide Spray Stains - Pumice Stone, Antique Linen
Distress Spray Stains - Black Soot, Hickory Smoke
Ranger Heavystock
watercolor paints

Sizzix and Scrapbook.com links in this post are affiliate links which do not affect the price you pay but allow me to earn a small percentage of a sale. Thanks! (My husband also thanks you!)

Wednesday, May 22, 2019

Eileen Hull Embossing Powders! – Robot Card

Hello! I've been having more fun with Eileen Hull's new Molten Dimensions Embossing Powder and made this cute robot card for my nephew's fifth birthday. I am finding it very handy to use my old Ranger Melting Pot to emboss all the little bitty parts of projects. For a more in-depth look at how I used it, see this post from last week where I used it to emboss all sorts of small flower parts on a Mother's Day card.


Look at that cute little robot! The embossing really adds a lot of dimension:


The robot is cut using the Tim Holtz Robotic Die (which I love!) I used Eileen's new Clearsnap Clear Ink dabber to apply embossing ink to the parts. It is super sticky ink and is perfect for holding even the chunky embossing powders. I also used a bit of Rinea foiled paper for some robot parts to add a different texture and some bling.

TIP: If you need to glue parts that have been embossed, you need to make sure you have the right glue. The embossed surfaces are a bit slick. I have had excellent success with Api's Crafter' Pick The Ultimate! glue. It is a liquid tacky-glue type adhesive but it is super strong. I use it all the time for gluing embellishments, chunky metal things, etc. – it's my favorite!

Thanks for stopping by. =) Check out Eileen's blog and if you are not already a member, join the Facebook Eileen Hull Fan Club group. It is a warm, supportive group with lots of inspiration and sharing going on. You'll just have to answer a few simple questions when asking to join (to keep out spammers) and then you'll be added. ;-)

Dies:
Tim Holtz Sizzix
Robotic ( Sizzix / SB )
Gearhead Sizzix / SB )

Other:
Eileen Hull Embossing Powder by Emerald Creek - Golden Rod
Eileen Hull Embossing Powder by Emerald Creek - Aqua Splash
Eileen Hull Embossing Powder by Emerald Creek - White Wonder
Eileen Hull Embossing Powder by Emerald Creek - Black Magic
Eileen Hull Embossing Powder by Emerald Creek - Polished Silver
Eileen Hull Clearsnap Blends Ink - Clear
Rinea foiled paper - Red Star
Tim Holtz stamp set - Simple Sayings
cardstock
Api's Crafter' Pick The Ultimate! glue

Sizzix and Scrapbook.com links in this post are affiliate links which do not affect the price you pay but allow me to earn a small percentage of a sale. Thanks! (My husband also thanks you!)

Tuesday, May 14, 2019

Mother's Day Card with Eileen Hull

Hello! I hope you had a wonderful weekend. It was warm and sunny here, downright hot! Of course the temperature is going to drop 30 degrees by the end of the week and rain is coming. That's okay though, it will be good for my garden. =) I made this card for my mother
-in-law using Eileen's dies and her NEW Molten Dimensions embossing powders from Emerald Creek. They are pretty fabulous!


They are chunky and you get really good coverage and dimension. I discovered that I can use my Melting Pot to easily make all the embossed die cut elements. (The Ranger Melting Pot was designed by Suze Weinberg and they were sadly discontinued a few years ago. You might have one in your craft stash already or be able to find one used on eBay etc.)


I die cut the flowers and word, inked them with Eileen's clear (super sticky!) Blends Ink, applied the powder and set it into the pre-heated pot to melt. (It doesn't take long!) I had these non-stick inserts with side flaps that were made to fit into the tray which made it really easy to remove the melted die cut. I just lifted the liner out and let it cool off to the side before handling it. You could do the same thing with a folded piece of foil or paper.


Thanks for stopping by! Check out Eileen's blog and if you are not already a member, join the Facebook Eileen Hull Fan Club group. It is a warm, supportive group with lots of inspiration and sharing going on. You'll just have to answer a few simple questions when asking to join (to keep out spammers) and then you'll be added. ;-)

Dies:
Eileen Hull Sizzix
Journaling Cards - Flowers & Leaves ( Sizzix / SB )
Credit Card Sleeve & Tags Sizzix / SB )
Journaling Words Sizzix / SB )

Tim Holtz Heartfelt Die ( Sizzix / SB )

Other:
Eileen Hull Embossing Powder by Emerald Creek - Golden Rod
Eileen Hull Embossing Powder by Emerald Creek - Aqua Splash
Eileen Hull Embossing Powder by Emerald Creek - White Wonder
Eileen Hull Embossing Powder by Emerald Creek - Black Magic
Eileen Hull Clearsnap Blends Ink - Clear, Leaf
cardstock
washi tape

Sizzix and Scrapbook.com links in this post are affiliate links which do not affect the price you pay but allow me to earn a small percentage of a sale. Thanks! (My husband also thanks you!)


Monday, May 6, 2019

Eileen Hull's New Embossing Powder & Topflight Stamps

Hello there! I made a cheery mixed media birthday card utilizing one of the gorgeous new Eileen Hull Molten Dimensions Embossing Powders by Emerald Creek. (Topflight Stamps carries the whole line!) Read on to find out what I did…


The background is formed from three book pages glued together and coated with gesso. I let the edges curl up to give it more dimension. I then spritzed it with water and sprinkled on some dye crystals. Once it was dry, I stamped it using a PaperArtsy stamp set, embossing some of the flowers with Polished Silver powder. Eileen's Molten Dimension Powders are very chunky and really do bring on the dimension! I also covered a 'happy birthday' diecut with the powder. It's a super luxe look!

Thanks for stopping by! Below is a list of supplies I used. Be sure to check out the Topflight Stamps blog for more inspiration. There is always something fun to see there! 

Topflight Stamps Products:
PaperArtsy stamp set - Tracy Scott ETS24
Eileen Hull Embossing Powder by Emerald Creek - Polished Silver


Other:
AJVD die set - Happy Birthday
gesso
Ranger Archival Ink - Jet Black, Pink Peony
Versamark ink
Ranger Distress Ink - Black Soot, Broken China
Tiny Attacher

Scrapbook.com links in this post are affiliate links which do not affect the price you pay but allow me to earn a small percentage of a sale. Thanks! (My husband also thanks you!)

Sunday, May 5, 2019

Sewing Box Notebooks with Eileen Hull

Hello! This tutorial has been a long time in the works and I've finally gotten it done! When Eileen's new dies were released and we shared the projects we had made for Creativation, many were very curious about how I put a zipper onto one of the notebooks from the sewing kit. So read on to find out!


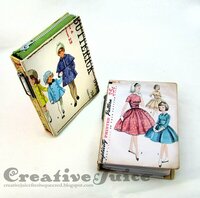
I used vintage patterns for the covers of the books.


The zippered book holds a needle book and other notions.


The Notebook Die makes books that fit perfectly into the Treasure Box! Check out this post from last month to see how to put the box together. Here is the whole kit and caboodle together with my mom's little Singer sewing machine from when she was a girl. (A gift from her grandmother who was a dressmaker.)


Now for THE TUTORIAL!  Putting the zipper in is challenging in parts and requires patience. Just a heads up. ;-)

Step 1 – I prepared the covers first of course. On the outsides I used vintage pattern packet graphics. One had a horizontal format and fit perfectly right off the bat. For the other I scanned additional patterns and sized them to fit on the cover. On the cover insides, I collaged torn pieces of the sewing pattern tissues (not the vintages ones ;-) ).


Step 2 – I used a die pick and the Tim Holtz ruler that has holes along the edge to punch stitching holes through the edges of the cover. (An old foam mouse pad makes a handy punching surface.)


Step 3 – I glued sections of an old measuring tape to the spines of both notebooks and punched holes for the binding.


Step 4 –  Did you know you can use your dies to make foam stamps? Buy adhesive backed fun foam (or make your own), die cut your shape, and apply it to a piece of scrap plastic packaging. Here I used Eileen's retired Doily Bigz die to make one and stamped the insides of the notebooks with acrylic paint.


Step 5 – The stitching begins! I held the zipper in place as I stitched along the edge with heavy duty thread (buttonhole thread). Having a piece of rubber balloon or a fat rubber band handy is helpful in gripping the needle and pulling it through if it is being a bit stubborn.


Step 6 – Getting around the corner is a bit tricky but I just eased the zipper tape in.


Step 7 – The zipper I had was too long so I had to shorten it. I stitched multiple times with the thread before the point where I wanted to cut it and also added a dab of glossy accents to hold the thread in place. NOTE: by ending the zipper right where the cover meets the spine, how far you can open the book is a bit hampered. (As in, you can't open it very wide.) In hindsight, I think I should have stitched it off another 1/2 - 3/4 inch or so beyond this point and tucked the extra zipper length into the book to lay alongside the spine.


Step 8 – See the trimmed zipper (and see note above in Step 7). I wanted to make sure the stitching was very secure so I stitched back to the beginning to make it stronger.


Step 9 – First half of the zipper is done! This part isn't too hard. It gets trickier sewing the second half because I couldn't open the book up very far. (See Step 7.)


Step 10 – I had to stitch loosely so I had room to maneuver the needle in and out. Once I got a few inches out I tightened the thread. I stitched all the way around and back again to double up the stitches. At the very end I had to use a pair of needle nose pliers to get the needle in and out.


Step 11 – I made a little needle book to fit inside of the notebook. I used the Passport Journal Die to cut the pages. (They fit perfectly in the Notebook die!) One page of felt and a cardstock cover.


Step 12 – I decorated the inside of the cover with stamping and a cut from Eileen's Credit Card Sleeve Die to hold a tag of buttons and needle threader.


Thanks for stopping by! Check out Eileen's blog and if you are not already a member, join the Facebook Eileen Hull Fan Club group. It is a warm, supportive group with lots of inspiration and sharing going on. You'll just have to answer a few simple questions when asking to join (to keep out spammers) and then you'll be added. ;-)

Dies:
Eileen Hull Sizzix
Notebook ( Sizzix / SB )
Treasure Box ( Sizzix / SB )
Journaling Cards - Flowers & Leaves ( Sizzix / SB )
Credit Card Sleeve & Tags Sizzix / SB )
Passport Book Sizzix / SB )
Doily - retired

Other:
Sizzix mat board
Tim Holtz ruler
Piercing tool
adhesive backed fun foam
elastic
vintage zipper - I shortened a 15 in one
Kunin felt
button hole thread

Sizzix and Scrapbook.com links in this post are affiliate links which do not affect the price you pay but allow me to earn a small percentage of a sale. Thanks! (My husband also thanks you!)