Saturday, April 24, 2021

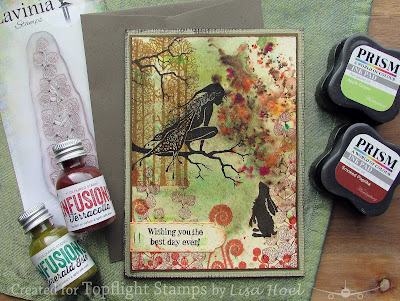
Lavinia Fairy Birthday Card with Topflight Stamps

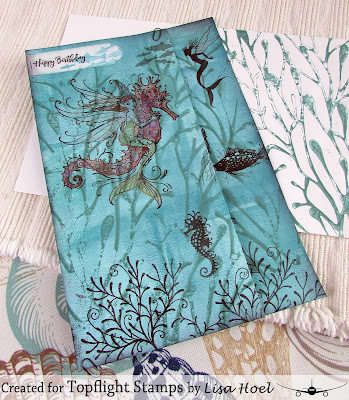
Hello there and happy Saturday! I have a weekend share of a birthday card I made for a friend using supplies from the Topflight Stamps store. I'm always happy to pull out my Lavinia stamps – they are so much fun to create scenes with.

Lisa Hoel for Topflight Stamps - Lavinia Stamps fairy birthday card #Laviniastamps #topflightstamps #creativejuicefreshsqueezed

First I started off by making a stack of backgrounds using PaperArtsy Infusions pigments. (Once you get going, you can't help but make a bunch!) Infusions are a water reactive dry dye stain suitable for fabric and paper. The two-part formulation has 2 different crystals which react with the water at 2 different rates; the color particles act fast, and the brown walnut crystals are slower to dissolve. This allows control over how much brown-to-color you create depending on the amount of water you apply and when you dry. The results are somewhat unpredictable which adds to the fun! 

For more Infusions play, my fellow designer Autumn Clark made a video tutorial for a resist stamping technique that is LOTS of fun. I tried it! You can check it out on her YouTube channel.

Lisa Hoel for Topflight Stamps - Lavinia Stamps fairy birthday card #Laviniastamps #topflightstamps #creativejuicefreshsqueezed

Once I selected the perfect background piece, I used a stamp platform to build my scene on top of it. I like using a platform for projects like this because you can re-ink and "do over" perfectly if a first stamping doesn't have perfect coverage.

Thanks for stopping by and be sure to check out all the wonderful products from around the world you can find all in one place, Topflight Stamps. Have a great weekend!

Supplies used:

Topflight Stamps Products:

Lavinia Stamps - Raven, Forest Scene, Tree Branch, Sea Flower, Whimsical Hares, Fern Heads, Small Berries
Darkroom Door - Happy Birthday Sentiment

PaperArtsy Infusions Terracotta, Emerald Isle
Versafine Black Pigment Ink
Prism Inks - Smoked Paprika, Apple Green

Other:
cardstock

Some links in this post are affiliate links which do not affect the price you pay but allow me to earn a small percentage of a sale. Thanks! (My husband also thanks you!) If you shop at Topflight Stamps, use my coupon code LISAHOEL for 12% off your order.

Saturday, April 10, 2021

Mermaid Card with Topflight Stamps

Happy Saturday y'all! If you participated in the recent 4th Birthday Blog Hop Celebration with Topflight Stamps, then you probably got a peek at the mermaid birthday card I'm going to share with you today. My sister-in-law loves mermaids so I always have fun making her a themed card each year. I also have a short tutorial at the end for the background I made using PaperArtsy Fresco Paints. It's easy and looks really cool!

Here's the card:

Lisa Hoel for Topflight Stamps - mermaid birthday card using Pink Ink Designs and Lavinia stamps

I made it an accordion type folded card so you could extend the whole scene when you opened it up.

Lisa Hoel for Topflight Stamps - mermaid birthday card using Pink Ink Designs and Lavinia stamps

The stamps used are from Pink Ink Designs and Lavinia and they play very well together! (See supply list for exact stamps.) I used twinkling metallic watercolor paints to color the mermaids. They are very glimmery!

The background is created using PaperArtsy Fresco Paints. These chalk acrylic paints dry with a matte surface and are perfect for stamping and inking on top of.

Step 1 – Using a brayer and three different colors of paint, I covered the cardstock in a patchy manner so there would be color variation.


Step 2 – I used the Lavinia Coral stencil to monoprint on top of the background. First I squeezed some paint onto my craft sheet and then brayered it out into a thin layer. I then misted it with water so it would be "soppier" and give me the watery effect I wanted. I lightly applied this paint to the back of the stencil with the brayer and then flipped it over onto the background. I pressed it down with a paper towel to transfer the paint and soak up any extra that squished out.


I did that a few times on the background and also on the card envelope.


Once I was done, I went ahead with my stamping and painting. I did use a stamping platform for more control.

Thanks for stopping by and be sure to check out all the wonderful products from around the world you can find all in one place, Topflight Stamps.

Supplies used:

Topflight Stamps Products:

Pink Ink Designs - Shell Nymph, Sea Nymphs
Lavinia Stamps - Shoal of Fish, Mini fish, Fish Set, Sea Creatures
Darkroom Door - Happy Birthday Sentiment
Lavinia Stencil - Coral
PaperArtsy Fresco Finish Chalk Paint - Mermaid, Paua Shell, Bora Bora, Dusty Teal
Versafine Black Pigment Ink

Other:
cardstock
Twinkling metallic watercolors

Some links in this post are affiliate links which do not affect the price you pay but allow me to earn a small percentage of a sale. Thanks! (My husband also thanks you!) If you shop at Topflight Stamps, use my coupon code LISAHOEL for 12% off your order.
Tuesday, April 6, 2021

Blog Hop Release Party - Eileen Hull's Ch. 2 Sizzix Dies!


Welcome to our Chapter 2 Release Party! Today we are sharing Folio Journal accessory dies – the Waterfall & Tags and Bookbinding & Label dies and the new Bigz L Camper ScoreBoards Die! But don't be limited to keeping them in a book – you can also use these elements in different size journals, cards and layouts!

Check out all the different ways to use these dies on our Blog Hop. Click through and leave a comment on each of the designers' posts and be eligible to win a $25 gift certificate in Eileen's Etsy Shop!

Join us on Facebook Live and YouTube Live for an up close and personal look at the team's projects. I will also demo how to use the dies during the show. Really hope you can join us for this fun event- prepare to be surprised 🙂 Thanks for joining us ❤


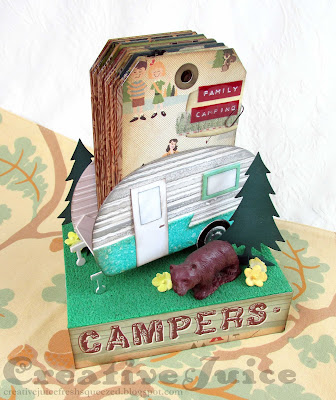
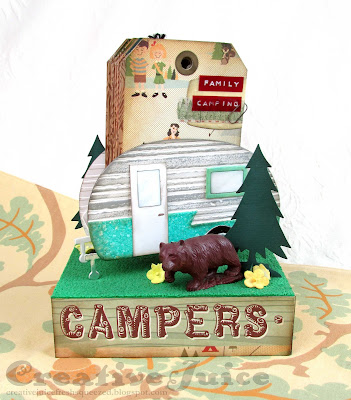
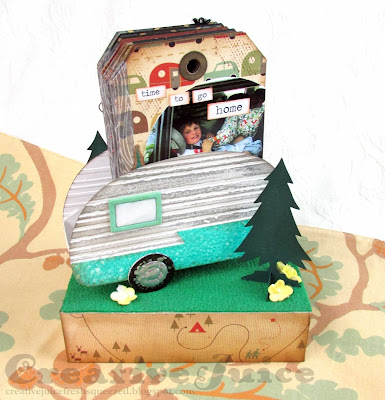
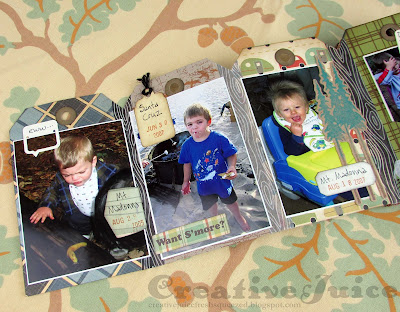
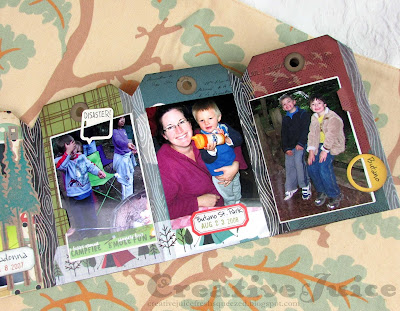
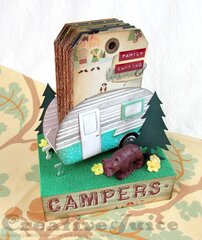
For my project, I made the 3-D Camper into a holder for a tag album chronicling our family camping trips from the time the boys were little. I sure had fun looking back through all our photo files to choose which pics to use! Here are a few views. Scroll on past the hop list to see more details and a short tutorial on how the camper goes together.

Lisa Hoel for Eileen Hull's Sizzix Ch. 2 Dies release! 3-D Camper with tag album  #eileenhull #eileenhulldesigns #eileenhullsizzix #ehinspirationteam #eheducators #Sizzix #mymakingstory #diecutting


Lisa Hoel for Eileen Hull's Sizzix Ch. 2 Dies release! 3-D Camper with tag album  #eileenhull #eileenhulldesigns #eileenhullsizzix #ehinspirationteam #eheducators #Sizzix #mymakingstory #diecutting

NOW IT'S TIME TO GET HOPPING! Check out the other makes from the Team and comment for a chance to win. Don't miss Eileen's special release party blog hop Facebook Live Wednesday, 4/7 at 12pm EST! It will be streaming live on both her YouTube channel and in FaceBook.


And now for some other views of my little camper project…

Lisa Hoel for Eileen Hull's Sizzix Ch. 2 Dies release! 3-D Camper with tag album  #eileenhull #eileenhulldesigns #eileenhullsizzix #ehinspirationteam #eheducators #Sizzix #mymakingstory #diecutting
The base is a Tim Holtz Vignette box I covered.

Lisa Hoel for Eileen Hull's Sizzix Ch. 2 Dies release! 3-D Camper with tag album  #eileenhull #eileenhulldesigns #eileenhullsizzix #ehinspirationteam #eheducators #Sizzix #mymakingstory #diecutting

Lisa Hoel for Eileen Hull's Sizzix Ch. 2 Dies release! 3-D Camper with tag album  #eileenhull #eileenhulldesigns #eileenhullsizzix #ehinspirationteam #eheducators #Sizzix #mymakingstory #diecutting

Lisa Hoel for Eileen Hull's Sizzix Ch. 2 Dies release! 3-D Camper with tag album  #eileenhull #eileenhulldesigns #eileenhullsizzix #ehinspirationteam #eheducators #Sizzix #mymakingstory #diecutting

The tag album is full of so many memories!

Lisa Hoel for Eileen Hull's Sizzix Ch. 2 Dies release! 3-D Camper with tag album  #eileenhull #eileenhulldesigns #eileenhullsizzix #ehinspirationteam #eheducators #Sizzix #mymakingstory #diecutting


Lisa Hoel for Eileen Hull's Sizzix Ch. 2 Dies release! 3-D Camper with tag album  #eileenhull #eileenhulldesigns #eileenhullsizzix #ehinspirationteam #eheducators #Sizzix #mymakingstory #diecutting

Lisa Hoel for Eileen Hull's Sizzix Ch. 2 Dies release! 3-D Camper with tag album  #eileenhull #eileenhulldesigns #eileenhullsizzix #ehinspirationteam #eheducators #Sizzix #mymakingstory #diecutting
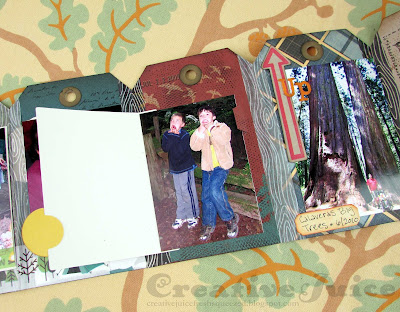
I used Eileen's new Waterfall die to cut flaps so I could 
layer photos on a single tag. The die made it really easy!


Speaking of easy, the 3-D Camper Die is easy to put together and has so many possibilities!

Step 1 – Cut out the pieces from matboard or chipboard. You will need to cut two sets of the camper sides, two sets of wheels, one bottom panel and two of the "ends" for the bottom panel. I used Eileen's Molten Dimensions Aqua Splash embossing powder to cover the decorative panels on the camper sides. I also ran the main body parts through an embossing folder to give them some ridged texture.


Here you can see I've glued the two end parts to the bottom panel.

Step 2 – I glued all the decorative parts to the camper sides. I also applied a little of Sizzix's new Silver Luster Wax to the raised parts of the embossed sides. It gives it a nice little shine! I also glued the bottom assembly to the back. Once it was dry, I glued on the front and then the tires.


Step 3 – the base is a Tim Holtz Vignette box I covered with paper. You can also see that I covered the camper tires with Molten Dimensions embossing powder Black Magic and Polished Silver. (I did that before I glued them on.)


Step 4 – making the tag album. This took awhile lol! The construction is simple though. I cut many many tags and connected them together with washi tape hinges on both sides. I added a bit of glue under the tape so it would hold better. (I don't trust the washi adhesive on its own.) You can make the album as small or as big as you like, just keep adding tags. ;-)

See, easy peasy! Thanks for stopping by and I hope you enjoy the Hop!