Wednesday, August 28, 2019

Grand Gift Giving with Eileen Hull

Hello there! One of Eileen's newest dies is the House Ornament Die which has so much potential! For this project, I envisioned it as a cute gift box that is as special as the gift inside. (A double gift? =) )

The size is perfect for small gifts.


This was easy to make! I used her handy Blends inks to color the walls of the house. I find it easier to do this part before assembly. I also glued a bit of lace behind each window to look like curtains. That is definitely easier to do before the house is put together!

You cut the house sides twice. Cut the bottom flap off one of the cuts.

I used the Rooftops die from the Tim Holtz Village series to created the tiles for the rooftop. Easy peasy! I added grass and flowers around the base to give it a little garden. =) I glued the bottom flap of the box in place, figuring I would load the gift in through the top. In retrospect, I probably should have made the top permanently closed instead. Oh well. Both ways work!


Thanks for stopping by!

Check out Eileen's blog and if you are not already a member, join the Facebook Eileen Hull Fan Club group. It is a warm, supportive group with lots of inspiration and sharing going on. You'll just have to answer a few simple questions when asking to join (to keep out spammers) and then you'll be added. ;-)

Dies:
Eileen Hull Sizzix
House Ornament ( Sizzix / SB )
Stitchy Flowers Sizzix ) - retired
Flower Layers & Stem ( Sizzix )
Grass #660326 - retired

Tim Holtz Village Rooftops Sizzix / SB )

Other:

Eileen Hull Clearsnap Blends inks - Frog, Nutmeg, Golden, Flagstone, Stop
Sizzix matboard
stencil - Tim Holtz, Mini Set 28
Distress Ink - Ground Espresso


Store links in this post may be affiliate links which do not affect the price you pay but allow me to earn a small percentage of a sale. Thanks! (My husband also thanks you!)

Friday, August 23, 2019

High Flying Fun with Topflight Stamps Dots to Diamonds

Hello! ;-)  Topflight Stamps has a new line of products from Hunkydory called Dots to Diamonds. Have you been seeing the great Design Team projects on the blog all this week?? You can get the paper pads that are preprinted with dot designs. Some dots are foiled and others are marks to show where you can add the pearls and rhinestones bling. (Use your stash of bling or buy color coordinated packs!) It is so easy to quickly create a sparkly card for any special occasion!


Preprinted sheets!

I used the hot air balloon page for this card:


I inked the balloon design with Prism inks and then trimmed it out of the page. After that I glued the gemstones onto the balloon. I also used matching Stickles glitter glue to fill in some of the dots when I didn't have quite enough gemstones. It worked perfectly!

Thanks for stopping by! Below is a list of supplies I used. Be sure to check out the Topflight Stamps blog for more inspiration. There is always something fun to see there! 

Topflight Stamps Products:
Hunkydory Dots to Diamonds Paper Pad #3
Hunkydory Diamond Sparkles - Precious Purples
Hunkydory Diamond Sparkles - Festive
Neenah Metallic Cardstock pack
Prism Ink - Apple Green, Peacock Green
Darkroom Door Sentiment Stamps - Happy Birthday

Some links in this post are affiliate links which do not affect the price you pay but allow me to earn a small percentage of a sale. Thanks! (My husband also thanks you!) If you shop at Topflight Stamps, use my coupon code LISAHOEL for 10% off your order.

Thursday, August 15, 2019

Let's Do It Again Funkie Junkie Boutique Challenge

Hello! I am honored to be a guest designer today on the Funkie Junkie Boutique Challenge Blog! Their new challenge is Let's Do It Again! in which you 're-do' an old project with a new twist. Back in 2012 I created this little project using an altered Altoid Tin:

The original! You can see the blog post HERE.
I thought it deserved a do-over with more details and more everything Tim Holtz. ;-) I have a large collection of Idea-ology that needs using in projects ha ha. So… I used the old idea and came up with:

New and improved!
More views!


And closeups!


Aaaaaand the back:


I love that Tim has so many different Thinlits dies now. They are perfect for little scenes like this. The Funky Florals sets are especially favorites of mine. All the little Idea-ology bits and bobs really appeal to me as well. I got caught up in the creation of this project and didn't really take step photos except for this one as I was working on the base. (So you get a mini mini tutorial. Or maybe it just counts as a few tips lol.)


Here it goes! The base is the bottom half of an old paper mâché box. I of course had hoarded it because I knew it would come in handy someday. I painted it green and then adhered Botanical Collage Paper to it with Distress Collage Medium. When it was dry, I dry brushed on a lighter color green over parts of the design. Then using more Collage Medium, I glued on the black flower die cuts around the sides. I brushed a layer of Medium over the tops as well to seal them. I glued some moss from the craft store (floral department) to the top and then I was ready to get to work on the scene!

Thanks for stopping by and be sure to check out the Let's Do It Again! challenge! Join in and you'll have a chance to win a gift credit at The Funkie Junkie Boutique store or be a future guest designer.

Dies:
Tim Holtz Sizzix
Wildflower Stems #1 ( Sizzix / SB )
Tiny Tattered Florals Sizzix / SB )
Garden Greens Sizzix / SB )
Funky Floral #2 Sizzix / SB )
Funky Floral #3 Sizzix / SB )

Other:

Tim Holtz mini layering stencils Set 28
Collage Paper - Botanical
Ranger Distress Grit Paste
Distress Crayons - Set 3, Set 1
Ranger Distress Collage Medium - Matte
Distress Markers
Distress Paint - Picket Fence, Fired Brick
Paper Artsy Fresco Paint - Guacamole, Tinned Peas
moss

Tim Holtz Idea-ology:
Paper Dolls
Transparent Wings
Metal Gate
Trinket Tins
Faucet Knobs
Bouquet
Ephemera - Botanical

Store links in this post may be affiliate links which do not affect the price you pay but allow me to earn a small percentage of a sale. Thanks! (My husband also thanks you!) If you go shopping at Topflight Stamps, use my code LISAHOEL for 10% off your order.

Monday, August 12, 2019

Under the Sea Triptych with Topflight Stamps

Hello there!! Today I have an ocean themed triptych to share with you. It's a piece of home decor that is going to sit on a shelf in my entryway for the summer. =)


Here's a little closer look of each panel:


Here's a little how-to for the background:


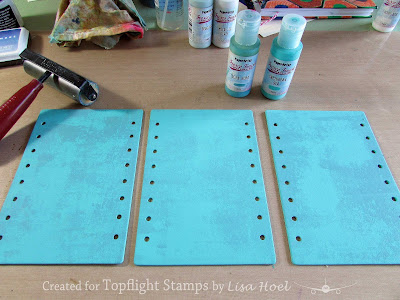
I had the set of chipboard cards languishing in my stash. I'm glad I could finally use them! I first base coated them with Paper Artsy Fresco Chalk Paint, Caribbean Sea. I added a bit of texture over the top by lightly brayering Bora Bora paint over the top when it was dry.


Next I stamped the Seaside Word Block stamp onto the panels using Sea Glass Fresco Paint. Be sure to immediately clean your stamp!! The paint dries quickly. I added pieces of washi tape over the top. It's hard to see in the photo, but over the top of all of that, I stenciled it using the Fibres stencil and Fresco Metallic Glaze Paint. It shows when the light hits it.

I stamped the mermaids and fish using the Lavinia stamps (see below). After that I stamped all the sea creatures and coral onto watercolor paper, painted it, and fussy cut all them all out to apply to the panels. I glued on some Classic Pearls to give it a bit of undersea bling.

Thanks for stopping by! Below is a list of supplies I used. Be sure to check out the Topflight Stamps blog for more inspiration. There is always something fun to see there! 


Topflight Stamps Products:
Darkroom Door - Word Block, Seaside
Lavinia Stamps - Alana Mermaid, Guinevere Mermaid, Sea Creatures
Studio Light - Ocean View #369
Alexandria Renke Washi - Blue Mermaids
Visible Image Stencil - Fibres
Paper Artsy Fresco Chalk Paint - Sea Glass, Bora Bora, Caribbean Sea, Metallic Glaze
Hunky Dory - Classic Pearls
watercolors

Some links in this post are affiliate links which do not affect the price you pay but allow me to earn a small percentage of a sale. Thanks! (My husband also thanks you!) If you shop at Topflight Stamps, use my coupon code LISAHOEL for 10% off your order.

Friday, August 9, 2019

Beach-y Wreath with Eileen Hull

Hello there! I'm starting to get the itch to create fall projects but I still have some summer creativity left in me! ;-) I have a beach theme going for my home summer decor and I needed a new wreath for my front door. A few weeks ago, Eileen Hull was inspired to use her Blends 2 inks and embossing powders to color sea shells. That inspired me in the creation of my new door wreath! It was really easy.

The actual wreath is a twig wreath from the craft store
that I lightly spray painted with white paint.


I started out with coloring the shells. I used a stylus with blending sponge to apply color just where I wanted it. I dried it with my heat gun.


Once I had colored and dried the shell and starfish, I went back with the clear ink (super strong for embossing!!) and added it on the parts I wanted the embossing powder to stick to.


I also die cut Paper Leather (the pink branches) and regular heavy cardstock (the 'seaweed'). The seaweed cuts I covered with clear ink and embossed with Aqua Splash powder.


Once I had all the parts prepared I went to town with my glue gun and put it all together. For a final step, I gave the whole wreath a spray with Glitter Dust to give it a bit of sparkle.

Check out Eileen's blog and if you are not already a member, join the Facebook Eileen Hull Fan Club group. It is a warm, supportive group with lots of inspiration and sharing going on. You'll just have to answer a few simple questions when asking to join (to keep out spammers) and then you'll be added. ;-)

Dies:
Sizzix
Sand & Sea ( Sizzix / SB )
Branch with Leaves & Flower (657241) - retired
Seaweed, Coral & Wave (660349) - retired

Other:
Eileen Hull Clearsnap Blends 2 inks - Pansy, Melon, Sunshine, Clear
Stylus and blending sponge tips
Eileen Hull Molten Dimensions Embossing Powder - Aqua Splash, Polished Silver, Golden Rod
Paper Leather - Pink
Glitter Dust

decorative fish net
seashell/starfish
twig wreath
white spray paint


Store links in this post may be affiliate links which do not affect the price you pay but allow me to earn a small percentage of a sale. Thanks! (My husband also thanks you!) If you go shopping at Topflight Stamps, use my code LISAHOEL for 10% off your order.

Tuesday, August 6, 2019

Misfit Robots with Topflight Stamps

Hello! This week on the Topflight Stamps blog the team is focusing on the brand, For the Love of Stamps. I used the set Misfit Robots, which lets you mix and match all the parts to make custom robots! It was fun to make this cheerful card using them.


I also used Prism inks, a new line of inks Topflight Stamps is now carrying. I really like how well they blend and there are lots of fab colors!

Thanks for stopping by! Below is a list of supplies I used. Be sure to check out the Topflight Stamps blog for more inspiration. There is always something fun to see there.

Topflight Stamps Products:
For The Love of Stamps - Misfit Robots
Stamperia, Antonis Tzanidakis stencil - KSAT05
Prism inks - Camellia Pink, Apple Green, Jersey Cream
Blender tool
watercolors


Some links in this post are affiliate links which do not affect the price you pay but allow me to earn a small percentage of a sale. Thanks! (My husband also thanks you!) If you shop at Topflight Stamps, use my coupon code LISAHOEL for 10% off your order.

Sunday, August 4, 2019

Vintage Drafting Stool Upcycle

You may have seen some peeks of this project on Instagram over the past few weeks! A few years ago I got one of the old vintage drafting stools from my Dad's office clean out. It was grey and boring. ;-) I decided to freshen it up a bit!

Before

After!

First I spray painted the chair an aqua color. I masked off the seat and primed it with white paint.


I used Pixie Spray, a repositional adhesive for stencils, to tack down the Butterfly with Border stencil in the middle of the seat.


Next I started adding color! Blends 2 inks from Eileen Hull are vivid pigment inks that are permanent  when dry. I masked off parts of the stencil with post-it notes and used the blending stylus to easily add color just where I wanted it. When I was done with a section, I lifted the stencil and carefully used a heat tool to dry the ink. (I taped the stencil at the top so I could lift and replace it exactly were it was.)


After I had stenciled all the design, I decided outlining with a black permanent pen would really make the design pop.


I added several final coats of Krylon Crystal Clear spray over the finished artwork to protect it. I made sure to mask off the surrounding metal so the overspray wouldn't get on it.


My pretty stool is happily living in my craft room now! FYI, we just found out last week that Clearsnap, the manufacturer of Eileen's inks, is going out of business! Eileen put in a last order to stock up her etsy shop, so if you have been thinking about getting any of her inks don't delay! When they are gone, they are gone as far as we know.


Check out Eileen's blog and if you are not already a member, join the Facebook Eileen Hull Fan Club group. It is a warm, supportive group with lots of inspiration and sharing going on. You'll just have to answer a few simple questions when asking to join (to keep out spammers) and then you'll be added. ;-)

Supplies:
Eileen Hull Clearsnap Blends 2 inks - a whole bunch of colors!
Clearsnap Colorbox blending stylus with sponges
StencilGirl stencil - Butterfly with Border
StencilGirl stencil - Mod Ovals and Circles Small Stencil
Pixie Spray
Krylon Crystal Clear
heat gun
painter's tape

Store links in this post may be affiliate links which do not affect the price you pay but allow me to earn a small percentage of a sale. Thanks! (My husband also thanks you!)