Tuesday, March 31, 2020

Eileen Hull's Brand New Dies & a Blog Hop!

Thanks for joining us for the Eileen Hull Release Party Blog Hop! The Inspiration Team is excited they can finally share their Sizzix Chapter 2 projects. All throughout April, the designers will be sharing tutorials and videos! Now, please hop down the list to see what the team has been working on. If you leave a comment on each of the designer’s posts by April 6, you will be entered to win a Tiny Book die! The winner will be announced on Eileen’s Facebook Live on Tuesday, April 7.

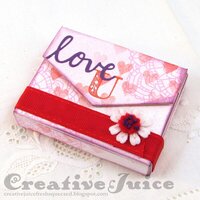
The Tiny Book measures 2 1/4” x 3” and is just the right size for wallet size photos, stamps, quotes, tags or tiny cards. The Tiny Book Case is designed to hold the book, a gift card, earrings, or small treats. If you haven’t gotten your hands on a Tiny Book and Tiny Book Case yet, you can find them at your local retailer or in Eileen’s Etsy store


This is a project I made for the Creativation show last January. I thought the Tiny Book Case was perfect to fit a little stitched heart (and more importantly a craft store gift card) into:


Be sure to hop around to the rest of the team and see their projects! Comment for a chance to win your own Tiny Book Die!


You are here >> Lisa Hoel


I don't really have a tutorial for this but here is a peek at it in the works. I used the Hearts Journaling Card Die to make my own heart stencil by repeatedly cutting the heart panel into a piece of thin plastic (overhead projector transparency).


Thanks for stopping by! Check out Eileen's blog and if you are not already a member, join the Facebook Eileen Hull Fan Club group. It is a warm, supportive group with lots of inspiration and sharing going on. You'll just have to answer a few simple questions when asking to join (to keep out spammers) and then you'll be added. ;-)

Dies:
Eileen Hull Sizzix
Tiny Book Case Sizzix / SB )
Journaling Cards - Hearts Sizzix / SB )

Journaling Words - retired


Other:
Indigo Blu Stamp set - Floral Fantasy
Distress Ink - Seedless Preserves, Candied Apple
Distress Ink Oxide - Candied Apple
Distress Spray Stain - Spun Sugar, Candied Apple
cardstock
acrylic felt

Some links in this post are affiliate links which do not affect the price you pay but allow me to earn a small percentage of a sale. Thanks! (My husband also thanks you!) If you shop at Topflight Stamps, use my coupon code LISAHOEL for 12% off your order.

Topflight Stamps Birthday Blog Hop WINNER'S POST!!


Thanks to everyone who joined in our Hop! Commenters on each blog stop had a chance to be chosen for a $15 gift certificate to spend in the Topflight Stamps online store. So, without further ado...

My winner is commenter #1, Ms. Tamp …


Ms. Tamp, please get in touch with me so I can get you your gift code! Congratulations! 


Hoppers should head to the Topflight blog to see if you are a winner from one of the others. Have a great day and thanks for stopping by.


If you shop at Topflight Stamps, use my coupon code LISAHOEL for 12% off your order.

Monday, March 30, 2020

Capturing a Bit of Spring

Hello there, I have more projects to share with you! =) I really wanted to make sure I joined in The Funkie Junkie Boutique 'Little Things' Challenge so I got my act together and made a little spring scene to fit into one of the new Tim Holtz Display Dome.


It's a bit hard to photograph under the glass dome so I'm glad I didn't glue it on! Here are some peeks:


I've been experimenting with making spun cotton mushrooms. It is fun but I need some more practice. This one turned out pretty well though. =)


Thanks for stopping by. I hope the rest of your week is a good one and that you have a chance to relax and get crafty amidst all the disruption that is going on. Stay safe and healthy!

Dies:
Tim Holtz Tiny Tattered Florals ( Sizzix / SB )
Tim Holtz Funky Floral #2 ( Sizzix / SB )
Tim Holtz Funky Foliage ( Sizzix / SB )
Eileen Hull Grass Die - retired

Other:
Tim Holtz Display Dome
Distress Ink
Distress Oxide Ink
Glitter Duster
Rock Candy Dry Glitter
Ranger Collage Medium Matte
PaperArtsy Fresco Finish Paint - Very Berry, Chalk, Snowflake

Some links in this post are affiliate links which do not affect the price you pay but allow me to earn a small percentage of a sale. Thanks! (My husband also thanks you!) If you shop at Topflight Stamps, use my coupon code LISAHOEL for 12% off your order.

Sunday, March 29, 2020

A Class with Gwen LaFleur for Topflight Stamps

Good morning! I still have a few Creativation projects I haven't shared yet here on the blog. One of the really fun parts of the show is getting to take workshops with awesome designers from the industry. I was fortunate enough to take a class taught by Gwen LaFleur and created this fab collage project!


Fun details:

Love the bead accents!

We learned several collage techniques and made a glorious mess with Fresco Paint, stencils, ink and stamping! Gwen's new embossing powders from Emerald Creek added some lovely finishing touches.

Thanks for stopping by and I hope your week goes well.

Topflight Stamps Products:
PaperArtsy Gwen LaFleur stamp sets  - EGL06, EGL04
Gwen LaFleur embossing powder - Antique Yellow, Topaz
Prism Embossing Ink
Versafine Ink - Onyx Black
PaperArtsy Fresco Finish Paint - various colors

Archival ink - various colors
white gel pen
beads
stencils

Some links in this post are affiliate links which do not affect the price you pay but allow me to earn a small percentage of a sale. Thanks! (My husband also thanks you!) If you shop at Topflight Stamps, use my coupon code LISAHOEL for 12% off your order.

Monday, March 23, 2020

Happy 3rd Birthday Topflight Stamps!! Let's Hop!


Welcome Topflight Hoppers!! It's Topflight Stamps 3rd birthday and to celebrate, I’ve teamed up with some great designers to showcase birthday cards using the unique products available at Topflight Stamps. Please hop along with us and see all the beautiful talent from this group of amazing designers! You should have arrived here from the Topflight Stamps blog. If not, no worries, catch the details below.

I made a fun mixed media robot birthday card for my project! Scroll past all the Hop info to find the background tutorial. Be sure to leave a comment to be eligible for my blog prize and the grand prize.


I was having so much fun I made a matching ATC too using the same techniques:


Follow along here and if you get lost you can always start at the Topflight Stamp Blog

Topflight Stamps
Lisa Hoel
Jennie Atkinson <<<<<NEXT
Cornelia Wenokor
Jenny Colacicco 
Karen Bearse
Dina Kowal
Kathi Rerek
Connie Mercer
Toni Maddox
Lindsay Weirich
Ericka Strange
Jenny Marples
Autumn Clark
Rachel Greig 


GIVEAWAY DETAILS

Of course, it wouldn’t be a birthday celebration without prizes!  Topflight Stamps is giving one lucky winner a $50 Gift Certificate to the store. But wait, there is more, each stop on the hop has an additional $15 Gift Certificate up for grabs for some lucky commenter.  For a chance to win, make sure to visit every stop on the hop and leave a comment by March 28th. Winners will be announced on the Topflight Stamps blog on March 31st.  Good Luck! Check out the sale at the store too!! 25% off your whole order!


Here is the tutorial for the background and a supply list:
Step 1 - I used a piece of heavy manila folder for my substrate. I base coated it with Stone and Mahogany Fresco Paint.


Step 2 - I wanted to give Andy Skinner's Cosmic Shimmer Resist Paste a try. (see his video about it here if you like) It works well! Once my first layer of paint was nice and dry, I used a stencil and blending brush to apply the paste.


Step 3 – Once the paste was applied, I painted over it with another layer of paint and then let that layer dry.


Step 4 - I used a damp baby wipe to remove the paint that was on top of the resist paste:


Cool beans!
Step 5 –  After applying texture paste through another stencil, I sprinkled the wet paste with Patina Oxide embossing powder and let it dry. One slight annoyance, the resist paste was still a bit tacky and grabbed some of the embossing powder. Once the texture paste was dry, I just used a dry paint brush to remove some of the extra powder. When I made the ATC background, the painted base sat around overnight before I did the embossing powder step and I had no trouble with excess powder sticking. (fyi)


Texture Paste added.

Sprinkled with embossing powder.
Step 6 - After melting the embossing powder, I gave the whole card front a wash of thinned out Paynes Grey acrylic paint. It unified the background and pooled around the raised areas which made them pop out more. The robot was stamped, watercolored, fussy cut and then attached to a Wobbler so it really pops off the card and moves around.

Thanks for stopping by and enjoy the rest of the Hop!! Comment below for a chance to win!

Supplies used:

Topflight Stamps Products:

Visible Image - Robot Data
Paper Rose - Cog Frame Border Die Set
Stamperia stencil - Microchip
Visible Image Stencil - Short Circuit
Prism Embossing Ink
Versafine Ink - Onyx Black
Seth Apter embossing powder - Patina Oxide
Cosmic Shimmer Resist Paste
Wobblers
Ink Blenders
PaperArtsy Fresco Finish Paint - Stone, Mahogany, Dusty Teal, French Roast
ATC greyboard blanks

watercolors
Tim Holtz Mini Fasteners
Tim Holtz Distress Mica Spray - Tarnished Brass
Ranger Texture Paste - Opaque Matte

Some links in this post are affiliate links which do not affect the price you pay but allow me to earn a small percentage of a sale. Thanks! (My husband also thanks you!) If you shop at Topflight Stamps, use my coupon code LISAHOEL for 12% off your order.

Mermaid Garden Shaker Card with Eileen Hull

What a month this has been! At least we can continue to look outside and see spring unfold. I've been working hard in my yard getting all the spring cleanup done. I'm eager to see some flowers start to bloom. All this month on Eileen Hull's blog the Inspiration Team has been busy creating and sharing lovely projects celebrating spring. I created a mermaid's garden shaker card mounted on a base cut with Eileen's new Display Stand Sizzix Die. I made it as a birthday card for my sister-in-law Katie who is a fellow lover of mermaids.


The shaker front is a sample from the January Creativation show. We R Memory Keepers was demoing one of their new (very cool!!) machines, a Mold Press. (see the short demo video here) It is basically a mini vacuum form machine and you can mold a sheet of hot plastic over pretty much everything! They had a scallop shell and foam stick on letters so I got the bright idea to make one with my SIL's name so I could use it later for a card. (Thinkin' ahead I was!!) So check out the video. I'm not gonna lie, I'm coveting one of those machines lol.

I applied a bit of gold paint to the inside of the letters to make them stand out.

The Display Stand has a built in stand that you can pop up and down so you can fold it flat for mailing (although this one isn't very flat ;-) I mailed it popped up in a box along with her present.


Here are a few peeks at how I put this together:

Step 1 - I inked up a sheet of Mat board with the blue background and then cut out my stand. Then I stamped a bit in the background. I figured out how the shaker front was going to fit onto the front and traced the cut lines with a sharpie marker. It was easy to cut with sharp scissors.


I prepared my mermaid and sea horse die cuts and also painted a bit of gold paint on the inside of the letters of her name to make them stand out.

Step 2 – Filling the shaker was a little tricky. I carefully made a little pile of the shaker bits in the middle of the area under the shell. I then applied Glossy Accents to the back of the plastic front and carefully laid it onto the front of the card. I pressed it down tightly with my hands and held it in place for a few moments until it started to hold. Then I weighted it down until it was totally dry.


When it was dry, I embellished the front with my die cuts and a layer of Dirty Sand embossing powder for the ocean floor.

It it is a little confusing on how to fold the Display Stand at first. Eileen Hull has created a short video on how to do it! Feel free to watch it several times. ;-)


Thanks for stopping by! Check out Eileen's blog and if you are not already a member, join the Facebook Eileen Hull Fan Club group. It is a warm, supportive group with lots of inspiration and sharing going on. You'll just have to answer a few simple questions when asking to join (to keep out spammers) and then you'll be added. ;-)


Dies:
Eileen Hull Sizzix
Display Stand Sizzix / SB )

Tim Holtz Sizzix
Holiday Greens Mini ( Sizzix / SB )
Crochet Sizzix / SB )

Dream Mermaid Sizzix / SB )

Other:
Eileen Hull Embossing Powder by Emerald Creek - Aqua Splash
Eileen Hull Embossing Powder by Emerald Creek - White Wonder
Eileen Hull Clearsnap Blends Ink - Clear
Sizzix Mat board
Lavinia Stamps - Sea Creatures, Seaweed 2
Baked Texture Embossing Powder - Dirty Sand
Glossy Accents
cardstock
various beads and sequins for shaker
shell mold press shaker front

Some links in this post are affiliate links which do not affect the price you pay but allow me to earn a small percentage of a sale. Thanks! (My husband also thanks you!) If you shop at Topflight Stamps, use my coupon code LISAHOEL for 12% off your order.

Tuesday, March 17, 2020

Get Your Green On! Happy St. Patrick's Day!

Hello and welcome to the blog! St. Patrick's Day is always a fun day for us because it is also my mom's birthday. I usually make her a appropriately themed birthday card too and here is the one I made for her this year:


Ann Butler Designs has some new stamp sets out from the Unity Stamp Company. They are strip background builder sets and you can do a lot of neat things with them! Read on to see…

The four leaf clover is cut out of Yupo paper and colored with alcohol inks. I used the Strip stamps and Alcohol Lift-Ink to create the pattern.


To first color my Yupo paper, I dripped various green alcohol inks onto one piece of the Yupo and then smooshed the second piece into all the drips on the first. I squished the ink around between the two pieces and then pulled them apart. I lightly sprinkled a few more drops of one of the green inks on them to get some speckles.


Next I built the Strip stamps into a herringbone pattern on my stamp blog and used Lift-Ink to stamp the pattern into the alcohol ink. Basically you just ink up the stamp, stamp it onto the alcohol inked surface and then buff it with a soft cloth to reveal the stamped pattern. While the lifted ink is still on your rubber stamp, you can also stamp that off onto another piece of paper:


After my initial stamping, I kept stamping with individual strip stamps to continue to build the herringbone pattern:

It was easy to line up the stamps!
I was able to cut two heart "clover leaves" from each sheet of Yupo. I folded them in half so they would have a crease and a bit of dimension. When cutting, I lined up the heart die so the "points" of the herringbone would be in the center of the leaf.


For the background, I first used a brayer to lightly apply white Fresco chalk paint to the kraft cardstock card base. Then I used the strip stamps to stamp a rainbow up the side:


A banner with the gold tinsel embossed sentiment and a gold cord tied around the card fold completed the festive St. Patrick's Day look.

Thanks for stopping by. I hope the rest of your week is a good one and that you have a chance to relax and get crafty amidst all the disruption that is going on. Stay safe and healthy!

Dies:
Crealies Nested Heart Die Set - XXL Heart 29

Stamps:
Unity Stamp Co - Ann Butler Designs Strips Background Builder Set 1
Unity Stamp Co - Ann Butler Designs Strips Background Builder Set 2

Other:
Distress Ink - Cracked Pistachio
Distress Oxide Ink - Lucky Clover, Wilted Violet, Blueprint Sketch, Fossilized Amber, Carved Pumpkin, Candied Apple
Ranger Yupo paper
Ranger Alcohol Lift-Ink
Ranger Alcohol Inks - Limeaide, Willow, Meadow, Clover, Botanical
gold tinsel embossing powder
embossing ink
PaperArtsy Fresco paint - Cloud 9
Tim Holtz Cling Foam Stamps - Cutout Script

Some links in this post are affiliate links which do not affect the price you pay but allow me to earn a small percentage of a sale. Thanks! (My husband also thanks you!) If you shop at Topflight Stamps, use my coupon code LISAHOEL for 12% off your order.

Tuesday, March 10, 2020

Happy St. Patrick's Day with Eileen Hull's New Gift Box Die

Get your green on because in a week it will be St. Patrick's Day! This is always a special holiday in our family because it's also my Mom's birthday. We will of course have an appropriately themed party for her. I made a new decoration to use in my house utilizing green stuff (of course) and Eileen Hull's new Gift Box Die!


I stamped a wee little green scene all around the sides of the box and filled it with paper shamrocks:


I used lots of Lavinia Stamps from Topflight Stamps as well as luscious Distress Oxide Inks. Take a peek at some of my step photos:

Step 1 - I pulled out all my Lavinia stamps to decide on which ones to use for my scene. The box is cut out of Sizzix Mat board which is the perfect thickness and accepts ink, stains and stamping very well.


Step 2 - I laid down a blended background of Distress Oxide Inks and then stamped with a combination of Archvial inks and Oxide inks. I also embossed the Fern Heads with green embossing powder. The clovers are stamped and fussy cut. I did some light stenciling in the areas of negative space too.


Step 3 - The shamrock leaves are hearts cut out of coffee filters that I dyed with Distress Sprays. I glued a little piece of wire to the back of each heart and then glued/taped the ends to a piece of green floral wire "stem". It's a bit fussy to do but I love how the shamrocks look. There are even a few four leaf ones in the batch! I poked the stems into a block of floral foam that I glued in the bottom of the box.


Thanks for stopping by! I hope the rest of your week is a good one and that you have a chance to get crafty. ;-)

Dies:
Eileen Hull Sizzix
Gift Box with Scallop Edges Die Sizzix / SB )

Tim Holtz Sizzix
Scribbly Butterflies Sizzix / SB )

Topflight Stamps:
Crealies Nested Heart Die Set - XXL Heart 29
Lavinia stamps: Whimsical Hares, Fairy Thistles, Daydreaming Silhouette, Tree Root, Fern Heads, Trees, Mini Berry
AALL & Create stencil - Florastella
Versafine Pigment Ink - Onyx Black
Eileen Hull Molten Dimensions Embossing Powder - Golden Rod

Other:
Distress Spray Stain - Mowed Lawn, Lucky Clover
Distress Ink - Tea Dye, Black Soot
Distress Oxide Ink - Aged Mahogeny, Dusty Concord, Shabby Shutters, Squeezed Lemonade, Scattered Straw, Twisted Citron, Mowed Lawn, Lucky Clover
Distress Paint - Tarnished Brass
Archival Ink - Potting Soil, Leaf Green
green embossing powder
Tim Holtz Idea-ology - Numeric
Some links in this post are affiliate links which do not affect the price you pay but allow me to earn a small percentage of a sale. Thanks! (My husband also thanks you!) If you shop at Topflight Stamps, use my coupon code LISAHOEL for 12% off your order.