Wednesday, October 30, 2019

Xyron Magnetic Halloween Play Board for Kids


Good morning and Happy Halloween! It's almost upon us. (Tonight is pumpkin carving night here in our household.) It's always fun to see the joy children take in Halloween – the dressing up, planning out your jack-o-lantern's face (tell me I'm not the only one who did that), the candy, the decorations…  Today I'm here to share a fun interactive project for kids to play with (and it's screen free! ;-) ) I took an old baking sheet and up-cycled it into a Halloween scene complete with magnetic cut outs so the child can rearrange to their heart's content. Think Colorforms but without the danger of melting into a toxic mess in a hot car.


Lisa Hoel for the Xyron Makers Program – up cycled baking sheet becomes a magnetic play board perfect for a child (big or little) to rearrange. All the elements are magnetic die cuts!

All the pieces are magnets so they peel right off and you can move them all around:


Here's a detail of the haunted house, decorated with extra die cuts:


Let's see how easy it is to create this project with the help of Xyron products!

Step 1 – I found an old baking sheet that was just the right size and of the proper patination lol. I used painters' tape to mask the edges and first painted a layer of gesso into the tray bottom.

Lisa Hoel for the Xyron Makers Program – up cycled baking sheet becomes a magnetic play board perfect for a child (big or little) to rearrange. All the elements are magnetic die cuts!

When that was dry I used acrylics to paint the background and stencil the stars.


Step 2 – Getting more out of your dies! Did you know you can use your dies to make foam stamps? It's a great way to get more for your money and it is really easy. All you need is fun foam, scrap plastic from discarded packaging and the Xyron Creative Station with a Permanent Adhesive cartridge installed. First run a piece of fun foam through the Creative Station to apply adhesive to one side.


Next, use your die to cut out a shape from the fun foam. Peel off the adhesive liner and stick it to a piece of scrap plastic.


Voila! You have just made a foam stamp! I used this one with paint to stamp the twisty vines onto the background of my cookie sheet. Clean the paint off with a baby wipe and your stamp is good to go for future projects.


TIP – Once I was done painting, I sprayed the whole background with Crystal Clear Acrylic Spray to protect the paint and keep it from getting scratched off.

Step 3 – Time to make the fun magnet pieces! I pulled out all the Halloween dies I wanted to use. (They are all Tim Holtz Sizzix dies.) I picked out the different papers and cut pieces of the appropriate size to fit each die. I ran the paper pieces through the Creative Station with the Laminate/Magnet Cartridge installed. It adheres the paper to the magnet material and then covers it with a clear laminate layer. (Good for handling by sticky candy kid hands lol.)

Lisa Hoel for the Xyron Makers Program – up cycled baking sheet becomes a magnetic play board perfect for a child (big or little) to rearrange. All the elements are magnetic die cuts!

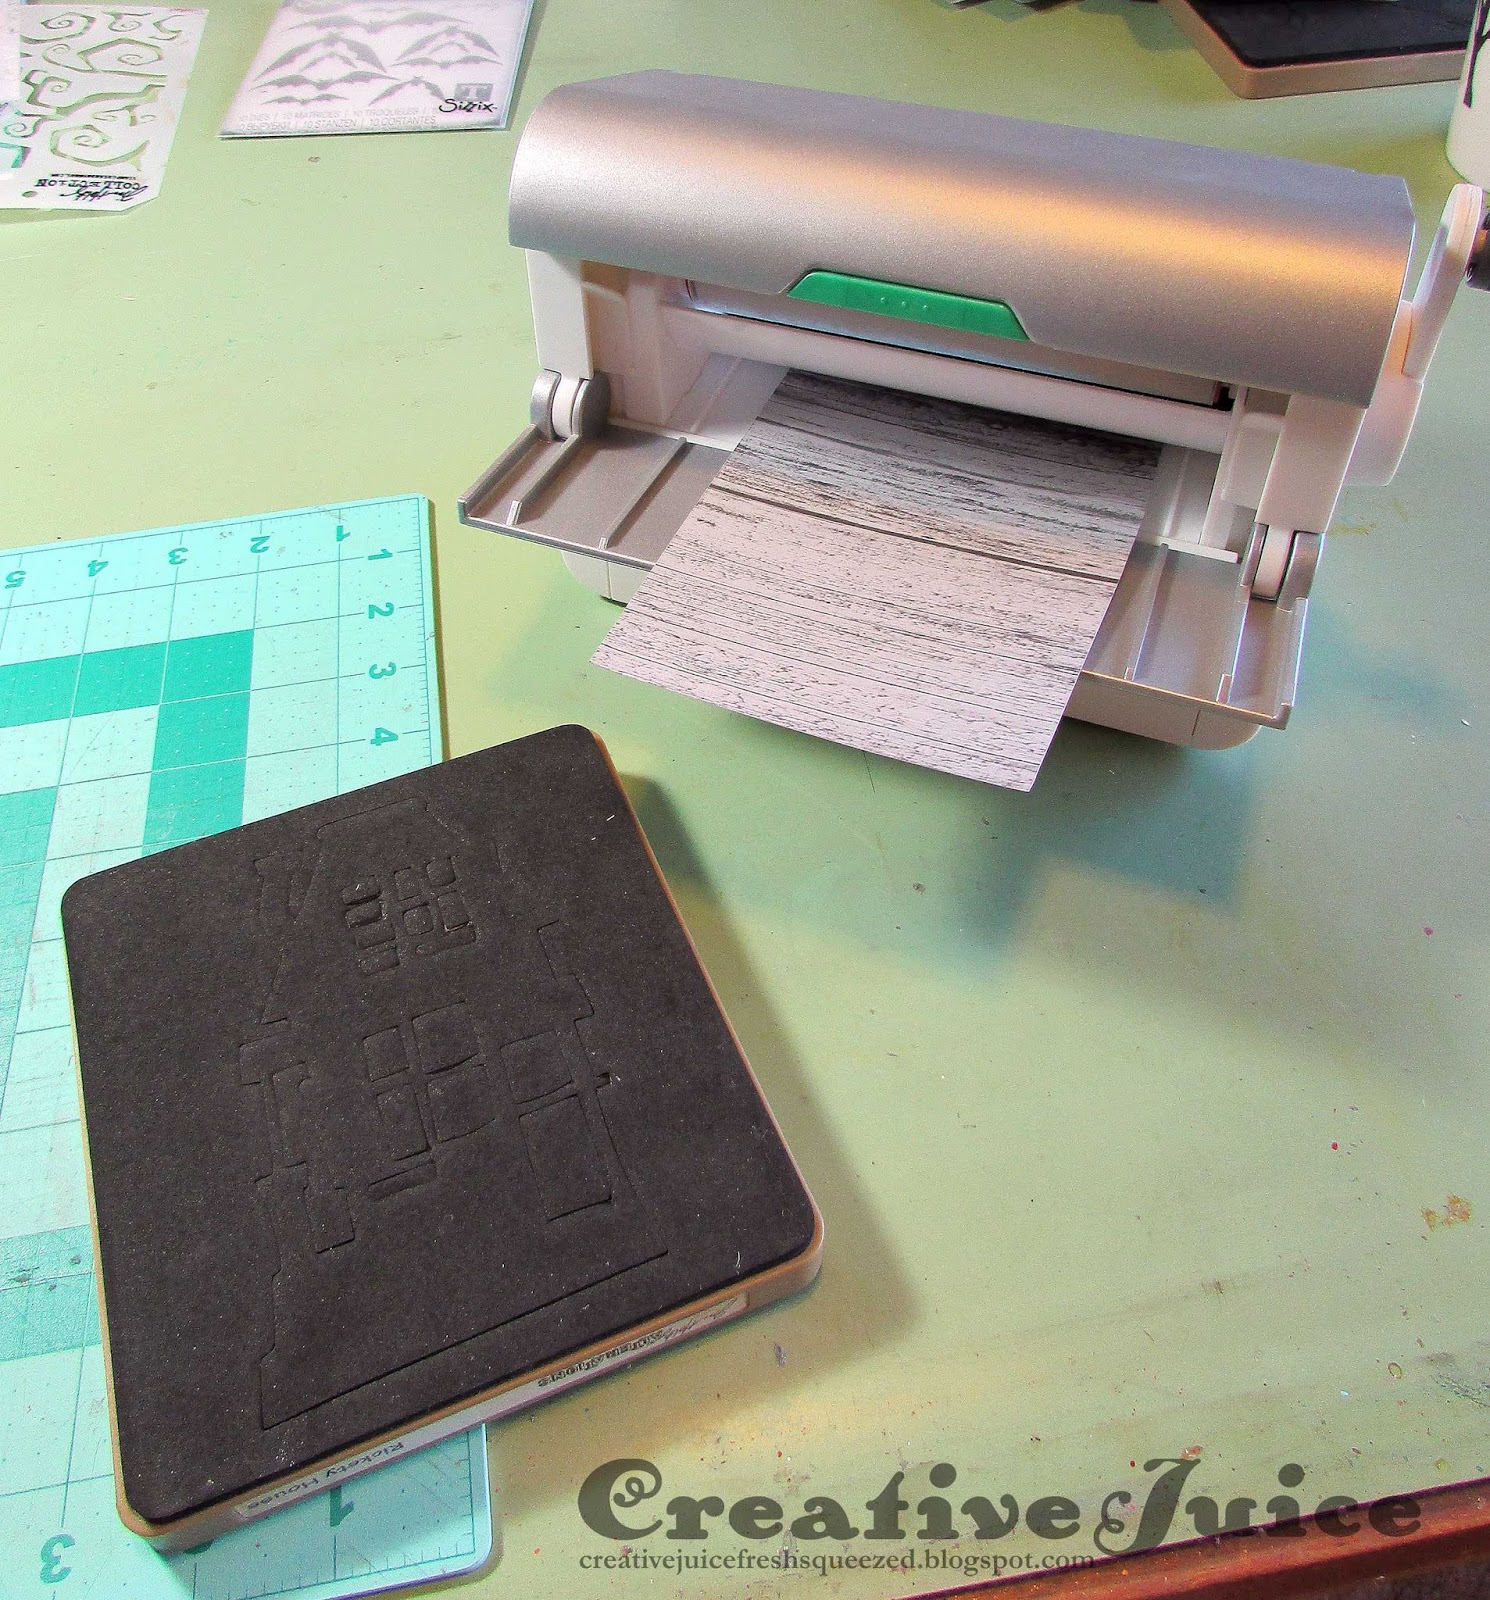
I then cut out the shape with my dies. Bigz steel rule dies cut through it like butter but I was also able to use Thinlits dies to cut through the magnet/paper/laminate layers.


Step 4 – Embellishing the magnets – I found that I wanted to ink the edges of the cut outs to give them some more visual depth. Using archival ink over the laminate plastic worked great. I also glued on paper die cuts (ghosts and pumpkin) on the haunted house and added Stickles glitter glue to a few of the other magnets.


Step 5 – Play! All done. ;-)


Thanks for stopping by and Happy Halloween!!! See the supply list below for materials used.

Supplies used:
Xyron:
Creative Station Lite
Permanent Adhesive Cartridge
Laminate /Magnet Cartridge

Dies:
Tim Holtz Sizzix
Bat Crazy ( Sizzix / SB )
Frightful Things Sizzix / SB )
Twisted Edge - retired
Rickety House - retired
Bewitching Hour - retired
On the Edge die, Graveyard - retired
Branch Tree - retired
multiple Movers & Shapers dies - retired

Other:
Tim Holtz Layering Stencil - Falling Stars

Ranger Archival Ink

Stickles glitter glue
DecoArt Fluid Acrylics - Green Gold, Viridian, Cobalt Blue Hue, Cerulean Blue, Metallic Gold
Crystal Clear Acrylic Spray
fun foam
painters' tape

Store links in this post may be affiliate links which do not affect the price you pay but allow me to earn a small percentage of a sale. Thanks! (My husband also thanks you!) If you go shopping at Topflight Stamps, use my code LISAHOEL for 10% off your order.

Friday, October 25, 2019

Haunted Halloween House Steampunk Style

Well it's the weekend before Halloween and I'm getting a few last minute projects finished! Today I have a cute little haunted house to share with you, made using Eileen Hull's House Ornament Die and a whole bunch of Tim Holtz's new Halloween Dies. I think it's great fun and you can put a little battery operated tea light inside.

Those ghosts make me laugh!


It looks really cool lit up too:


I had a random wood spool in my stash that I used as a base:


Did I mention that these ghosts crack me up? =)


I love the look of the Foundry embossed house. Doesn't it look like real metal?? I put foil tape over matboard and ran it through my Big Shot. Black paint rubbed into the details and then wiped off really shows off the design.

One tip for putting the house together. I cut off both of the bottom flaps from the house side parts. Usually you just cut off one and then the other one forms the bottom of your house ornament but I wanted it to be able to sit on top of a tea light.


Thanks for stopping by!

Check out Eileen's blog and if you are not already a member, join the Facebook Eileen Hull Fan Club group. It is a warm, supportive group with lots of inspiration and sharing going on. You'll just have to answer a few simple questions when asking to join (to keep out spammers) and then you'll be added. ;-)

I am entering this into the October Vintage Journey challenge, Inky Wings. I have lovely bats flying around and I used ink to distress the various little diecuts AND I'm also entering this into The Funkie Junkie Boutique It Looks Real Challenge because it looks like the house is made of metal but it is really matboard with foil tape embossed in a 3-D folder. (I think that is a run on sentence, oops.) And last but not least, I have to enter my little steampunk haunted house into the SanDee & amelie's October Steampunk Challenge.

Supplies used:

Dies:
Eileen Hull Sizzix
House Ornament ( Sizzix / SB )

Tim Holtz Sizzix
Bat Crazy ( Sizzix / SB )
Frightful Things Sizzix / SB )
Ghost Town Sizzix / SB )
3-D Texture Fade - Foundry Sizzix / SB )
Gadget Gears 2 

Other:

Distress Inks
Distress Paint - Black Soot
iCraft Decofoil Metallix gel - Glazed Pewter
Stickles glitter glue
black wire
foil tape
Sizzix matboard

Store links in this post may be affiliate links which do not affect the price you pay but allow me to earn a small percentage of a sale. Thanks! (My husband also thanks you!) If you go shopping at Topflight Stamps, use my code LISAHOEL for 10% off your order.

Sunday, October 20, 2019

Spooky Halloween Pocket Notebook Journal

Happy Monday y'all! Cool stamps from Topflight Stamps and Eileen Hull's new Pocket Notebook Die are a match made in heaven! Perfectly spooky, this journal is full of the Halloween vibe:


You know me; I can't resist adding charms to my journals.

I love the owl stamp!

The Pocket Notebook can be made in variable spine widths. For this one, I made it so it could hold five signatures:


Tutorial time!!

Step 1 – I created some Gel Press monprints to adhere to Matboard substrate that I cut the journal out of. I used lighter paint tones for the outside cover sheets and more warm fall colors for the inside sheets. After using Eileen Hull Easy Cut Adhesive to attach the prints to the matboard, I die cut the Notebook cover pieces out. I also die cut my front "frame" piece and painted it with the Fresco Chalk paints so it would look rusty.


I also added some of Seth Apter's Chunky Rust Embossing Powder for even more texture.

Step 2 – I stamped on the covers and embossed the leaves with detail black embossing powder. I used   watered down DecoArt Media Liquid Acrylics to paint inside the embossed images with vivid fall colors. The owl image I watercolored and then glued into its "frame".


Step 3 – I assembled the cover and glued on the rusty frame pieces.


Step 4 – I used black elastic cording to lace up the binding for the signatures. I need to play around with this and come up with a better lacing pattern for a five signature configuration. I don't like how there are two empty spaces on the outside of the spine.


Step 5 – The signatures are simple. I used pattered paper from my stash for the signature covers and a brown recycled stock for the inside pages. Using the elastic for binding makes it really easy to insert the signatures. After I stitched each little signature booklet, I just had to slip it under one of the elastic bands in the spine of the journal.


Thanks for stopping by! Check out Eileen's blog and if you are not already a member, join the Facebook Eileen Hull Fan Club group. It is a warm, supportive group with lots of inspiration and sharing going on. You'll just have to answer a few simple questions when asking to join (to keep out spammers) and then you'll be added. ;-) Also be sure to check out the Topflight Stamps blog for even more inspiration.

I am entering this journal in the It's Halloween! Challenge over at the Funkie Junkie Blog as well as the Mini Album Makers October Challenge.


Supplies used!

Topflight Stamps Products:
IndigoBlu stamp set - Autumn Nights
Crafty Individuals stamp set - The Crow Plate
Visible Image - Scripted Streets
Seth Apter Baked Texture Embossing Powder - Chunky Rust
PaperArtsy Fresco Paint - Mahogany, Chalk, Smoked Paprika
Gel Press Plate

Dies:
Sizzix
Eileen Hull Pocket Notebook ( Sizzix / SB )
Tim Holtz Voltage Sizzix / SB )
Tim Holtz Postage Stamp Frame - retired

Other:

Sizzix Sizzles Matboard
Eileen Hull Easy Cut Adhesive
owl charm
DecoArt Media Liquid Acrylics - Diarylide Yellow, Cadmium Red Hue, Cadmium Orange Hue, Quinacridone Burnt Orange, Burnt Sienna
Tim Holtz Halloween Clippings stickers
Detail Black embossing powder
elastic
watercolors

Some links in this post are affiliate links which do not affect the price you pay but allow me to earn a small percentage of a sale. Thanks! (My husband also thanks you!) If you shop at Topflight Stamps, use my coupon code LISAHOEL for 12% off your order.

Wednesday, October 2, 2019

Party Time with Eileen Hull!


Welcome to the Pocket Notebook Release Party! This is Eileen Hull’s newest book die with Sizzix. On the die, you get all of the pieces you need to make an entire book- the cover, pages, latch and pen loop! The PocketNotebook measures 6 3/4” x 4 1/2” with a spine that can adjust from of 3/8” to almost 2”! String it with elastic, hemp, ribbon or twine. So many option for this fun die!

The new Pocket Notebook Die!


Eileen’s Inspiration and Educator teams have combined to show us their amazing Pocket Notebook ideas. Please follow the Blog Hop to see all of the fabulous projects, techniques and videos!

There are also two GIVEAWAYS – the Pocket Notebook die and a gift certificate for Eileen’s Etsy store. To enter to win, leave a comment on each of the posts. Winners will be announced on Tuesday, October 8 on Eileen’s Facebook Live show.

Here is my Pocket Notebook I created for the party:


If you would like to see more photos and some tutorial / tip photos, scroll on down to the very bottom of this post. Otherwise, look right below for the rest of the hop list! You are almost done. ;-)

Thanks for hopping along with us today!

Lisa Hoel  (you are here)


*************************************

Ready for more?


The front piece is cut using the Trinket Box Die and painted with Viva Croco Crackling Colour in copper. (It is so luscious!) I left a spot blank in the middle for the oval insert, which I stamped and watercolored with the cute Stampotique bird enjoying his warm beverage (surely a pumpkin latte?)


For the cover, I first sprayed the matboard with Distress Oxide Spray Stains to lay down some color. Then I used Dried Marigold Distress Ink to stencil on a leaf pattern. After throughly drying the ink, I added another layer of stenciled leaves but these I embossed with some of Seth Apter's Baked Velvet embossing powders.


As mentioned in the beginning, the Pocket Notebook die cuts the pages for your notebook as well as the cover pieces. You place a few sheets of folded paper (about 8.5 x 6.5 inches) with the fold lined up at the edge. I added a piece of washi tape to my die to show exactly where the fold should go. (There is no cutting blade there.)


Also as mentioned above, there is a wide range of widths you can create with this Notebook Die! I chose to make it three signatures wide by completely overlapping the spine areas (and that makes for a very sturdy spine!)


Thanks for stopping by! Check out Eileen's blog and if you are not already a member, join the Facebook Eileen Hull Fan Club group. It is a warm, supportive group with lots of inspiration and sharing going on. You'll just have to answer a few simple questions when asking to join (to keep out spammers) and then you'll be added. ;-)

Dies:
Eileen Hull Sizzix
Pocket Notebook ( Sizzix / SB )
Book & Pages, Trinket Box & Frame Sizzix / SB )
Spring Leaves ( Sizzix / SB )

Other:

Eileen Hull Clearsnap Blends Ink - Clear
Eileen Hull Easy Cut Adhesive

Sizzix Sizzles Matboard
Stampotique stamp - Cocoa Bird
Tim Holtz Seasonal Chitchat stickers
Darkroom Door stencil - Carved Leaves
Seth Apter Baked Velvet Embossing Powder - Sahara Kit
Emerald Creek Embossing Powder - Burnt Copper Leaves
Viva Croco Crackling Colour - copper
Distress Oxide Ink - Dried Marigold
Distress Oxide Spray Stain - Fossilized Amber, Antique Linen
Distress Stain - Gathered Twigs
Distress Ink - Ground Espresso
elastic
watercolors

Some links in this post are affiliate links which do not affect the price you pay but allow me to earn a small percentage of a sale. Thanks! (My husband also thanks you!) If you shop at Topflight Stamps, use my coupon code LISAHOEL for 10% off your order.