Sunday, December 30, 2018

Last Christmas Project #timholtzholidayhacks

Good-bye 2018, it's been grand! Before you go though I want to share a final Christmas project I made. I have had these Mini Mason Jars and Photo Clip Kits in my stash since last year and I was inspired by Tim Holtz's Holiday Hacks videos to finally get on the stick and actually use them in a project.


It was fun to make little scenes inside with the Salvaged Santas and Snowmen. I painted them and the metal lids of the jars with Distress Paint which sticks well to the plastic and metal. My stash of Idea-ology and other doo-dads served me well for filling the jars and decorating the tops. The Santa photo is my son from several years ago - he wasn't too sure about that bearded guy lol.


and the Santa jar:


Thanks for stopping by and happy New Year!!

Dies:
Tim Holtz - Mini Holiday Greens Sizzix / SB )
Tim Holtz - Funky Festive Sizzix / SB )
Tim Holtz - 3-D Impresslits - Medallion Sizzix / SB )

Other:
Tim Holtz Mini Mason Jars
Tim Holtz Mason Jar Photo Clip Kit
Tim Holtz Salvaged Snowmen
Tim Holtz Salvaged Santas
Tim Holtz Story Sticks - Christmas
Tim Holtz Decorative Deer
Tim Holtz Baubles
Tim Holtz Fringe - Christmas
Tim Holtz Small Talk - Snarky
Distress Crayon - white
Ranger Rock Candy Dry Glitter
Ranger Collage Medium - Matte
Distress Paint - Pine Needles, Festive Berry
Kraft Stock - Metallic
Snow texture paste

Sizzix and Scrapbook.com links in this post are affiliate links which do not affect the price you pay but allow me to earn a small percentage of a sale. Thanks! (My husband also thanks you!)

Saturday, December 29, 2018

2018 Favorite Eileen Hull Projects Round Up!


Happy almost New Years! Hasn't 2018 just flown by? I can't believe that we are days away from 2019. As I was taking a look back at the Eileen projects I created this year, I couldn't just choose one favorite so here are my top four!


Let's start with my wool felt embroidered tea cup pincushions from May.


Wool felt is so easy to cut with both the Sizzix Bigz and Thinlits dies. I used some of Eileen's flower dies to cut the shapes and then went to town embroidering them with decorative stitches.

Number two is the journal I completed to commemorate the Great American Eclipse of 2017. It took me a year but I got it all done just in time for the one-year anniversary of the eclipse. What an experience that was! Check out the tutorial for it on the Mini Album Makers blog.


The journal is full of photos and ephemera from the event!

Number three is my Fall Fairy Trinket Box scene. The Trinket Box Die is perfect for making little dioramas. You can see the how-to post HERE.


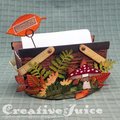
Lastly is the 'Thankful Basket' I made for our Thanksgiving guests to document what they are thankful for. I love the fall woodsy vibe it has:


Thanks for stopping by and I hope you have a lovely finish to your holiday season! Check out Eileen's blog posts for this month. The other Inspiration Team members are sharing their favorite makes from the year too. If you are not already a member, join the Facebook Eileen Hull Fan Club group. It is a warm, supportive group with lots of inspiration and sharing going on. You'll just have to answer a few simple questions when asking to join (to keep out spammers) and then you'll be added. There will be lots of action there in a few weeks when Creativations 2019 kicks off. You'll see Eileen's new releases and probably a lot of behind the scenes and shenanigans. ;-)

Happy New Years!!!

Monday, December 17, 2018

Winter Tree with Topflight Stamps

Hello! Still working on Christmas projects? Once again I have more ideas than time. ;-) I created this project to be more of a 'winter' theme so I can leave it out past Christmas.


This MDF tree kit comes with all sorts of papers and embellishments to use with the tree. I used the cardstock woodland creature embellishments from the kit to add to my scene.


Here's a few tips!

I decided not to cover the tree with paper. I wanted to create a more mixed media look. I started by covering the MDF with a coat of gesso to seal it and prepare the surface.


Then I used some of the Infusions Dye to color the surfaces. You never know quite what you will get from the dye crystals. The color patters are interesting and the dye crystals are very concentrated! A little goes a loooooong way. Once the dye was dry I stamped the pine needles onto all the surfaces with archival ink and heat set it. Then I stamped and embossed the Winter Scene around the base of the tree panels. After assembling the tree and inserting it into the base (I had to sand a bit to get the trunk to fit into the slots on the base) I applied the snow texture paste all around the base surface. Using a strong wet glue, I glued the other elements in place while the snow texture paste was wet and then sprinkled all the exposed snow surfaces with glitter. Some die cut snowflakes completed the look!

Thanks for stopping by! Below is a list of supplies I used. Be sure to check out the Topflight Stamps blog for more inspiration. There is always something fun to see there! Have a great week and Merry Christmas. =)

Topflight Stamps Products:
Darkroom Door - Pine Cones
Katzelkraft - Winter Scene
Studio Light - MDF Christmas Tree Kit
Paper Artsy Infusions Dye - Emerald Isle

Other:
Tim Holtz Sizzix Die - Paper Snowflakes, Mini ( Sizzix / SB )
Tim Holtz Idea-ology - Christmas Typography
Ranger Archival Ink - Library Green
Versamark Ink
gesso
Deco Art Snow Tex
black embossing powder
Ranger Rock Candy Dry Glitter
mini trees
mini pinecones
preserved juniper greens

Scrapbook.com and Sizzix links in this post are affiliate links which do not affect the price you pay but allow me to earn a small percentage of a sale. Thanks! (My husband also thanks you!)

Wednesday, December 12, 2018

Christmas Travelers

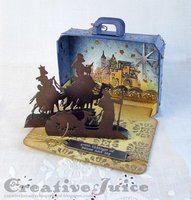
Mary and Joseph, pack your bags because you need to start on your trip to Bethlehem. Christmas is coming! ;-) Eileen Hull's Suitcase Die is a perfect setting for this nativity scene.


I was also inspired by several of the Holiday Hacks that Tim Holtz recently shared in a pair of videos. (Check them out!) Here are some tips on how I created this.

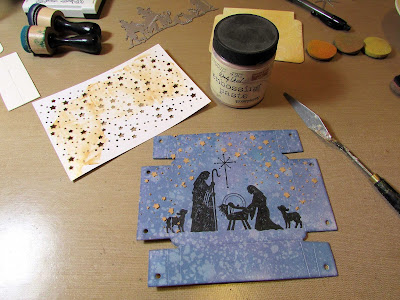
1) I used a die to create a starry sky stencil. I didn't have a real stencil that would work but the Scattered Stars die was just the right scale for what I needed. I cut the pattern twice into a piece of heavy cardstock and used that for my stencil. It's only good for a few uses, but that's all I needed. This is a good way to get more use out of your dies!


2) I used one of Tim's hacks to create the standing wise men. He showed how you can make stand up shapes with your Bigz dies. The Wise Men die is a Thinlit and not a Bigz die so I had to use paper instead of cardstock. (Doubled cardstock wouldn't have cut well with the Thinlit die.) Because this particular die doesn't have a bottom cutting edge, I didn't have to do the 'W' fold technique that Tim showed. I guess mine was a 'U' fold lol.


I glued the heads of the figures together to make a table tent of sorts for these.


Two other 'hacks' I used were the 'Distress crayon filling in the words of the word band' and 'glittering the adornments charm'. Check out Tim's hack videos for all his tips. There are lots of great ideas in them.


Also be sure to check out Eileen Hull's blog! All this month the Inspiration Team is sharing holiday makes so you can get lots of ideas there as well. Also join us in the Eileen Hull Fan Club on Facebook. You have to ask to join and answer a few questions (so we can keep the scammers out and make sure you are a real crafter person) but one of the admins should approve you quickly. It's a friendly group filled with lots of craft talk and inspiration!

I am also entering this in the 'Star Light Star Bright' Challenge over at Vintage Journey. Lots of stars in this project! 

Thanks for stopping by and merry Christmas!

Dies:
Eileen Hull Sizzix
Bag, Suitcase ( Sizzix )
Credit Card Sleeve & Tags (Sizzix )
Embossing Folder - Daisy Wreaths

Tim Holtz - 3-D Impresslits Mini Scallop Sizzix / SB )
Tim Holtz - Wise Men Sizzix / SB )
AJVD - Scattered Stars

Other:
Stampendous Nativity Carol stamp set (CRS6003)
Tim Holtz Layering Stencil - Rosette
Ranger Archival Ink - Jet Black
Distress Inks - Chipped Sapphire, Vintage Photo
Distress Oxide Inks - Fossilized Amber, Scattered Straw, Brushed Corduroy, Broken China, Chipped Sapphire, Faded Jeans
Sizzix mat board
Metallic Kraft stock paper
Dreamweaver embossing paste - Metallic Gold
Ranger Dry Glitter - Rock Candy
Ranger Distress Collage Medium - matte
Tim Holtz Idea-ology Christmas Adornments
Tim Holtz Idea-ology Christmas Word Bands - retired
Emerald Creek Baked Texture embossing powder - Dirty Sand
Distress Crayon - Picket Fence (in Set 3)
small brads
jump rings

Sizzix and Scrapbook.com links in this post are affiliate links which do not affect the price you pay but allow me to earn a small percentage of a sale. Thanks! (My husband also thanks you!)

Tuesday, December 4, 2018

Christmas Angel Card for Topflight Stamps

Good morning! This week over at the Topflight Stamps blog we are showcasing Crafty Individuals stamps. They have so many gorgeous stamps, especially Christmas ones! I used the Christmas Angel of Love stamps and a slightly non-traditional color palette to create my joy card.


Thanks for stopping by! Below is a list of supplies I used. Be sure to check out the Topflight Stamps blog for more inspiration. There is always something fun to see there! Have a great week and happy Thanksgiving. =)

Topflight Stamps Products:
Crafty Individuals - Christmas Angel of Love
Crafty Individuals - Crackle Background

Other:
Tim Holtz Sizzix Die - Cameo Frame
Tim Holtz Sizzix Die - Festive Greens
Tim Holtz embossing folder - Sparkles ( Sizzix / SB )
Tim Holtz Kraft Stock - Metallic - Confections
Distress Watercolor Cardstock
Ranger Archival Ink - Jet Black
Ranger Distress Ink - Tattered Rose, Aged Mahogany, Ground Espresso
Ranger Oxide Ink - Tattered Rose, Hickory Smoke
Tim Holtz Big Chat Stickers

Scrapbook.com and Sizzix links in this post are affiliate links which do not affect the price you pay but allow me to earn a small percentage of a sale. Thanks! (My husband also thanks you!)

Tuesday, November 27, 2018

Robots Wishing a Happy Birthday

Hello! I'm here today to share a birthday card I made for my son using the hilarious Katzelkraft Robot stamps available from Topflight Stamps. As with many of the Katzelkraft stamps, these make me smile and I knew my son would enjoy them too.


The background is metallic cardstock embossed with the Foundry embossing folder. I stamped and fussy cut the robots out to layer over the background. (In case you are rusty on converting numbers to binary, 1111 = 15. ;-)  )

Thanks for stopping by! Below is a list of supplies I used. Be sure to check out the Topflight Stamps blog for more inspiration. There is always something fun to see there! Have a great week and happy Thanksgiving. =)

Topflight Stamps Products:
Katzelkraft - Robots 2
Katzelkraft - Holiday Quotes
That's Crafty - Dinky Stencil, Burst
Paper Artsy Fresco Finish Paint - Coral, Banana

Other:
Tim Holtz Sizzix 3-D Embossing Folder - Foundry ( Sizzix / SB )
Tim Holtz Layering Stencil - Numbered
Tim Holtz Metallic Kraft Stack
Ranger Archival Ink - Jet Black
Ranger Distress Paint - Black Soot
gel pens
watercolors

Scrapbook.com and Sizzix links in this post are affiliate links which do not affect the price you pay but allow me to earn a small percentage of a sale. Thanks! (My husband also thanks you!)

Thursday, November 22, 2018

Eileen Hull & Emerald Creek Blog Hop!

Warm thoughts are unfolding, 

as we begin to enter a festive time of year. Eileen, Kim and The Teams have created a fun blog hop challenge to kick of the American Thanksgiving and Winter festivities.

To play along all you need to do is follow along and comment on every blog. If you play along and link up your own creation using Eileen and Emerald Creek products, you will get 2 bonus entries for the draw. Contest Closes on Sunday November 25th, with the Winner announced Cyber Monday!

Prize includes an Eileen Hull Journal Die and a $50.00 gift certificate to the Emerald Creek Shop.

I created a little Passport Journal using some of Eileen's dies and Emerald Creek's stamps! The snowflake background was stamped and embossed with clear powder before I added the blue ink. Eileen's ColorBox Blends do blend beautifully and the built in sponge applicator is a cinch to use.


Here is the Blog Hop List:

You are here ---> Lisa Hoel 


Thanks for stopping by! Have fun hopping and good luck winning!

Emerald Creek Stamps:
Snowflake
Tiny Tim
Let It Snow

Emerald Creek Embossing Powder:
Allure - Soft Fallen Snow
Allure - Onyx Frost
Clear Fine Gloss

Dies:
Eileen Hull Passport Book Sizzix / SB )
Eileen Hull Bookplate, Hinges & Label Sizzix / SB )
Tim Holtz - Funky Festive Sizzix / SB )

Other:
Eileen Hull ColorBox Blends ink - Uniform, Hydranga
Ranger Archival Ink - Jet Black,
Sizzix mat board
Ranger Texture Paste
Tim Holtz mini Snowcap Layering Stencil from Simon Says Stamp exclusive set
Tim Holtz Idea-ology Snowflake charm
elastic
watercolors
Distress Rock Candy Glitter

Sizzix and Scrapbook.com links in this post are affiliate links which do not affect the price you pay but allow me to earn a small percentage of a sale. Thanks! (My husband also thanks you!)

I'm also entering this into the Mini Album Makers November/December challenge.

Tuesday, November 20, 2018

Christmas Tags with Topflight Stamps

Hello and welcome to the holiday season! Happy Thanksgiving if you are here in the US and hang onto your warm fuzzy hats because Christmas is right around the corner! I have a tag and its tutorial to share with you today. I bleached loads of pine cones to sell at a craft bazaar this fall and I wanted to make tags to put on the bags. I wanted them to be festive but fairly simple since I had to make so many of them! The Darkroom Door Pine Cones stamp set was just what I needed. Added bonus: the bottom part is perforated so you can tear it off and be left with a gift tag for another use.


The bleached pine cones are perfect for decorating with and make a nice change from regular brown cones.


Here's the how-to:

Step 1 – I cut tags out of old manila folders. (You can buy pre-made tags too.) Assembly line tactics are key here. I laid down an initial layer of background color and texture by squishing Antique Linen Distress Stain onto my craft mat and then applying it to the tags with a brayer. It makes a cool streaky effect.


Step 2 –  More texture was added with random stamping with the Crackle Background stamp and Pale Ochre ink.


Step 3 – Mask sheets are a Tim Holtz product that has been discontinued which is too bad because it's really useful! There must be a similar product out there so look around if you can't find these somewhere. I stamped the pine cone onto the mask sheet with archival ink and then cut it out with fine tipped scissors. Then I stamped the pinecone in place on the tag and covered it with the mask in preparation for stamping the needles.


Step 4 – I stamped the pine needles twice with 'full strength' ink and once with the residual ink left on the stamp to make a lighter green area behind the pine cone.


Step 5 – Finishing the tag…
I made the description/price tag using a graphics program and printed them out on kraft label paper. I cut them out and stuck them onto the bottoms of the tags. About an 1/8th of an inch above the edge of the label, I used the perforation tool to inscribe a perforated line. When it's bent at the line it will rip right off so all the 'commercial' stuff is removed.

As a final step, I used a Ground Espresso Distress Marker and the Marker Spritzer to add a splatter of dark speckles over all the tags.

NOTE: All week long Topflight Stamps is having a daily deal sale! Today you can get Gel Printing Texture Plates for 25% off! Check it out and keep an eye on the site to see what the rest of the deals are. ;-)


Thanks for stopping by! Below is a list of supplies I used. Be sure to check out the Topflight Stamps blog for more inspiration. There is always something fun to see there! Have a great week and happy Thanksgiving. =)

Topflight Stamps Products:
Darkroom Door - Pine Cones
Crafty Individuals - Crackle Background


Other:
Tim Holtz Sizzix Die - Tag & Bookplates retired
Ranger Archival Ink - Pale Ochre, Potting Soil, Fern Green, Library Green, Red Geranium
Ranger Distress Stain - Antique Linen
brayer
Tonic Perforator Tool
Ranger Marker Spritzer Tool
Distress Marker - Ground Espresso
red & white bakers twine
Tim Holtz Mask Sheets - discontinued =(

Scrapbook.com and Sizzix links in this post are affiliate links which do not affect the price you pay but allow me to earn a small percentage of a sale. Thanks! (My husband also thanks you!)

Monday, November 19, 2018

Being Thankful Basket

Happy almost Thanksgiving to my USA readers! I always try to be thankful as a matter of course but this time of year gives us extra reason to pause and really take a look at all we have to be grateful for. For my November Eileen Hull project, I created a fall themed Basket as a table decoration. It holds blank cards that people can take out and write what they are thankful for on. I've done this before at Thanksgiving dinners and it makes for a great family snapshot and memories. I have so many things to be thankful for – a snug house, family close by, lots of love… I could fill up a whole basket of cards myself!


Check out the how-to:

Step 1 – I used the Lumber 3-D Texture Fade Embossing Folder to texture the matboard before I cut the basket out of it. First I misted both sides of it with Distress Spray Stain. While it was still a little damp I ran it through my Big Shot in the embossing folder. The texture you get with the folder is amazing!


Step 2 – Tim Holtz has recommended using Distress Crayons as one method of coloring the embossed texture so I gave it a try. I did it in sections so the crayon wouldn't dry before I blended it. I scribbled on Vintage Photo and Walnut Stain crayon and then blended it with a wet finger. When it was all dry I cut out the main parts of the basket.

The top piece has the blended crayon done.
Step 3 – I wanted the handles to be lighter so I used Eileen's Golden ColorBox Blends ink to color another piece of matboard. I stamped it with a  wood grain texture stamp on one side and then cut the handle pieces out of it.


Step 4 – I assembled the basket and glued it onto an oval of patterned paper covered matboard for a base. I added a strip of grass cut with Eileen's Grass die.


Lastly I added all the plants and flowers. I used the Funky Foliage and Funky Floral 3 die sets to cut them all out. I think I am love with the little mushrooms in the Funky Foliage set!

Thanks for stopping by. Be sure to visit Eileen's blog and check out the other posts for this month! I am also entering this in Frilly & Funkie's current challenge, A Harvest of Gratitude. Check out their blog too!

Dies:
Eileen Hull Sizzix
Basket ( Sizzix / SB )
Journaling Cards, Flowers & Leaves ( Sizzix / SB )
Grass ( Sizzix / SB )

Tim Holtz - Funky Foliage Sizzix / SB )
Tim Holtz - Funky Floral #3 Sizzix / SB )
Tim Holtz - Movers & Shapers Sized Ovals Sizzix )

Other:
Eileen Hull ColorBox Blends Ink - Golden
Tim Holtz 3-D Texture Fade Embossing Folder, Lumber ( Sizzix / SB )
Ranger Archival Ink - Pale Ochre
Distress Inks - Forest Moss, Ground Espresso
Distress Spray Stain - Tea Dye, Vintage Photo
Sizzix mat board
Distress Crayons - set 3
Tim Holtz Chitchat Seasonal stickers
Tim Holtz Memo Pins

Sizzix and Scrapbook.com links in this post are affiliate links which do not affect the price you pay but allow me to earn a small percentage of a sale. Thanks! (My husband also thanks you!)

Monday, November 12, 2018

Sneak Peek!

Good morning! I have a new card posted on the A Jillian Vance Design blog and wanted to tease you with a peek. Head on over to see the whole thing!


Thanks for stopping by and have a great week.

Wednesday, October 31, 2018

Halloween Eileen Hull Journal

Hello and Happy Halloween!! I have a final treat for you today; no tricks I promise! I whipped up a spooktacular little book using Eileen Hull's ever so versatile Journal Die and lots of Tim Holtz dies and stamps.

BOO!!


The journal covers I first colored with multiple colors of Distress Oxide Inks in yellows, oranges and greens. I really love how the Oxides blend and react with water. Spritzing, sprinkling and dabbing got me the texture I desired. For the front cover overlay, I cut a piece of mixed media paper to fit so it was inset a bit from the edges. I used black, purple and grey inks to blend the background and make it gradate from dark to light. The Tim Holtz Stamping Platform made it easy to position the haunted house, tree etc. stamps and ensure even stamping coverage. I then cut the eyes and word out with the Frightening Faces and Alphanumeric, Cutout Lower die sets before glueing it onto the journal front.


The back has stamping and a cutout from the Cobweb die for embellishment.

Thanks for stopping by. Be sure to visit Eileen's blog and check out the other posts for this month! All month the Inspiration Team has been sharing fall and Halloween projects. =) I am also adding this journal to the October Mini Album Makers Challenge.


Dies:
Eileen Hull Sizzix
Journal ( Sizzix / SB )

Tim Holtz - Frightening Faces Sizzix / SB )
Tim Holtz - Alphanumeric, Cutout Lower Sizzix / SB )
Tim Holtz - Cobweb Sizzix )

Other:
Tim Holtz stamp set - Mini Halloween 2
Tim Holtz stamp set - Haunted House
Tim Holtz stamp set - Halloween Cutouts
Ranger Archival Ink - Jet Black, Orange Blossom
Distress Inks - Black Soot, Dusty Concord
Distress Oxide Inks - Black Soot, Shaded Lilac, Weathered Wood, Spiced Marmalade, Wild Honey, Crushed Olive, Twisted Citron, Fossilized Amber, Squeezed Lemonade
Distress Spray Stain - Fossilized Amber, Twisted Citron
Sizzix mat board
Halloween Idea-ology charms (from a few years ago)
A Jillian Vance Design Pear Pins
elastic
gold embossing powder
Versamark Ink Pad (for embossing moon)

Sizzix and Scrapbook.com links in this post are affiliate links which do not affect the price you pay but allow me to earn a small percentage of a sale. Thanks! (My husband also thanks you!)