Showing posts with label mermaid. Show all posts

Wednesday, July 19, 2023

Funkie Junkie Focus – Summer Fun

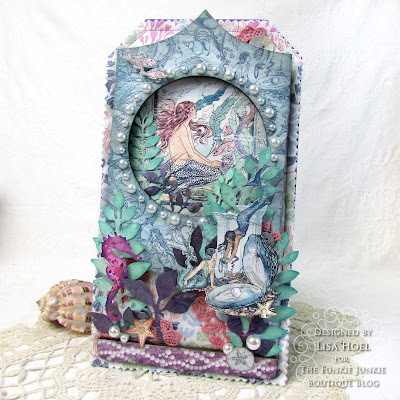
Hello Funkie Junkie fans! Our new theme is "Summer Fun". I always think of beach and ocean themed things as a part of 'summer' so I pulled out the Graphic 45 "Make a Splash" paper pad and started to play.

Lisa Hoel for The Funkie Junkie Boutique    #creativejuicefreshsqueezed #Graphic45 #mymakingstory #tim_holtz #thefunkiejunkieboutique #sizzix

The Tim Holtz Etcetera tags and parts make perfect bases! The new Facades coordinate perfectly with the tags and add a lot of dimension.

Lisa Hoel for The Funkie Junkie Boutique    #creativejuicefreshsqueezed #Graphic45 #mymakingstory #tim_holtz #thefunkiejunkieboutique #sizzix
Graphic 45 papers always have so much lovely detail built into each collection. The focal designs are perfect for fussy cutting.

Lisa Hoel for The Funkie Junkie Boutique    #creativejuicefreshsqueezed #Graphic45 #mymakingstory #tim_holtz #thefunkiejunkieboutique #sizzix

Here are some looks at the "in progress"

1) First I painted the edges of the tag with purple. I cut a piece of fabric and thin quilt batting to fit the front of the tag and stitched around the edges.


2) I stitched on some scraps of lace and shell buttons before I adhered the fabric to the tag base. Then I went to town layering away.


The purple foliage I cut from some scraps of painted and heat treated Tyvek I had from this project.

Thanks for stopping by. Keep an eye on the Funkie Junkie Boutique Blog, Inspiration Ave. because you are now getting regular doses of expanded (and inspiring) content each week. Don't miss it…

Supplies used:

Graphic 45 8"x8" Paper Pad - Make a Splash
Graphic 45 4x6 Stamp Set - Make a Splash
Tim Holtz Thinlits Die Set - Garden Greens
Tim Holtz Bigz Die - Garden Greens 659436

Tim Holtz Idea-ology: 
Etcetera Medium Tag Thickboards
Etcetera Facades
Etcetera Bracket Trims
Baubles

Distress Archival Ink - Black Soot
Distress Ink - Evergreen Bough, Wilted Violet, Bundled Sage
Distress Paint - Wilted Violet

Wednesday, August 10, 2022

New Funkie Junkie Challenge - Chillin' In the Heat

Hello there, our new challenge at the Funkie Junkie Boutique Blog is up and running and you won't want to miss out! Our hostess is Lyla Larimore and the theme is Chillin' In the Heat.

Lyla -" It's the last days of Summer before School begins. What's your favorite part; the heat of the sunshine and laying by the pool or on the beach... or keeping cool in the water, and loading up on cold lemonade in the shade? Let's see a make of your choice – Tag, book, panel, 3D project, etc – with either HOT design using warm colors (red, orange, yellow. etc) or COOL design using cool colors (blues and greens). Use anything at your will to dress up your design and compliment your idea of the perfect degree!"

Lisa Hoel for The Funkie Junkie Blog challenge – made using Eileen Hull's Skinny Mini Book Box Die #creativejuicefreshsqueezed #EileenHull  #eileenhulldesigns #timholtz #sizzix #mymakingstory #thefunkiejunkie #thefunkiejunkieboutique #frillyandfunkie

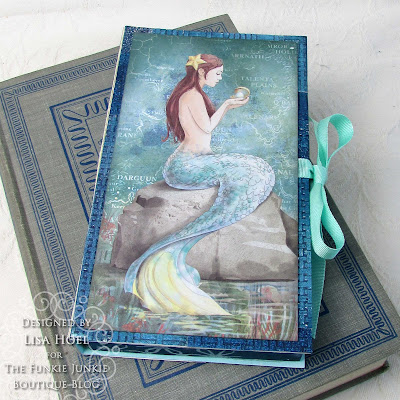
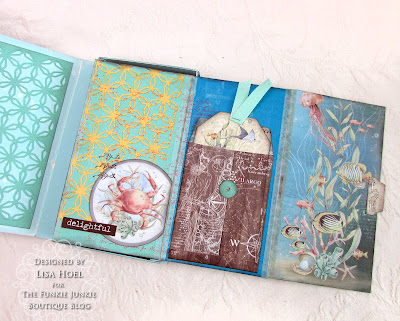
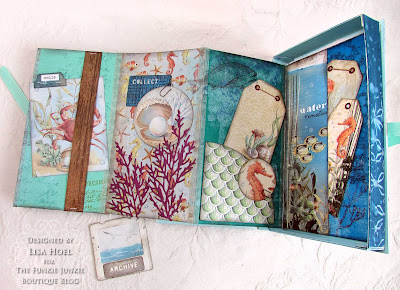
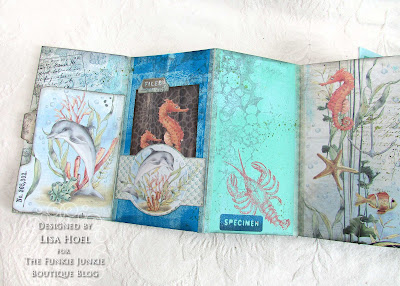
When the hot weather hits, staying cool is on my mind! I opted for a cool color scheme,  using beautiful watery patterned paper from Ciao Bella. (How can I resist mermaids?) I used Eileen Hull's brand new Scoreboards die, the Skinny Mini Book Box and made an accordion journal to fit inside. I was inspired by a project made by the talented Jenny Marples for Eileen's Chapter 3 Release Party. Jenny created an accordion journal and I loved the format!

Lisa Hoel for The Funkie Junkie Blog challenge – made using Eileen Hull's Skinny Mini Book Box Die #creativejuicefreshsqueezed #EileenHull  #eileenhulldesigns #timholtz #sizzix #mymakingstory #thefunkiejunkie #thefunkiejunkieboutique #frillyandfunkie

Lisa Hoel for The Funkie Junkie Blog challenge – made using Eileen Hull's Skinny Mini Book Box Die #creativejuicefreshsqueezed #EileenHull  #eileenhulldesigns #timholtz #sizzix #mymakingstory #thefunkiejunkie #thefunkiejunkieboutique #frillyandfunkie

The journal unfolds from the box and is full of beautiful papers, tags, bits, bobs and tuck spots. Let's take a look at the page panels. I embellished both the fronts and the backs.

Lisa Hoel for The Funkie Junkie Blog challenge – made using Eileen Hull's Skinny Mini Book Box Die #creativejuicefreshsqueezed #EileenHull  #eileenhulldesigns #timholtz #sizzix #mymakingstory #thefunkiejunkie #thefunkiejunkieboutique #frillyandfunkie

Lisa Hoel for The Funkie Junkie Blog challenge – made using Eileen Hull's Skinny Mini Book Box Die #creativejuicefreshsqueezed #EileenHull  #eileenhulldesigns #timholtz #sizzix #mymakingstory #thefunkiejunkie #thefunkiejunkieboutique #frillyandfunkie

Lisa Hoel for The Funkie Junkie Blog challenge – made using Eileen Hull's Skinny Mini Book Box Die #creativejuicefreshsqueezed #EileenHull  #eileenhulldesigns #timholtz #sizzix #mymakingstory #thefunkiejunkie #thefunkiejunkieboutique #frillyandfunkie

Lisa Hoel for The Funkie Junkie Blog challenge – made using Eileen Hull's Skinny Mini Book Box Die #creativejuicefreshsqueezed #EileenHull  #eileenhulldesigns #timholtz #sizzix #mymakingstory #thefunkiejunkie #thefunkiejunkieboutique #frillyandfunkie

Lisa Hoel for The Funkie Junkie Blog challenge – made using Eileen Hull's Skinny Mini Book Box Die #creativejuicefreshsqueezed #EileenHull  #eileenhulldesigns #timholtz #sizzix #mymakingstory #thefunkiejunkie #thefunkiejunkieboutique #frillyandfunkie

Lisa Hoel for The Funkie Junkie Blog challenge – made using Eileen Hull's Skinny Mini Book Box Die #creativejuicefreshsqueezed #EileenHull  #eileenhulldesigns #timholtz #sizzix #mymakingstory #thefunkiejunkie #thefunkiejunkieboutique #frillyandfunkie

Lisa Hoel for The Funkie Junkie Blog challenge – made using Eileen Hull's Skinny Mini Book Box Die #creativejuicefreshsqueezed #EileenHull  #eileenhulldesigns #timholtz #sizzix #mymakingstory #thefunkiejunkie #thefunkiejunkieboutique #frillyandfunkie

Lisa Hoel for The Funkie Junkie Blog challenge – made using Eileen Hull's Skinny Mini Book Box Die #creativejuicefreshsqueezed #EileenHull  #eileenhulldesigns #timholtz #sizzix #mymakingstory #thefunkiejunkie #thefunkiejunkieboutique #frillyandfunkie


Thanks for stopping by! I hope you check out the fun challenges we have on the Funkie Junkie Boutique Blog. They are always good for sparking your creativity! You have two weeks to join the current challenge so I hope you give it a go.

Supplies used:
Eileen Hull die - Skinny Mini Book Box
Eileen Hull die - Skinny Mini Elements
Eileen Hull die set - Folio Page, Pocket & Flowers
Eileen Hull 3-D embossing folder - Woven Leather
Tim Holtz die set - Collector
Tim Holtz die set - Postale
Tim Holtz die set - Specimen

Ciao Bella patterned paper - Underwater Love CBCL050, CBH050 (on sale!!)
Tim Holtz stamp sets - Sealife, Ledger Script, Bubbles, Field Notes, Tiny Toadstools, Eccentric

Distress Ink - Uncharted Mariner, Hickory Smoke, Black Soot
Distress Oxide Ink - Uncharted Mariner, Abandoned Coral
Ranger Archival Inks - Black SootHickory Smoke, Fern Green, Garden Patina


Saturday, April 10, 2021

Mermaid Card with Topflight Stamps

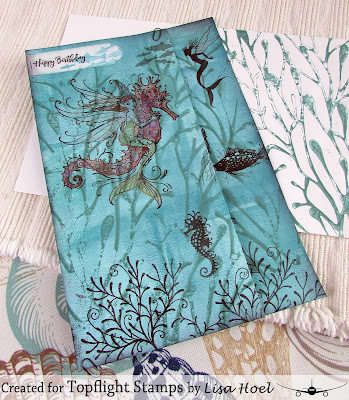
Happy Saturday y'all! If you participated in the recent 4th Birthday Blog Hop Celebration with Topflight Stamps, then you probably got a peek at the mermaid birthday card I'm going to share with you today. My sister-in-law loves mermaids so I always have fun making her a themed card each year. I also have a short tutorial at the end for the background I made using PaperArtsy Fresco Paints. It's easy and looks really cool!

Here's the card:

Lisa Hoel for Topflight Stamps - mermaid birthday card using Pink Ink Designs and Lavinia stamps

I made it an accordion type folded card so you could extend the whole scene when you opened it up.

Lisa Hoel for Topflight Stamps - mermaid birthday card using Pink Ink Designs and Lavinia stamps

The stamps used are from Pink Ink Designs and Lavinia and they play very well together! (See supply list for exact stamps.) I used twinkling metallic watercolor paints to color the mermaids. They are very glimmery!

The background is created using PaperArtsy Fresco Paints. These chalk acrylic paints dry with a matte surface and are perfect for stamping and inking on top of.

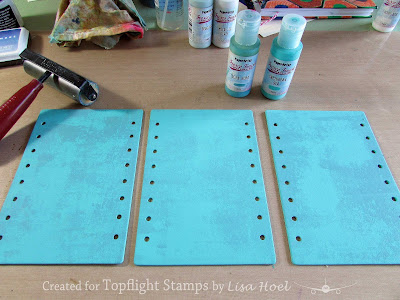
Step 1 – Using a brayer and three different colors of paint, I covered the cardstock in a patchy manner so there would be color variation.


Step 2 – I used the Lavinia Coral stencil to monoprint on top of the background. First I squeezed some paint onto my craft sheet and then brayered it out into a thin layer. I then misted it with water so it would be "soppier" and give me the watery effect I wanted. I lightly applied this paint to the back of the stencil with the brayer and then flipped it over onto the background. I pressed it down with a paper towel to transfer the paint and soak up any extra that squished out.


I did that a few times on the background and also on the card envelope.


Once I was done, I went ahead with my stamping and painting. I did use a stamping platform for more control.

Thanks for stopping by and be sure to check out all the wonderful products from around the world you can find all in one place, Topflight Stamps.

Supplies used:

Topflight Stamps Products:

Pink Ink Designs - Shell Nymph, Sea Nymphs
Lavinia Stamps - Shoal of Fish, Mini fish, Fish Set, Sea Creatures
Darkroom Door - Happy Birthday Sentiment
Lavinia Stencil - Coral
PaperArtsy Fresco Finish Chalk Paint - Mermaid, Paua Shell, Bora Bora, Dusty Teal
Versafine Black Pigment Ink

Other:
cardstock
Twinkling metallic watercolors

Some links in this post are affiliate links which do not affect the price you pay but allow me to earn a small percentage of a sale. Thanks! (My husband also thanks you!) If you shop at Topflight Stamps, use my coupon code LISAHOEL for 12% off your order.

Monday, March 23, 2020

Mermaid Garden Shaker Card with Eileen Hull

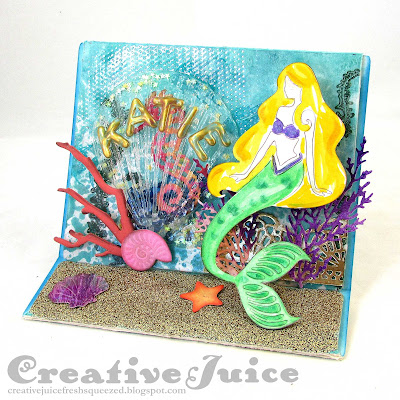
What a month this has been! At least we can continue to look outside and see spring unfold. I've been working hard in my yard getting all the spring cleanup done. I'm eager to see some flowers start to bloom. All this month on Eileen Hull's blog the Inspiration Team has been busy creating and sharing lovely projects celebrating spring. I created a mermaid's garden shaker card mounted on a base cut with Eileen's new Display Stand Sizzix Die. I made it as a birthday card for my sister-in-law Katie who is a fellow lover of mermaids.


The shaker front is a sample from the January Creativation show. We R Memory Keepers was demoing one of their new (very cool!!) machines, a Mold Press. (see the short demo video here) It is basically a mini vacuum form machine and you can mold a sheet of hot plastic over pretty much everything! They had a scallop shell and foam stick on letters so I got the bright idea to make one with my SIL's name so I could use it later for a card. (Thinkin' ahead I was!!) So check out the video. I'm not gonna lie, I'm coveting one of those machines lol.

I applied a bit of gold paint to the inside of the letters to make them stand out.

The Display Stand has a built in stand that you can pop up and down so you can fold it flat for mailing (although this one isn't very flat ;-) I mailed it popped up in a box along with her present.


Here are a few peeks at how I put this together:

Step 1 - I inked up a sheet of Mat board with the blue background and then cut out my stand. Then I stamped a bit in the background. I figured out how the shaker front was going to fit onto the front and traced the cut lines with a sharpie marker. It was easy to cut with sharp scissors.


I prepared my mermaid and sea horse die cuts and also painted a bit of gold paint on the inside of the letters of her name to make them stand out.

Step 2 – Filling the shaker was a little tricky. I carefully made a little pile of the shaker bits in the middle of the area under the shell. I then applied Glossy Accents to the back of the plastic front and carefully laid it onto the front of the card. I pressed it down tightly with my hands and held it in place for a few moments until it started to hold. Then I weighted it down until it was totally dry.


When it was dry, I embellished the front with my die cuts and a layer of Dirty Sand embossing powder for the ocean floor.

It it is a little confusing on how to fold the Display Stand at first. Eileen Hull has created a short video on how to do it! Feel free to watch it several times. ;-)


Thanks for stopping by! Check out Eileen's blog and if you are not already a member, join the Facebook Eileen Hull Fan Club group. It is a warm, supportive group with lots of inspiration and sharing going on. You'll just have to answer a few simple questions when asking to join (to keep out spammers) and then you'll be added. ;-)


Dies:
Eileen Hull Sizzix
Display Stand Sizzix / SB )

Tim Holtz Sizzix
Holiday Greens Mini ( Sizzix / SB )
Crochet Sizzix / SB )

Dream Mermaid Sizzix / SB )

Other:
Eileen Hull Embossing Powder by Emerald Creek - Aqua Splash
Eileen Hull Embossing Powder by Emerald Creek - White Wonder
Eileen Hull Clearsnap Blends Ink - Clear
Sizzix Mat board
Lavinia Stamps - Sea Creatures, Seaweed 2
Baked Texture Embossing Powder - Dirty Sand
Glossy Accents
cardstock
various beads and sequins for shaker
shell mold press shaker front

Some links in this post are affiliate links which do not affect the price you pay but allow me to earn a small percentage of a sale. Thanks! (My husband also thanks you!) If you shop at Topflight Stamps, use my coupon code LISAHOEL for 12% off your order.

Sunday, September 22, 2019

Listen to the Current of Your Heart with Topflight Stamps

Hello! This week the Design Team over on the Topflight Stamps blog is taking a look at a new product in the store: MDF desk plaques by Debbi Moore. There are designs for every occasion! I received a mermaid themed one to decorate. (Donna knows me so well!)


The plaques are made from laser cut MDF and come ready for you to paint, ink, spray and otherwise doctor up however you like. They would make a great gift or piece of home decor! I used Fresco chalk paint, glitter paint, embossing powder and foil to bling mine up.


Let's take a look at the how-to:

Step 1 – I chose three different Fresco paints to use for my base coats. First off I painted it all over  with Mermaid, the lightest color.


I dry brushed on the other colors so the base coat would have a mottled effect.


Step 2 – After painting the base coat, I added some touches of pink (Prawn) as well as some teal glitter paint on the lettering. I also wanted to add foil to the figure of the mermaid. I applied TCW's Tacky-When-Dry Gel Medium through a stencil. When it had dried, I applied the foil. (see next)

Gel Medium is wet here. It dries clear...but tacky!

Step 3 – Applying the foil is easy! I laid a sheet of the foil (dull side down) over the tacky gel medium and burnished it. The foil sticks to the gel. Peel back the sheet and the foil stays behind! I also added some Dirty Sand embossing powder to the base.


Thanks for stopping by! Below is a list of supplies I used. Be sure to check out the Topflight Stamps blog for more inspiration. All week long we will be sharing more of these plaques. =)

Topflight Stamps Products:
Debbi Moore MDF Life Quotes Plaque - Mermaid Current of Your Heart

Paper Artsy Fresco Chalk Paint - Caribbean Sea, Mermaid, Captain Peacock, Prawn
Seth Apter Baked Texture Embossing Powder - Dirty Sand 
AALL & Create stencil - ACS#53

Other:
Ranger Emboss-It Dabber
TCW – Tacky-When-Dry Gel Medium
iCraft Deco Foil - Lilac
Aladine - IZink Diamond glitter paint - Vert Pastel

Some links in this post are affiliate links which do not affect the price you pay but allow me to earn a small percentage of a sale. Thanks! (My husband also thanks you!) If you shop at Topflight Stamps, use my coupon code LISAHOEL for 10% off your order.

Monday, August 12, 2019

Under the Sea Triptych with Topflight Stamps

Hello there!! Today I have an ocean themed triptych to share with you. It's a piece of home decor that is going to sit on a shelf in my entryway for the summer. =)


Here's a little closer look of each panel:


Here's a little how-to for the background:


I had the set of chipboard cards languishing in my stash. I'm glad I could finally use them! I first base coated them with Paper Artsy Fresco Chalk Paint, Caribbean Sea. I added a bit of texture over the top by lightly brayering Bora Bora paint over the top when it was dry.


Next I stamped the Seaside Word Block stamp onto the panels using Sea Glass Fresco Paint. Be sure to immediately clean your stamp!! The paint dries quickly. I added pieces of washi tape over the top. It's hard to see in the photo, but over the top of all of that, I stenciled it using the Fibres stencil and Fresco Metallic Glaze Paint. It shows when the light hits it.

I stamped the mermaids and fish using the Lavinia stamps (see below). After that I stamped all the sea creatures and coral onto watercolor paper, painted it, and fussy cut all them all out to apply to the panels. I glued on some Classic Pearls to give it a bit of undersea bling.

Thanks for stopping by! Below is a list of supplies I used. Be sure to check out the Topflight Stamps blog for more inspiration. There is always something fun to see there! 


Topflight Stamps Products:
Darkroom Door - Word Block, Seaside
Lavinia Stamps - Alana Mermaid, Guinevere Mermaid, Sea Creatures
Studio Light - Ocean View #369
Alexandria Renke Washi - Blue Mermaids
Visible Image Stencil - Fibres
Paper Artsy Fresco Chalk Paint - Sea Glass, Bora Bora, Caribbean Sea, Metallic Glaze
Hunky Dory - Classic Pearls
watercolors

Some links in this post are affiliate links which do not affect the price you pay but allow me to earn a small percentage of a sale. Thanks! (My husband also thanks you!) If you shop at Topflight Stamps, use my coupon code LISAHOEL for 10% off your order.

Thursday, June 27, 2019

Mermaid Wrapped Journal with Eileen Hull

Hello there! I'm finally getting my June project for Eileen Hull posted! =) Eileen has new branded products through Therm-o-web as well as Clearsnap inks and the Design Team is highlighting them this month. Therm-o-web was so generous and sent each of us a big box of goodies to use in our projects! It was like Christmas opening that box.

woo-hoo!!! Thanks Therm-o-web!
I tried to use as many of the products they sent as I could as well as Eileen's Blends 2 inks. I think you'll like the result. ;-) Read on for photos and tons of techniques!


I created a mermaid themed Wrapped Journal! (You know me and mermaids lol.)

I love the flap that closes the journal.

Back side.


The inside is lined with mermaid fabric.

I packed soooo many techniques into this little journal! Check them out:

1) I tried the Blends 2 inks on a Gel Press plate and I got some interesting results. The inks bead up a bit but it left an interesting mottled effect on the prints.


I dotted ink directly onto the plate and then blended with a brayer. I also lightly misted it with a bit of water after blending.


I printed one side of a piece of matboard. For the part of the board that doesn't fit on the Gel plate, I just pressed it against the still 'inked' open side of the plate. I also made more of these prints onto copy paper which I used in the covering of the signature notebooks (more on that later).


2) I covered the other side of the matboard with fabric. It is really easy to do using Eileen's new Easy Cut Adhesive. It's a double sided adhesive sheet. I applied it to the blank side, peeled off the backing paper from the second side and then smoothed on the rough cut piece of fabric.


This will be on the inside of the journal.
Because more bling is good bling, I misted the inside fabric with Glitter Dust for some added sparkle. Why not lol? Next, I cut out the journal cover with the Wrapped Journal Die and it cut easily through all the layers.


3) Decorating the cover came next! I dug into my box of Therm-o-web goodies and went to town. First I used a stencil (Mighty Wave) to apply foil Transfer Gel all over the cover. It dries but remains tacky. Then you just press the foil sheets over the top and burnish it to transfer the foil. It looks so beautiful!


Therm-o-web also sent an Adhesive Pen to use with the foil sheets. After applying the Aqua foil, I wanted to add some Lilac foil accents. I used the pen to draw in some wavy lines among the stenciled shapes. Once the fluid had dried to tacky, I pressed the Lilac foil sheet over and burnished to get it to transfer.


4) Adding the fun decorative bits:


Therm-o-web sent Flock Transfer Sheets in the box. I ended up die cutting shapes (foliage/coral) directly out of the sheets. I also covered a small piece of matboard with the blue sheet and used the Journal Die to cut the little label piece behind the mermaid. I also used a stencil and the Deco Foil Metallic Gel to the flap first. I really blinged this journal up!

5) 101 and 1 ways to use Blends 2:
Well here are three more ways at least. ;-) I used a blending sponge to apply a bit of the ink to the mermaids' tails…


…and you can use the ink like watercolors (that are permanent when dry).


I tried a technique I use with Distress Ink with the Blends and it worked perfectly:


I squeezed a few drops of ink onto my craft mat and spritzed with water. Then I smooshed the cardstock into the puddles of ink. I used these pieces to diecut 'coral' elements out of.

6) And another way to use Blends! I took the extra gel prints I had made and added streaks of color.


I added some very small dots of ink and scraped the edge of the Stencil Pal tool across the paper to streak the color. (A little ink goes a long way!)

Mini composition books from the Dollar Store fit perfectly!
I cut the papers to fit the mini composition books and added some stamping, then glued them onto the books.


Whew! You made it through this huge, long post! I hope you are inspired by the techniques and apply them to your own projects.

Check out Eileen's blog and if you are not already a member, join the Facebook Eileen Hull Fan Club group. It is a warm, supportive group with lots of inspiration and sharing going on. You'll just have to answer a few simple questions when asking to join (to keep out spammers) and then you'll be added. ;-)

Dies:
Eileen Hull Sizzix
Wrapped Journal ( Sizzix / SB )
Journal Sizzix / SB )

Other:
Eileen Hull Easy Cut Adhesive
Eileen Hull Clearsnap Blends 2 inks - Coconut, Beach , Bay, Leaf, Frog, Pansy, Melon, Wildberry, Nutmeg, Sunshine, Rose Gold
Sizzix matboard
stencil - Diana Wakely, Mighty Wave
stencil - Tim Holtz, Burst
Gel Press Plate
elastic
$1 Store mini composition books
mermaid fabric
Lavinia stamps - Sebastian, Seaweed 2, Sea Creatures, Forest Spruce, Guinevere Mermaid, Alana Mermaid

Therm O web products:
Deco Foil - Aqua, Lilac
Deco Foil Transfer Gel
Deco Foil Adhesive Pen
Glitter Dust
Deco Foil Metallic Gel - Champagne Mist
Stencil Pal
Ultra Bond Adhesive
Flock Transfer Sheets - Orange Glow, Blue Diamond

Store links in this post may be affiliate links which do not affect the price you pay but allow me to earn a small percentage of a sale. Thanks! (My husband also thanks you!)