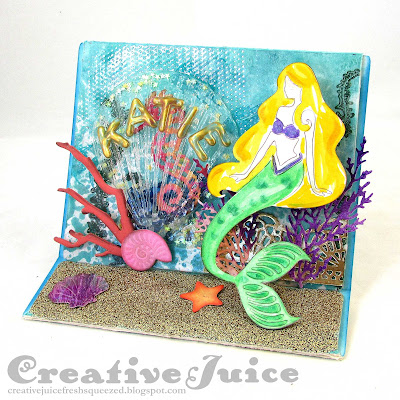
The shaker front is a sample from the January Creativation show. We R Memory Keepers was demoing one of their new (very cool!!) machines, a Mold Press. (see the short demo video here) It is basically a mini vacuum form machine and you can mold a sheet of hot plastic over pretty much everything! They had a scallop shell and foam stick on letters so I got the bright idea to make one with my SIL's name so I could use it later for a card. (Thinkin' ahead I was!!) So check out the video. I'm not gonna lie, I'm coveting one of those machines lol.
 |
| I applied a bit of gold paint to the inside of the letters to make them stand out. |
The Display Stand has a built in stand that you can pop up and down so you can fold it flat for mailing (although this one isn't very flat ;-) I mailed it popped up in a box along with her present.
Here are a few peeks at how I put this together:
Step 1 - I inked up a sheet of Mat board with the blue background and then cut out my stand. Then I stamped a bit in the background. I figured out how the shaker front was going to fit onto the front and traced the cut lines with a sharpie marker. It was easy to cut with sharp scissors.
I prepared my mermaid and sea horse die cuts and also painted a bit of gold paint on the inside of the letters of her name to make them stand out.
Step 2 – Filling the shaker was a little tricky. I carefully made a little pile of the shaker bits in the middle of the area under the shell. I then applied Glossy Accents to the back of the plastic front and carefully laid it onto the front of the card. I pressed it down tightly with my hands and held it in place for a few moments until it started to hold. Then I weighted it down until it was totally dry.
When it was dry, I embellished the front with my die cuts and a layer of Dirty Sand embossing powder for the ocean floor.
It it is a little confusing on how to fold the Display Stand at first. Eileen Hull has created a short video on how to do it! Feel free to watch it several times. ;-)
Thanks for stopping by! Check out Eileen's blog and if you are not already a member, join the Facebook Eileen Hull Fan Club group. It is a warm, supportive group with lots of inspiration and sharing going on. You'll just have to answer a few simple questions when asking to join (to keep out spammers) and then you'll be added. ;-)
Dies:
Eileen Hull Sizzix
Display Stand ( Sizzix / SB )
Tim Holtz Sizzix
Holiday Greens Mini ( Sizzix / SB )
Crochet ( Sizzix / SB )
Dream Mermaid ( Sizzix / SB )
Other:
Eileen Hull Embossing Powder by Emerald Creek - Aqua Splash
Eileen Hull Embossing Powder by Emerald Creek - White Wonder
Eileen Hull Clearsnap Blends Ink - Clear
Sizzix Mat board
Lavinia Stamps - Sea Creatures, Seaweed 2
Baked Texture Embossing Powder - Dirty Sand
Glossy Accents
cardstock
various beads and sequins for shaker
shell mold press shaker front
Some links in this post are affiliate links which do not affect the price you pay but allow me to earn a small percentage of a sale. Thanks! (My husband also thanks you!) If you shop at Topflight Stamps, use my coupon code LISAHOEL for 12% off your order.


You had me at ocean...or mermaid...or seashell! Love me some vitamin SEA!
ReplyDeletewhat a wonderful summertime ocean scene Lisa! Makes me wishing for beach weather! That shaker is so cool in the shell shape, love the mermaid and the fun sand!
ReplyDeleteWow Lisa- you always come up with innovative ways to create! Your sister-in-law is going to love her card ��
ReplyDelete