

Hello there and welcome! You have arrived at your next stop on the Blog Hop to celebrate the new Chapter 4 Dies– two new ScoreBoards releases from Eileen Hull and Sizzix! Are you ready for a new 3D Bigz L Tea Cup die? Fill it with teabags and other assorted goodies or use the Tea Cup cutout on the front of a card – so many possibilities. Also new is the XL Post Box, a fun little box that goes together in 10 seconds and has a slit in the top to tuck a gift card. You will have fun embellishing in your style to create holiday treats for everyone on your list!
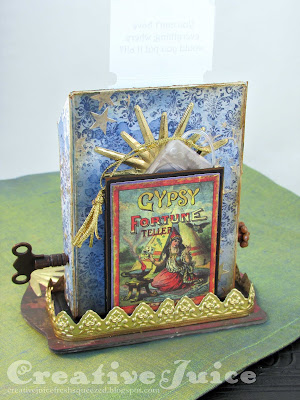
If you are jumping in midway, you can go back to Eileen's blog to begin at the beginning. For my hop project I used the new XL Post Box Die and made a "Fortune Telling Machine". There is a tutorial so scroll on down past the Hop list to check it out.

 |
| My light up crystal ball was inspired by a project Tim Holtz made for his 2020 Halloween Idea-ology release. Check it out! |

I made a little hiding place for the battery/switch mechanism of the Tiny Lights strand filling the crystal ball.

Throughout the hop you will see all the creative ways the Inspiration and Education Teams have used the Post Box and Teacup dies! We hope that you will be inspired too and share how you use the dies in the Eileen Hull Fan Club.
But wait – there’s more – the Release Party continues! You won’t want to miss the Facebook Live at Eileen Hull Designs at 12:00 noon Eastern time on Thursday, Oct. 1! Join the chat – and a random commenter will WIN a new Teacup Die. Comment on the Blog Hop under each designer to be entered to win the Post Box die. Random winners will be picked and announced on next Tuesday's Facebook Live!
Please hop with us through all of the projects and leave comments on the different designers' blogs. A lucky commenter will WIN a Post Box Die…
Hop Participants:
Lisa Hoel <<<<< YOU ARE HERE
Tutorial time!
Step 1 – I cut the Post Box out of mat board and decorated it up with stamping and stenciling. I made a base for it by by cutting three pieces of the Trinket Box lid and gluing them together.

Step 2 – I poked around Pinterest to find some funny "fortunes" I could use on my tickets. I used a graphics layout program to format the tickets and printed it out. I glued the two pieces together to make one long strip.

Step 3 – I constructed a ticket roll 'mechanism' . A piece of bamboo skewer glued into a clock key serves as an axel. I glued the end of the ticket strip onto a piece of paper straw (to glue onto the axel inside the post box). Using a Crop-A-Dile tool, I punched holes for the axel through the side flaps of the box.

Step 4 – Installing the ticket strip was a bit tricky but not too bad. I glued the right sides together first, making sure the holes lined up. I pushed the axel part through the holes and then slid the straw (with a bit of glue inside) over the axel on the inside. After that I glued the other sides together and poked the axel through the holes, gluing a bead over the end. I also threaded the ticket strip through the slot in the lid.

Step 5 – the base! I had to make a base for the post box so I could hide the cord from the Tiny Lights in the 'crystal ball'. I stacked up several layers of mat board shapes and cut a recess into the middles of them.

The crystal ball is a Tim Holtz Snow Globe. I drilled a hole in the base to thread the lights up into the glass. I created a little pocket on the back of the post box to hide the controller for the lights.


Once the ball was glued on I arranged the cords and hot glued the post box in place, then embellished with the trim. Whew, you made it through that long tutorial lol. I hope you are inspired and do hop along to see all the other wonderful projects. Thanks for stopping by!
Dies:
Post Box Die ( Sizzix / SB )
Trinket Box Die ( Sizzix / SB ) - retired
Tim Holtz 3-D Impresslits Embossing Folders
Distress Oxide Ink - Chipped Sapphire
Distress Spray Stain - Faded Jeans
Deco Foil - Metallix Gel - Champagne Mist
Tim Holtz Stencil - Falling Stars
Tim Holtz Kraft Stock Metallic Paper
glue gun
Tim Holtz Kraft Stock Metallic Paper
glue gun
Some links in this post are affiliate links which do not affect the price you pay but allow me to earn a small percentage of a sale. Thanks! (My husband also thanks you!) If you shop at Topflight Stamps, use my coupon code LISAHOEL for 12% off your order.

Wow! What a great example of using more than one die for your project! Great job!
ReplyDeleteLove this. It reminds me of BIG. Such fun.
ReplyDeleteI love this idea for the box!
ReplyDeleteOh my gosh - this is SO creative and fun - wonderful attention to detail AND it lights up!! Love this Lisa!!
ReplyDeleteNO WAY! This is crazy awesome and creative!!!!!!!!!!!!!!!!!!!!
ReplyDeleteWow - SO COOL, Lisa!!! ❤
ReplyDeleteWho knew that papercrafting would turn you into an engineer? Fantastic!
ReplyDeleteWow Lisa-I am stunned. This is absolutely brilliant and so clever. I wish I had the skills of formatting things to fit my needs- I am useless at stuff like this. But I absolutely admire the way you put this all together. That little turning key and the snowglobe turned into a crystal ball give it such a special touch.
ReplyDeleteYour project is amazing - I love the attention to detail! The 3d effects are great. Awesome job with this.
ReplyDeleteNow that I've picked my jaw up off the floor...that ticket roll mechanism just blew my mind. Thank you for the inspiration! ♥
ReplyDeleteSuper creative!
ReplyDeleteWow! Very creative Lisa!
ReplyDeleteThank you for the great tutorial - you make it look easy!
ReplyDeleteIngenious and inspiring
ReplyDeleteA fantastic project - so clever! I love that the crystal ball lights up.
ReplyDeleteI love this - so clever - and I know I don’t have room for everything but I want it all!!!
ReplyDeleteYou can always be trusted to come up with a clever design, this is wonderful Lisa, I am totally in love with the crystal ball and really want to use that idea too. A brilliant design and love your tutorial! Hugs, Anne xx
ReplyDeleteWow! That is very clever! Love how you added the crystal ball.
ReplyDeleteThis is so so clever...would be a fun party idea....
ReplyDeleteSo fun! The creativity makes me feel a bit like I've drunk too much coffee--itchin' to get going making things!
ReplyDeleteI am in awe! Love the rolling ‘fortune’ box! And the light up snow globe, adorable!
ReplyDeleteI can see your very creative. Love your make.
ReplyDeleteWow, just wow, what an inspired idea and such a lot of thought, and work went into this....I love it! ❤️ Jane x
ReplyDeleteOK, I give you the prize for WOW factor! How awesome is that, a fortune telling box!! Like the Wizard of Oz. Love that fortune you chose to share. I totally enjoyed reading the other fortunes- still smiling at the wisdom and humor.
ReplyDeleteHow creative you are! Very cool!
ReplyDeleteHa! What a great decoration! I love that it lights up too :-)
ReplyDeleteThis is fabulous and thanks for the tutorial x
ReplyDeleteLisa this is breathtakingly inventive and ingenious. You've gone above and beyond, making that ticket mechanism and fitting the 'crystal ball' light. Every part is so well thought through and beautifully decorated xx
ReplyDeleteLove your creative idea, and the tutorial is wonderful. Thank you for sharing!!
ReplyDeleteSuch a fun project! I love your fortune telling machine! Great details!
ReplyDeleteThank You for the Tutorial. It looks amazing.
ReplyDeleteThank You for the Tutorial. It looks amazing.
ReplyDeleteAren't you clever and fun. I am going to find out about the papers....going back to the post. THANK YOU
ReplyDeleteThis is so stinking clever with that crystal ball...seriously!!! LOVE!
ReplyDeleteThis is amazing Lisa. Lucky me- I get to go through all of the little fortunes :-) Genius, seriously!
ReplyDeleteAnother great project….love this idea…was thinking to do for Xmas for grown grandkids with money rolling out after some messages…this shows me how to make the tickets so i can do xmas messages first and attach “bills” to the end of it…thanks for sharing
ReplyDelete