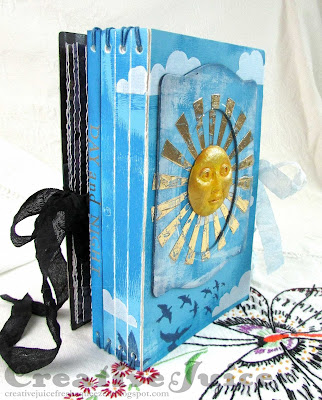
Hello and welcome to May! As you know, Eileen Hull is the Queen of journaling dies and she her designs are always so versatile. I had an idea to use several of her newest accessory dies for the Folio Journal and create a reversible junk journal. Plus, all the accessory dies work well in any of her journal dies! I used the Pocket Notebook for my base. Let's take a look:
 |
| The "Day" side |
I glued two Pocket Notebook covers together to form the "reversible" book:
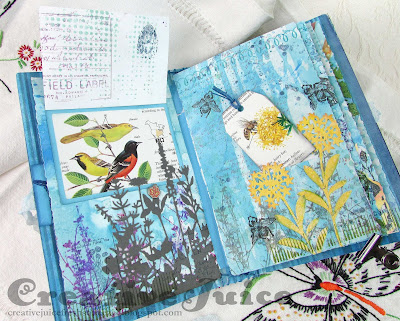
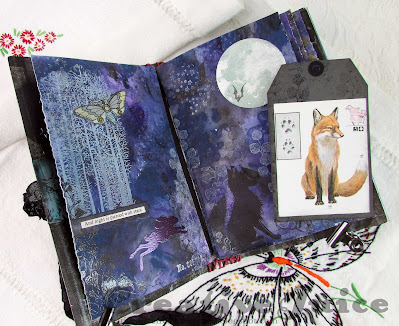
The pages of each half are decorated appropriately:
 |
 |
| The flap edges tuck under decorative brads to hold them closed. |
Night side:
I also used the pocket from the Folio Page, Pocket & Flowers Die Set to hold the largest tag on some of the pages. It's great how they all mix and match!
Some of the How-To!
Step 1 – backgrounds for the pages: I forgot to take photos of the "Day" backgrounds, oops! Lots of mists, Distress Inks and some resist stenciling/stamping. For the "Night" backgrounds I used Distress Paint because of its marvelous water reactive properties and I knew it would give me a cool marbled effect and then be perfect for stamping on.
After this first layer of Chipped Sapphire and Wilted Violet, I added another layer of Black Soot paint. (Craft mat swipe and dip technique) I kept it very thin and used lots of water so the backgrounds wouldn't get too dark. I set all my backgrounds aside as I moved to working on the covers.
Sizzix has a great new line of Making Essentials that really add some great effects to projects. Here I used the Effectz 3-D Adhesive through a stencil to create the sun rays. When the Adhesive dries, it is still tacky so I just laid the Foil Sheet over it and rubbed it on. It adheres perfectly to the tacky adhesive. I did the same thing with the silver stars on the Night cover.
The sun and moon faces were created with polymer clay pressed into Prima's Finnabair Star & Moons Silicone Mould. After I had baked them to harden them, I painted them up and then used a touch of the new Sizzix Luster Wax to give them some shine. (Perfect!)
Step 3 – assembling the cover: Below are the two completed cover halves. The insides are also painted and finished at this point.
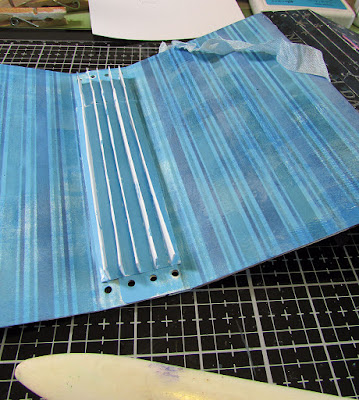
I glued the Day and Night halves together and added the ribbon closures at the same time. I also cut the accordion fold binding pieces in readiness for the next step. The Bookbinding Die cuts and scores the accordion fold binding at the same time. It is sized to fit perfectly into the Folio Journal but is easily adapted to any journal size. Here I just cut an additional piece and trimmed a 1" section off to extend the binding to fit the Pocket Notebook.
Step 4 – adding the binding: Fold the binding as shown below and use either glue or tape adhesive to stick the "peaks" together.
Glue (or use strong dry adhesive) to adhere the folded binding unit to the spine of the cover. After I glued it in, I realized that the "valleys" would probably show a bit with the pages in so I painted them a matching blue color. For the Night side binding, I went and re-cut the parts out of black cardstock.
Step 5 – page assembly: The Pocket Notebook is a die that also cuts pages as well as the cover pieces (super handy!) I cut pairs of "front/back" pages out of my backgrounds I previously made. (Mind the fronts and backs!) I decorated the page halves completely before sticking them together.
I used my tape runner to add adhesive. IMPORTANT, do not add adhesive right at the inner page edge that slips over the binding tabs. (I only forgot once ha ha.)
I lined up the pages and stuck them together, then trimmed them to 4" wide with my Deckle Trimmer from Tim Holtz. I really like it. The blades are nice and sharp and had no trouble cutting through the pages and any extra paper layers at the edge.
Step 6 – Installing pages: I applied strips of strong Red Liner Tape to each side of the binding tabs. After removing the tape liner, I slipped the page over the sticky binding tab and pressed it all together. (A bone folder was helpful in this.)
This is an easy way to add pages to your journals and the Bookbinding Die with the cutting/scoring all in one pass is so convenient!
Adding the tag slots: This was also easy to do thanks to Eileen's Card, Waterfall & Tags Die Set. I just figured out where I wanted to have the tag poke out and used the little slot die to cut into the page itself. (Of course this happens before the two page halves are stuck together.) You can make a wider slot for the bigger tags by cutting one slot, moving the slot die over and running it through again. (Use washi or low tack tape to hold the die in place.)
IMPORTANT: When you stick your pages together, don't apply adhesive in the area where the tag's "pocket" is!
Whew, that was long! Thanks for stopping by and checking out my post. Be sure to keep an eye on Eileen's blog because all month long we will be sharing some awesome projects from the Teams. The May theme is to create with "Unconventional Materials" so you will be seeing some super creative ideas. Eileen has invited her Fan Club to join in and share their unique makes as well.
Supplies used:
Eileen Hull Sizzix Dies:
Pocket Notebook ( Sizzix )
Bookbinding & Label ( Sizzix / SB )
Card, Waterfall & Tags ( Sizzix / SB )
Folio Page, Pocket & Flowers ( Sizzix / SB )
Trinket Box - retired
Tim Holtz Sizzix Dies:
Flower Field ( Sizzix / SB )
Detailed Butterflies, Mini ( Sizzix / SB )
Wildflower Stems #1 ( Sizzix / SB )
Feathered Friends ( Sizzix / SB )
Entomology ( Sizzix / SB )
Skeleton Leaves ( Sizzix / SB )
Fall Foliage ( Sizzix / SB )
Wildflowers #2 ( Sizzix )
Gate Keeper ( Sizzix / SB )
Sizzix:
Mat board
Effectz 3-D Adhesive
Effectz Foil Sheets - Gold & Silver
Effectz Luster Wax - Gold & Silver
Distress Paint: Chipped Sapphire, Wilted Violet, Black Soot
Huge old pile of Tim Holtz Stamp Sets: Classics #1, Entomology, Nature Walk, Bird Feather, Ledger Script, Ornate Trims, Specimen, Field Notes, Spring Sprung, Glorious Bouquet, Psychedelic Grunge, Slate & Stone, Tree Line, Halloween Cutouts, Tiny Toadstools, Grunged, Haunted House, Snarky Cat Halloween
Topflight Stamps Products:
Lavinia Stamps - Forest Scene, Tree Branch, Sea Flower, Whimsical Hares, Fern Heads, Small Berries, Brodwin & Maylin, Moon, Fox 1, Fairy Foragers, Trailing Ivy, Star Gazing
Indigo Blu - Autumn Nights, Floral Fantasy
Carabelle - Background Stars
Pink Ink - Moth & Legends stamp/die set
Paper Artsy - ETS24
Katzelkraft -Winter Scene
Crafty Individuals - Crackle Background
Versafine Black Pigment Ink
Prism Inks - Thundercloud
WOW Embossing Ink
PaperArtsy Fresco Paint: Smurf, China, Inky Pool, Metallic Glaze, Antarctic, Amethyst
Strathmore Mixed Media Paper for pages
Prima Finnabair Silicone Mould - Star & Moons
white polymer clay
Some links in this post are affiliate links which do not affect the price you pay but allow me to earn a small percentage of a sale. Thanks! (My husband also thanks you!) If you shop at Topflight Stamps, use my coupon code LISAHOEL for 12% off your order.


This is so creative and beautifully done!
ReplyDeleteIt is not surprising this took you a while, and love the idea of the reverse and night/day journal. I also have to say that your pictures of how to fold the bookbinding die is the clearest I've seen. Thank you so much for the step by step it was great to know how it came together. Your journal and it's theme are absolutely awesome. Thank you so much for sharing
ReplyDeleteWow, what a brilliant concept and beautiful book. Thank you for sharing all the step-by-step photos.
ReplyDeletewow this is awesome love the concept, all the elements you used & theme. Ya you may have won the most photos challenge!
ReplyDeleteOf course! A reversible journal! This is simply genius and what a great way to incorporate two distinct themes into one book. I love how you've matched the pages to fit the feel of each side too. Loving that helpful tutorial x
ReplyDelete