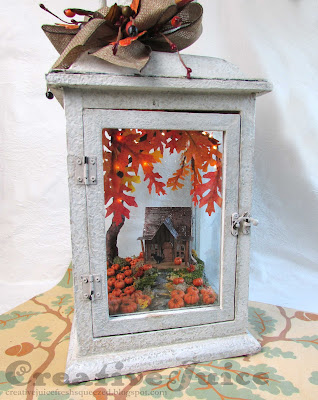
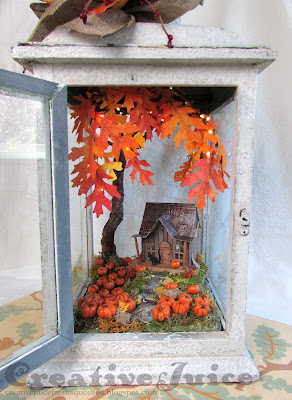
Hello! If you're a follower of mine on Instagram (@creativejuicefreshsqueezed) you might have seen my progression of sneak peeks of this latest project! It's finally complete and I can show you the whole thing now. The little shack in its pumpkin patch was destined to reside in a lantern and become my newest fall decor piece:
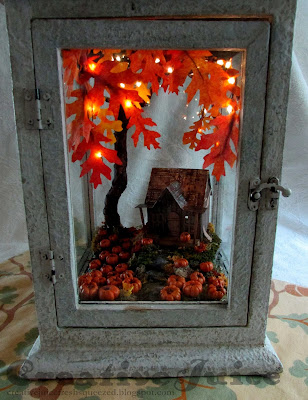
… which is wired up with Tiny Lights!
I had to make sure the outside of the lantern was beautiful too:
 |
| Leaf embellishments are made using the Oak Leaf 3-D Embossing Impresslits from Sizzix. Love! |
I am entering this into The Funkie Junkie Blog "Creating Die-Na-Mite" Challenge. My project definitely utilizes dies! Check out their challenges, they are always fun themes!
Scroll on if you'd like a little tutorial on how I put this together!
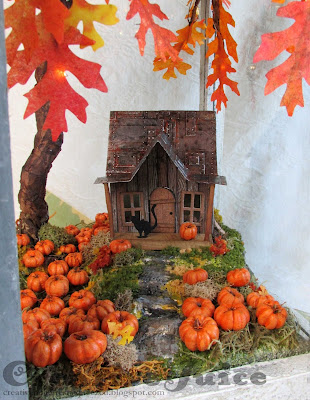
The shack is made using some of the Tim Holtz Village Die Series (retired). I didn't really chronicle its construction, Tim has done several videos on how to put them together. I will note that the siding is inked Distress Woodgrain Cardstock cut into strips and the roof is metal tape on cardstock and then embossed with the new Mini Foundry 3-D Embossing Folder (absolutely perfect!!)
On to the base!
Step 1 - I cut a piece foam to fit in the bottom of the lantern and then built up areas of elevation with more foam and cardboard. I usually cover my base with plaster cloth to fill in the contours and make more textures. You can find it in the model/train sections of craft stores.
Step 2 - I painted the base and then added bits of moss and lichen from my landscaping stuff stash.
The pumpkins are actually seed pods I painted "pumpkin" colors.
Step 3 - Glued the pumpkins into the 'patch'! To help with the illusion of perspective I picked bigger pumpkins for the front and then put the tiniest ones in the back next the shack.
Step 4 - Wired the tree: I used two strands of Tiny Lights to wrap around the branches. My plan was to hide the battery/switch parts in the top of the lantern (photo later).
Step 5 - Leaves: I chose to cut my leaves out of colored coffee filters. I use filters a lot for making foliage and flowers. It dyes readily and has the look of tissue but is stronger. In this case, I wanted a substrate that would also allow the lights to shine through it. Tip: you can cut through several layers of filter paper at a time, both with steel rule and Thinlits dies. That made it easy to cut out lots of leaves at once!
Tree with die cut leaves:
At this stage, I popped the scene back into the lantern. Fortunately, this particular lantern had a metal top that was just screwed on. I was able to take it off and easily lift the scene in and out. I always find it easier to build scenes using a 'top loading' container so you can complete it outside of the container and then just pop it in. It doesn't always work out that way, but it's a plus when it does!
Step 6 - I put the lantern top back on and glued pieces of velcro into the top. I glued matching pieces onto the backs of the light controls. They tuck right in there out of sight!
Last but not least, I'll leave you with a detail photo of the tin roof because I love it so much. Yum!
Thanks for stopping by!!
Supplies used:
Dies:
Tim Holtz Sizzix
Tattered Leaves - retired
Village Dwelling - retired
Village Surf Shack - retired
Village Fixer Upper - retired
Other:
Tim Holtz Stamp Sets - Falling Leaves, Grunged
Ranger Distress Halloween Mica Set
Distress Collage Medium - Matte
Ranger Heavystock - white
a zillion different Ranger inks and Distress Spray Stains
Distress Resist Spray
Idea-ology Tiny Lights
coffee filters
Some links in this post are affiliate links which do not affect the price you pay but allow me to earn a small percentage of a sale. Thanks! (My husband also thanks you!)


Absolutely adorable and a great inspiration! Where did you get your lantern if you don't mind me asking?
ReplyDeletethanks Sandy! The lantern was a gift someone gave me a couple of years ago but I believe that she got it from Crafter's Warehouse (a Pacific NW chain). thrift stores and homegoods stores like Ross, TJMaxx etc are good places to look for lanterns too.
DeleteAmazing Lisa! Love everything about this. Thanks for the great tutorial, I just may give this a go!
ReplyDeleteYou are so very clever! Thanks for all the great ideas over the years! Xxxxxx
ReplyDeleteLisa this is a complete WOW project!!!!!! Every little detail has been thought of and I love how you've built the scene and lit up that big tree. AMAZING! Thank you for joining us at The Funkie Junkie Boutique blog x
ReplyDeleteCongratulations on your WELL-DESERVED win!!!
ReplyDeleteThis is soooo fabulously beautiful!! And yes, the perspective works- very well done!!
Genius use of seed pods for the pumpkins because, at first glance, I was thinking that you invested a lot in IdeaOlogy pumpkins- they look so detailed!
I’m a follower of your blog & keep your page handy on my Safari list-you never fail to ‘WOW!’!