
Hello Eileen Hull fans! Did you catch the Chapter 4 Release party and blog hop on October 1st? If so, then you know that Eileen's latest release is awesome! Here's what she had to say about it:
"The Chapter 4 Sizzix Release is exciting for so many reasons – there are two never-done-before designs! One is the Full Size Journal which is a Bigz Pro size – you will need a machine with at least a 9" throat to cut this die- like a Big Shot Plus or Pro. Not to worry, if you don't have that machine, Eileen will have the pre-cut pieces available in her Etsy store for you to work with. The other new technology is a 3-D Embossing Folder! It's called Sweater and is oh so cozy. Also new this release is a Bigz Notepad Die with lots of options for materials and uses, and a Heart Mandala Thinlits Die to decorate with! "

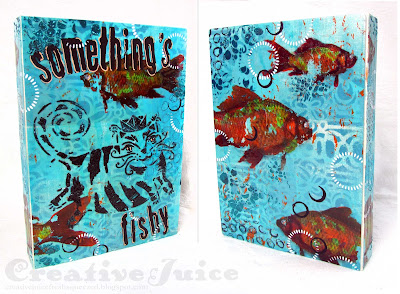
Today I'm sharing the tutorial for the mixed media Full Size Journal cover I made. We're doing a collaboration this month with The Crafter's Workshop so I've incorporated some of their fantastic stencils and other products into my make.
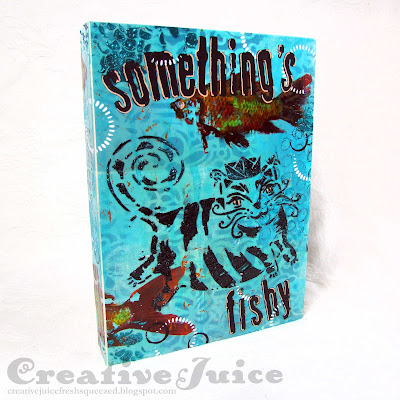 |
| Front of the cover… |
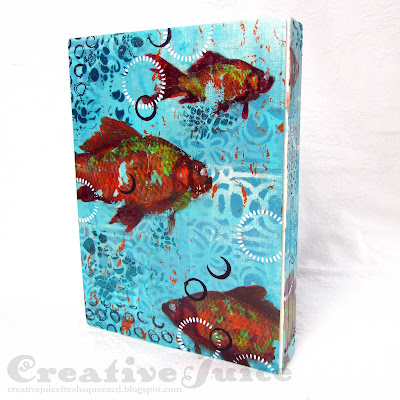 |
| … and the back! |
Let's take a look at how I did this and also how I saved it from a big oopsie. (ug)
I used a fun image transfer technique to apply those goldfish to my cover:
Step 1 - I'm kind of anal about how my images lay out so I "composed" them in a graphic layout program (Adobe Illustrator) on my computer.
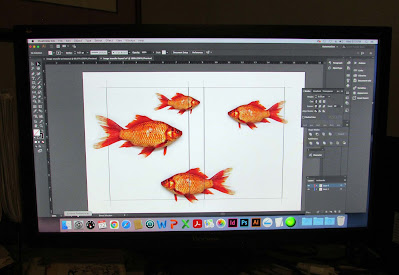
I printed out the sides in black and white using my laser printer (important to use a laser printer or copier!) Also VERY IMPORTANT is to print out your images REVERSED.
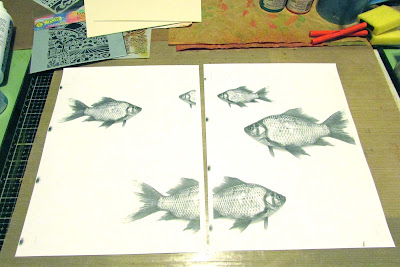
I took into account the spine overlap for the placement of my fish images. The plan was to have the halves line up across the spine when the cover was assembled.
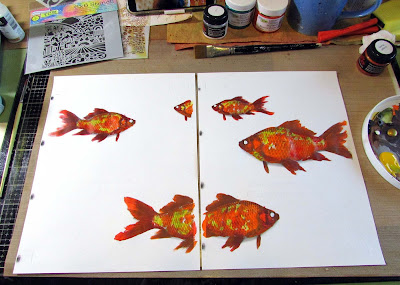
Next step is to paint over the toner images with acrylic paint. This painted layer will show through once the image is transferred!
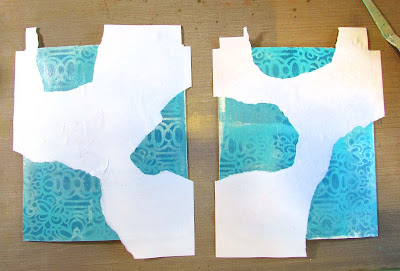
Step 2 - Prepping the covers; I used a brayer and Fresco paint to lay down some color. (Other side of mat board for the insides of the cover were collaged with marbled paper and text pages from a fishing book.)
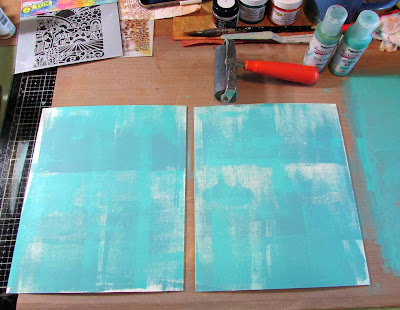
I also stenciled on the fronts:

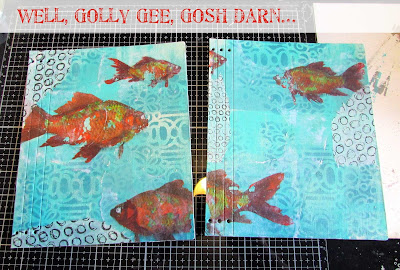
Step 3 - Now for the transfer! I tore away the excess paper from the images.
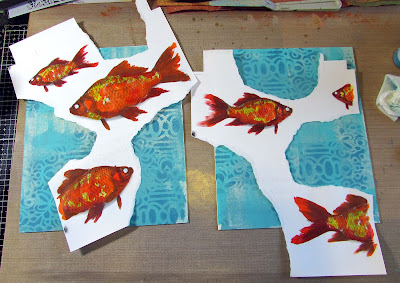
I applied a layer of gel medium to the cover and then laid the images face down into it, squishing out any air bubbles. You need to make sure you have a good layer of medium on your substrate. I think mine was a little thin and was drying too quickly which led to an incomplete transfer of the fish images. You'll see later.
Once it was all dry, it was time to remove the backing paper. This part is a bit of a pain but patience is the key. Spritz sections of the paper with water and then gently rub off the soggy paper, revealing the image! You'll see areas of the fish where I didn't have enough medium so the image didn't stick and rubbed away with the paper. It definitely more of a distressed look!


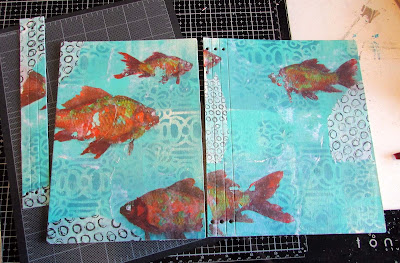
Step 4 - Cutting out the cover parts. If you have a 'directional' pattern, you need to be careful about how you position your matboard when you cut the cover. If it's not flipped the right way, things like this happen:
 |
| I made two "front" covers. grrrr |
In Eileen's recent Facebook Live, she shows how to put together the Full Size Journal Die and how you mark up your die so you don't make mistakes like this! Obviously I need to do that. You can watch the video here.
I really didn't want to redo the cover so I came up with an (imperfect) fix. The spine sections are supposed to overlap but I cut the back cover the wrong way. So, I just lopped off the scored spine section from the back cover.
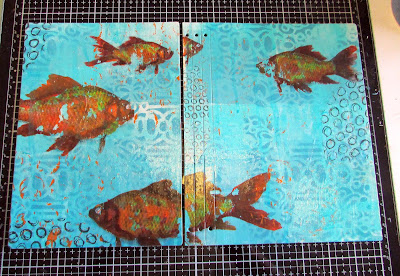 |
| At this stage, I also coated the cover with Gloss Varnish to brighten the image and get rid of the 'paper residue haze' from the image transfer. |
Of course now my planned overlap of the fish images across the spine was completely screwed up but what are you going to do? I decided to live with it. ;-)
On the inside of the cover I taped the two pieces together with cloth book repair tape. It is flexible and has strong adhesive. I could also add more paint accents over it to make it blend in. I used my Crop-a-dile to punch through the tape that covered the holes in the spine for binding.

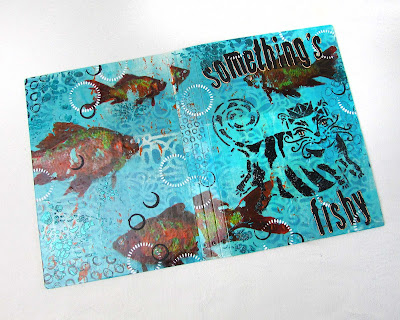
I added some paint marks and used a stencil to add some TCW Turquoise Stencil Butter accents. It goes on really smoothly and has a beautiful metallic shine. I also used the Stencil Butter through the Flying Kitty stencil on the front. I lightly sprinkled it with some black embossing powder while it was wet. Once it was dry, I heated it to emboss the powder. You could still see hints of the turquoise through but the black made the cat much more of a focal point. I also stamped the words with paint and foam stamps as a final step.
Whew, that was long! I hope you give the image transfer technique a try. It's a fun one to have in your box of tricks. Thanks for stopping by and be sure to keep an eye on Eileen's blog for more inspiration from the Educator and Inspiration Teams.
Also keep an eye on The Crafter's Workshop blog to see how their Design Team utilized Eileen's dies in their projects this month!
Also keep an eye on The Crafter's Workshop blog to see how their Design Team utilized Eileen's dies in their projects this month!
Supplies used:
Dies:
The Crafter's Workshop supplies:
Stencils: Secret Garden, Mini Cell Theory, Mini Flying Cat
Other:
mat board
brayer
Lavinia stamp - Shoal of Fish
Tim Holtz Cling Foam Stamps - Block Lower & Upper case sets
lots of different acrylic paints from my stash
Paper Artsy Fresco chalk paint - Cloud 9, Paua Shell, Bora Bora, Caribbean Sea, Captain Peacock, Caramel
Archival (permanent) inks
black embossing powder
DecoArt Media Gloss Varnish
Dina Wakley Collage Paper (tissue)
Sakura Souffle pens
Some links in this post are affiliate links which do not affect the price you pay but allow me to earn a small percentage of a sale. Thanks! (My husband also thanks you!)
Beautiful! Love this!
ReplyDeleteIt looks like you meant to do it! I had no idea things went awry even though you said that- could not figure out where the mistake was. Although I have done that myself many times! 😀 It is beautiful Lisa and so cool how you laid the fish out to position.
ReplyDelete