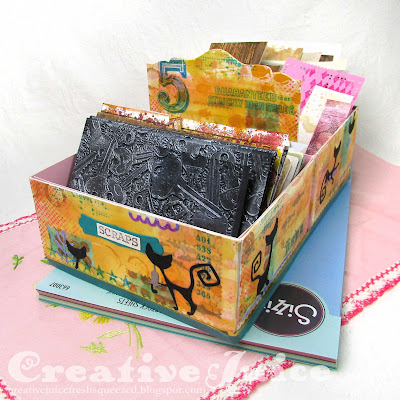
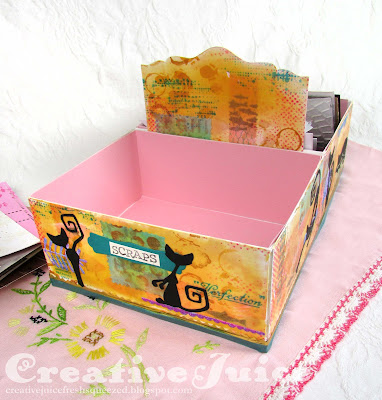
This month Eileen Hull's theme is "Box Bonanza"! Over the years, Eileen has designed many different box/container dies and the Teams were tasked with creating with them for the month of September. I chose to use one of her newest dies, the Slotted Treat Box Die (Plus sized die), to create a caddy to organize scrap paper bits.
I used two Slotted Treat Box bases adhered together to form the caddy (scroll down for tutorial).
I got into my mixed media groove to decorate the outsides of the caddy and played with a new to me medium, DecoArt Wax Effects Paint. It is a water based paint that looks like encaustic wax when it dries. So cool!
Here is some of the 'how-to':
Step 1 – I cut all the pieces out of mat board. I didn't worry about decorating the two inner sides that were going to be glued together anyway.
Step 2 – I made stamps to collage onto the backgrounds. I used retired Tim Holtz Collage Paper, but you could also use deli sheets or coffee filters. I inked the paper with Distress Spray Stain, did a little stamping/stenciling on it and then cut it with the Slimline & Tickets Die Set. (Later on I did another batch of these with a blue background.)
Step 3 – Here is a look at the all the base layers done. Some stamping, stenciling and collaging. In the next step I added the Aged Beeswax Wax Effects paint with a palette knife over the top of it all.
Most of the stamping I did with Archival ink but I did add a bit with regular Picked Raspberries Distress Ink. I noticed that it was smearing a little underneath the Wax Effects paint. I went back to the sides I hadn't done yet and added a layer of Distress Micro Glaze over those problem areas to seal it. That worked great and the ink didn't smear at all. NOTE: I did not add the Wax Effects paint on the box glue tabs!
Step 4 – Here are all the sides done. When the paint was dry, I glued on die cuts, the blue collage stamps and did some final stamping on top of everything with Mermaid Lagoon Archival Ink.
Step 5 – Assembly! I glued the two boxes together and when they were all dry, glued them together with the handle in between. I also glued the whole unit onto a piece of foam core board to give it added strength and support.
To hide the seam where the boxes were glued together, I filled in the cracks with hot glue and then covered them with extra collage paper.
 |
| Probably could have filled the crack even more. Next time! |
Thanks for stopping by and be sure to keep an eye on Eileen's blog for more inspiration from the Educator and Inspiration Teams.
Supplies used:
Eileen Hull Plus Die - Slotted Treat Box Die ( Sizzix, SB )Eileen Hull Die Set - Mini Slimline & Tickets ( Sizzix, SB, FJ )
Eileen Hull Die Set - Shadowbox Frames #1 ( Sizzix, SB )
Eileen Hull Die - Card Caddy ( Sizzix, SB )
Tim Holtz Die Set - Mischievous ( SB, FJ )
Tim Holtz Die Set - Abstract Elements ( Sizzix, SB, FJ )
Tim Holtz Stamp Sets - Mesh & Linen, Halftone & Rings, Grunged, Eccentric, Rockstar
Dina Wakley Stencil - Pointed
Tim Holtz Plain Collage Paper - retired
Distress Collage Medium - Matte
Distress Micro Glaze
DecoArt Wax Effects - Aged Beeswax


No comments:
Post a Comment
Thank you so much for leaving a comment. I appreciate it!