Showing posts with label Thanksgiving. Show all posts

Tuesday, November 12, 2019

Thanksgiving Card with Eileen Hull

Hello! I've been playing more with Eileen's Molten Dimensions Embossing Powder and Clearsnap Blends Ink and have created a fall Thanksgiving card. Read on to see the embossing techniques I used!


The powders are chunky and you get really good coverage and dimension. I discovered that I can use my Melting Pot to easily make all the embossed die cut leaves. (The Ranger Melting Pot was designed by Suze Weinberg and they were sadly discontinued a few years ago. You might have one in your craft stash already or be able to find one used on eBay etc.)

I die cut the leaves, inked them with Eileen's clear (super sticky!) Blends Ink, applied the powder and set it into the pre-heated pot to melt. (It doesn't take long!) I had these non-stick inserts with side flaps that were made to fit into the tray which made it really easy to remove the melted die cut. I just lifted the liner out and let it cool off to the side before handling it. You could do the same thing with a folded piece of foil or paper. While the leaves were in the pot and the base powder had melted, I sprinkled on a little bit of a second color. It melted in and created a speckled texture on the leaves. So cool!!! I have lots of ideas to try with this. (Play time!)


Love that speckled look!!

For the card base, I used a piece of patterned paper in my stash and made a dry embossed center panel using Eileen's retired Honeycomb embossing folder.


Once the card base was done, I played around with my embossed leaves and other elements until I was happy with the placement. Then I glued it all down. I had to use a strong liquid adhesive to glue the leaves down because of the slick embossed surfaces. Crafter's Pick The Ultimate! glue is one of my favorites for such jobs.

Thanks for stopping by! Check out Eileen's blog and if you are not already a member, join the Facebook Eileen Hull Fan Club group. It is a warm, supportive group with lots of inspiration and sharing going on. You'll just have to answer a few simple questions when asking to join (to keep out spammers) and then you'll be added. ;-)

I am also entering this into the TFJB Challenge - Fabulous Fall!

Dies:
Eileen Hull Sizzix
Journaling Cards - Flowers & Leaves ( Sizzix / SB )
Spring Leaves Sizzix / SB )
Honeycomb embossing folder - retired

Other:
Eileen Hull Embossing Powder by Emerald Creek - Golden Rod
Eileen Hull Embossing Powder by Emerald Creek - Polished Silver
Eileen Hull Embossing Powder by Emerald Creek - White Wonder
Eileen Hull Embossing Powder by Emerald Creek - Black Magic
Eileen Hull Clearsnap Blends Ink - Clear
cardstock

Tim Holtz Big Chat Stickers
Ranger Melting Pot - retired


Some links in this post are affiliate links which do not affect the price you pay but allow me to earn a small percentage of a sale. Thanks! (My husband also thanks you!) If you shop at Topflight Stamps, use my coupon code LISAHOEL for 12% off your order.

Monday, November 19, 2018

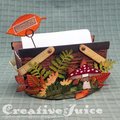
Being Thankful Basket

Happy almost Thanksgiving to my USA readers! I always try to be thankful as a matter of course but this time of year gives us extra reason to pause and really take a look at all we have to be grateful for. For my November Eileen Hull project, I created a fall themed Basket as a table decoration. It holds blank cards that people can take out and write what they are thankful for on. I've done this before at Thanksgiving dinners and it makes for a great family snapshot and memories. I have so many things to be thankful for – a snug house, family close by, lots of love… I could fill up a whole basket of cards myself!


Check out the how-to:

Step 1 – I used the Lumber 3-D Texture Fade Embossing Folder to texture the matboard before I cut the basket out of it. First I misted both sides of it with Distress Spray Stain. While it was still a little damp I ran it through my Big Shot in the embossing folder. The texture you get with the folder is amazing!


Step 2 – Tim Holtz has recommended using Distress Crayons as one method of coloring the embossed texture so I gave it a try. I did it in sections so the crayon wouldn't dry before I blended it. I scribbled on Vintage Photo and Walnut Stain crayon and then blended it with a wet finger. When it was all dry I cut out the main parts of the basket.

The top piece has the blended crayon done.
Step 3 – I wanted the handles to be lighter so I used Eileen's Golden ColorBox Blends ink to color another piece of matboard. I stamped it with a  wood grain texture stamp on one side and then cut the handle pieces out of it.


Step 4 – I assembled the basket and glued it onto an oval of patterned paper covered matboard for a base. I added a strip of grass cut with Eileen's Grass die.


Lastly I added all the plants and flowers. I used the Funky Foliage and Funky Floral 3 die sets to cut them all out. I think I am love with the little mushrooms in the Funky Foliage set!

Thanks for stopping by. Be sure to visit Eileen's blog and check out the other posts for this month! I am also entering this in Frilly & Funkie's current challenge, A Harvest of Gratitude. Check out their blog too!

Dies:
Eileen Hull Sizzix
Basket ( Sizzix / SB )
Journaling Cards, Flowers & Leaves ( Sizzix / SB )
Grass ( Sizzix / SB )

Tim Holtz - Funky Foliage Sizzix / SB )
Tim Holtz - Funky Floral #3 Sizzix / SB )
Tim Holtz - Movers & Shapers Sized Ovals Sizzix )

Other:
Eileen Hull ColorBox Blends Ink - Golden
Tim Holtz 3-D Texture Fade Embossing Folder, Lumber ( Sizzix / SB )
Ranger Archival Ink - Pale Ochre
Distress Inks - Forest Moss, Ground Espresso
Distress Spray Stain - Tea Dye, Vintage Photo
Sizzix mat board
Distress Crayons - set 3
Tim Holtz Chitchat Seasonal stickers
Tim Holtz Memo Pins

Sizzix and Scrapbook.com links in this post are affiliate links which do not affect the price you pay but allow me to earn a small percentage of a sale. Thanks! (My husband also thanks you!)

Tuesday, September 4, 2018

Katzelkraft Holiday Cards

Hello and welcome to September! I love making projects for the fall and winter holidays and it's time to get busy with it! ;-) If you are a fan of Katzelkraft Stamps, pay attention to this. Topflight Stamps is carrying two exclusive stamps sets that pair wonderfully with the funny animal stamp sets they have.


I used some of the accessory stamps from Pilgrims with the Les Chats set to create an amusing Thanksgiving card:

These cat stamps crack me up every time!

The cats are stamped on the card base and then I stamped on another piece of cardstock and fussy cut the hats out. The leaves are actually cut with dies out of fun foam. This is a great way to get more use out of your dies! I applied a double sided adhesive sheet to the foam before I cut it and then stuck the foam shapes onto pieces of scrap packaging plastic.


I used ColorBox Blends Inks (with handy built-in sponge applicator tip) to apply ink to the foam and then stamped the leaves around the edges of the card.

For the second card I used the gingerbread man stamp from the Pilgrim set and the 'Merry Christmas' sentiment from the Holiday Quotes set. It's a clean and simple card:


I used a stamping platform for the sentiment. I stamped it in red ink and then moved the card very slightly down and to the right and then re-stamped it using black ink. This gives a nice drop shadow effect.

Thanks for stopping by! Below is a list of supplies I used. Be sure to check out the Topflight Stamps blog for more inspiration. There is always something fun to see there! Have a great week. =)

Topflight Stamps Products:
Katzelkraft - Les Chats
Katzelkraft - Holiday Quotes
Katzelkraft - Pilgrim


Dies:
AJVD - Leaves & Petals

Other:
Ranger Archival Ink - Jet Black
Distress Inks - Vintage Photo, Pumice Stone
fun foam
adhesive sheet
watercolors
ColorBox Blends Ink - Nutmeg, Golden, Stop

Scrapbook.com links in this post are affiliate links which do not affect the price you pay but allow me to earn a small percentage of a sale. Thanks! (My husband also thanks you!)

Wednesday, November 20, 2013

Fall Decorating!

Did I mention that I love to decorate for fall? I do! Fall and December are the two seasons where I really go all out. I have a shelf in my entryway that has been crying out for some sort of fall decor for a few years now. I finally got something done for that space, a fall-themed pennant banner!


Detail of one of the pennants
I wanted the softness and flexibility of a fabric base and I really wanted to use some of the new fabric that Tim Holtz has out now. I ended up layering triangles of felt, quilt batting and fabric so it would have some substance and dimension to it. Pin it well, add a little top-stitching and you are in business!

"sandwich" for the pennant base
Of course there had to be a paper element to the project as well. I used Distress Stains to lay down the first layer of color on the manila tags. It's a super easy technique! First scribble various colors of stain onto your craft sheet:


Then swipe the tag right through the puddles:


Dry it with a heat gun and you can blot it or swipe it through the stain still left on the sheet for another layer of color and texture. You can also flick water onto the tag and it will react with the stain, making spots.


I then stamped it with the Autumn Blueprint stamps using some of the new Wendy Vecchi Archival Ink colors (see product list below). They are some really beautiful colors! After stamping, I blended Brushed Corduroy Distress ink around the tag and flicked it with water to make spots. I also distressed the edges of the tag and inked them with Walnut Stain to define them.

I embellished the tags with glassine leaves (see the link for Tim's tutorial, I did not use metallic mixatives on mine however). I also die cut acorns out of grungeboard. The caps I painted with Walnut Stain Crackle Paint and the other part is brown paint with a layer of Glossy Accents over it.

But wait, there's more! I had an extra pennant so I made it into a hanging decor piece:


Whew! All that kept me out of mischief for awhile. =) I am thinking that a Christmas version of the hanger would make a great gift. Hmmmm…

Well, I hope you've been inspired to make something of your own. To those in the U.S., I wish you a happy Thanksgiving next week! And regardless of your country of residence, take some time to count your blessings and share with your family what you are thankful for. Oh, and here is my garland hanging in my entryway (one swag's worth anyway):


Most of the supplies I used to create this card can be found at Inspiration Emporium. Follow the links below and use my code JUICE to save 10% if you go shopping. Thanks!