Showing posts with label camping. Show all posts

Wednesday, August 18, 2021

Camping Memories Tag Album + Eileen Hull's Vintage Truck Die

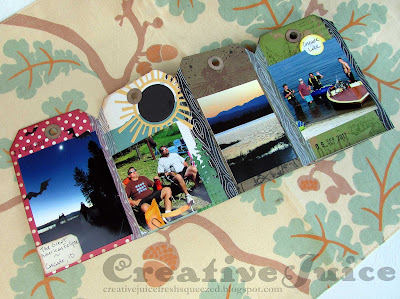
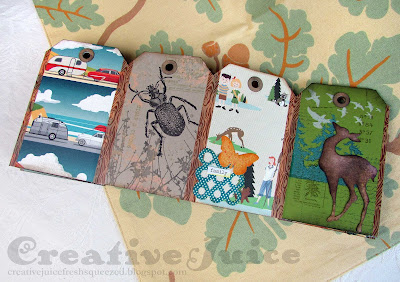
Hello there folks! I have a new project to share with you today. Back in April with Eileen Hull's Chapter 2 Sizzix release, we met the 3-D Camper Box Die and I used it to make a holder for a tag album commemorating many of our family's past camping trips. (Find that post HERE.) For Chapter 3, Eileen released a fabulous 3-D Vintage Truck Box Die that matches the Camper! I knew I had to make a companion piece for the Camper project, especially since I wasn't able to fit our more current camping trips into that tag album.

Lisa Hoel for Eileen Hull - Camping Tag mini album using new Sizzix Dies! #creativejuicefreshsqueezed #eileenhull #eileenhulldesigns #eileenhullsizzix #ehinspirationteam #eheducators #Sizzix #mymakingstory #diecutting

How cute is that little red truck? It's such a versatile die.

Lisa Hoel for Eileen Hull - Camping Tag mini album using new Sizzix Dies! #creativejuicefreshsqueezed #eileenhull #eileenhulldesigns #eileenhullsizzix #ehinspirationteam #eheducators #Sizzix #mymakingstory #diecutting

The tag album fits right in the box.

Lisa Hoel for Eileen Hull - Camping Tag mini album using new Sizzix Dies! #creativejuicefreshsqueezed #eileenhull #eileenhulldesigns #eileenhullsizzix #ehinspirationteam #eheducators #Sizzix #mymakingstory #diecutting

Here are some peeks at the insides of the tag album. I used a ton of stamps and die cuts to bring home the nature theme.

Lisa Hoel for Eileen Hull - Camping Tag mini album using new Sizzix Dies! #creativejuicefreshsqueezed #eileenhull #eileenhulldesigns #eileenhullsizzix #ehinspirationteam #eheducators #Sizzix #mymakingstory #diecutting

Lisa Hoel for Eileen Hull - Camping Tag mini album using new Sizzix Dies! #creativejuicefreshsqueezed #eileenhull #eileenhulldesigns #eileenhullsizzix #ehinspirationteam #eheducators #Sizzix #mymakingstory #diecutting

Lisa Hoel for Eileen Hull - Camping Tag mini album using new Sizzix Dies! #creativejuicefreshsqueezed #eileenhull #eileenhulldesigns #eileenhullsizzix #ehinspirationteam #eheducators #Sizzix #mymakingstory #diecutting

Lisa Hoel for Eileen Hull - Camping Tag mini album using new Sizzix Dies! #creativejuicefreshsqueezed #eileenhull #eileenhulldesigns #eileenhullsizzix #ehinspirationteam #eheducators #Sizzix #mymakingstory #diecutting

Both sides of the tags got the works!

Lisa Hoel for Eileen Hull - Camping Tag mini album using new Sizzix Dies! #creativejuicefreshsqueezed #eileenhull #eileenhulldesigns #eileenhullsizzix #ehinspirationteam #eheducators #Sizzix #mymakingstory #diecutting

Lisa Hoel for Eileen Hull - Camping Tag mini album using new Sizzix Dies! #creativejuicefreshsqueezed #eileenhull #eileenhulldesigns #eileenhullsizzix #ehinspirationteam #eheducators #Sizzix #mymakingstory #diecutting

Lisa Hoel for Eileen Hull - Camping Tag mini album using new Sizzix Dies! #creativejuicefreshsqueezed #eileenhull #eileenhulldesigns #eileenhullsizzix #ehinspirationteam #eheducators #Sizzix #mymakingstory #diecutting

 A few notes on the truck construction:

I spritzed both sides of two pieces of Sizzix mat board with Distress Oxide Spray Fired Brick and regular Distress Spray in Crackling Campfire and Aged Mahogany. The oxide spray gave it a wonderful aged mottled look. After cutting out my truck pieces, I sealed them with a coating of Distress Micro Glaze. On top of that, I dabbed on embossing ink and then covered all the parts with Eileen's Glistening Glass clear embossing powder.

Truck parts I cut for your reference. (Check this past post for more truck assembly instructions.) I didn't make a hood for this truck so I'd have more room to fit my tag album.


Thanks for stopping by! Be sure to keep an eye on Eileen's blog for more inspiration from the Educator and Inspiration Teams.

Supplies used:

Dies:
Eileen Hull Sizzix 
Vintage Truck Box  Sizzix / SB )
3-D Camper Box  Sizzix / SB )
Wreath & Snowflake Set  Sizzix / SB )
Card, Waterfall & Tags Set ( Sizzix / SB )

Tim Holtz Sizzix
Circle Play Sizzix / SB )
Gate Keeper ( Sizzix / SB )
3-D Impresslits Folder - Butterfly ( Sizzix / SB )
Tree Line ( Sizzix / SB )


Other:
Tim Holtz Stamp Sets - Specimen, Spring Sprung, Tiny Toadstools, Tree Line, Entomology, Field Notes, Falling Leaves, Flutter, Slight Alterations, Lumberjack, Halftone & Rings, Grunged
embossing ink
Eileen Hull Molten Dimensions Embossing Powder - Glistening Glass, Polished Silver
cardstock
a zillion different Ranger inks


Some links in this post are affiliate links which do not affect the price you pay but allow me to earn a small percentage of a sale. Thanks! (My husband also thanks you!) 

Tuesday, June 20, 2017

Eileen Hull & Stampotique Collaboration…

Hello! This month Eileen Hull's team is collaborating with Stampotique and both teams have been creating some pretty spectacular projects! I encourage you to check out the June posts on Eileen's blog and the Stampotique blog too! For my project, I used Eileen's Mini Album for the structure and all sorts of diecuts and of course fabulously whimsical Kira Nichols stamps from Stampotique to create a tunnel book.

Front, off on a road trip!

Back cover - road stripes are made with washi tape

The adventure begins!


Hmm, is this the end?

Nope!
I used Liquid Glass to adhere the glass glitter "crystals" to the cave walls.

Whew, lots of photos aren't there? ;-) Continue on for a look at how I created this.

Step 1 – I played around with tracing paper to determine the placement of elements and the cut openings in the pages.


Step 2 – I cut three layers of foam core for the cave base and carved out the openings with a craft knife. (Use a sharp blade!)


Step 3 – I stamped all the characters onto a heavy mixed media substrate and painted them with DecoArt Media Fluid Acrylics. Then I fussy cut them out. I also stamped and painted the cover, cut from Sizzix Matboard.


Step 4 – I added DecoArt Media Gesso and Texture Sand Paste to the layers of the cave parts before painting them. I left the top layer loose because I knew I was going to have some of the stamped images sandwiched between them.


Step 5 – I assembled the top pages with their die cuts and stamping. It was handy to have my tracing paper sketches to keep track of which page was which.


Step 6 – Last, I made the spine to hold the top pages and mount to the cave base. (I used a similar binding for this album project.) I cut six strips of cardstock 1 x 4.75 inches. (Turned out that I really only needed five of them.) I folded each in half lengthwise and then glued them together to form a fan shape (bottom photo). One outside flap got glued to the side of the foam core base and I adhered the pages to each of the other flaps.


Well, that was an epic post! You get a medal if you made it through the whole thing lol. Check out the other projects we've made this month and enjoy your week!

I'm also going to enter this into the Stampotique challenge for June. Lots to see there!

Stampotique stamps used for this project:
Stitched Houses, Cocoa Bird, Happy Camper Text, Bushes, Stack of Birds, Little Hoo-Hoo, Monster w/ Sign, Kitty Squad, Waving Spotted Monster

Many of the supplies I used for this project can be found at Sizzix or Simon Says Stamp. Follow the links below and a shopping you may go! Some links are affiliate links which do not affect the price you pay but allow me to earn a small percentage of the sale. Thanks!