I used loads of DecoArt Media Fluid Acrylics and other DecoArt products. I'll give you a run down and some closeups:
The arches are shapes I cut out of foam core board. (Tip: always use a super sharp X-acto blade when cutting foam core!) I base coated them with Prussian Blue Hue and then covered them with Crackle Paint. Remember thicker paint makes bigger crackles, so I tried to vary the thickness a bit for variety. When the paint was dry I gave the frames a light wash of Medium Grey to bring out the cracks and textures.
The deer were painted with Burnt Umber with a bit of Titan Buff mixed in (plus Gold for the antlers). When dry, I coated them with Glue 'n Seal and sprinkled on dry Rock Candy Distress Glitter.
The blue background in the arches is the result of a little experiment I did. I used illustration board as a substrate, wet it first and loosely applied watered down Cobalt Blue Hue, Cerulean Blue, and few splatters of Paynes Grey. I wanted it to look blotchy so I didn't overwork the colors. I was wondering what would happen if I sprinkled salt all over it while it was still wet. This is a tried and true technique when watercoloring – you get a gorgeous, feathery pattern when it all dries. I wasn't sure how it would react with acrylics. I sprinkled the table salt on and let it sit until the board dried. It didn't react like watercolor paint does at all but I was very pleased with the speckle pattern it left. I think it's perfect for a snowy background!
 |
| The full board of the sky background. I also splattered some White Shimmer Mist here and there. |
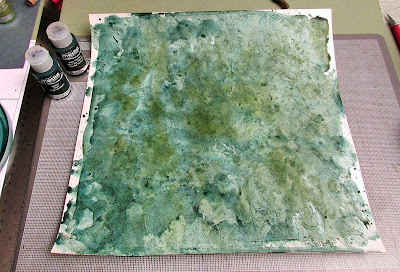
I also similarly used Fluid Acrylics to create a sheet of paper to cut up for the trees.
 |
| The full sheet of "tree" paper. |
If you are still here I'm almost done lol. The snowflakes were die cut out of scrap packaging plastic and embossed with the folder that comes with the die (Snowflake Duo by Sizzix) I dabbed one side with watered down Silver paint and then applied Crackle Glaze to the opposite side once it was dry. While the glaze was wet I sprinkled on a touch of Ultra-fine Art Sugar glitter. Last but not least, the base of the project is covered with Snow Tex paint with Rock Candy glitter sprinkled on while the paint was wet. You can see I am a fan of sparkle.
Whew that was long! I hope you've been inspired and maybe picked up a few things to try yourself. For even more inspiration, head on over to The Mixed Media Monthly Challenge Blog and check out our current challenge, Time Flies. (You can see my original post and more details HERE.) You have until the end of the month to join in and link up your projects!
Thanks for stopping by! The supplies I used for this project can be found at Sizzix, Simon Says Stamp or Amazon. Follow the links below and a shopping you may go. ;-)


Wow, Lisa! this is one fantastic winter scene! It was such a pleasure to read your step by step, and so easy to follow! Your salt and acrylics experiment led to such amazing textured look on the snowy sky and trees! Love the results! The crackle on your hand made frame is just out of this world! Well done on another fabulous project! Hugs!
ReplyDeleteOver the top BEAUTIFUL artwork Lisa. Something to be very very proud of.... wow. j
ReplyDeleteThis project is delightful Lisa! I so enjoy your sharing with us on ATT...keep it up!
ReplyDeleteWow,Lisa, tht is some beautiful scenery!
ReplyDeleteSooo magical, Lisa!
ReplyDeleteI love love love your winter wonderland! I can almost hear the snow crunch under the hooves of the gorgeous reindeer!
Thank you for sharing your enchanted make with us at DecoArt's Winter Wonderland Challenge!
Claudia x
Oh Lisa....this is right up my alley! I totally am in love with your piece. It's such a beautiful and peaceful little winter scene. Love how you've done your evergreens and made them dimensional. Love the crackled arches with the wintery scenes in each. Love your little reindeer prancing and playing in the fallen snow. Fantastic interpretation of a wintery theme! Thanks for entering our DecoArt Winter Challenge.
ReplyDeleteIt's a perfect wintertime scene and a great sequel for the post-Christmas decorating.
ReplyDeleteGorgeous! This certainly fit the bill of a joyful wintery piece, that's not for Christmas. Blessings!
ReplyDeleteWhat a beautiful display. Winterwonderland as it's best. Thanks for sharing your project with us, at the DecoArt Winter Wonderland Challenge.
ReplyDeleteLisa, I love your winter scene. It could also be used for your Christmas decorations, too. TFS your glittery techniques. So glad you joined us in the DecoArt Winter Wonderland Challenge.
ReplyDeleteAbsolutely stunning. Thank you for the detailed step-by-step.
ReplyDeleteLisa, another stunning piece!!! Love everything and the details are so amazing!! Thanks for creating for the DecoArt Winter Wonderland Challenge.
ReplyDelete