Showing posts with label woods. Show all posts

Thursday, December 3, 2020

Funkie Junkie Challenge 'A Time to be Grateful!' Guest Post

Hello, I am honored to be a guest designer today on the Funkie Junkie Boutique blog! The current challenge is 'A Time to Be Grateful' which is a very worthy one! To help me focus on gratefulness, I created a little keeper using Eileen Hull's Post Box Die. Each day for the month of December I will write something I am grateful for on a slip of paper and pop it into the box. I think it will help me to be mindful of things and not just let the month blur by in a whirl.

Lisa Hoel for the Funkie Junkie Boutique - 'A Time to be Grateful' challenge, project using Eileen Hull's Post Box Die from Sizzix
I cut the slips of paper using Eileen Hull's retired Credit
Card Sleeve die but you can cut them by hand with a trimmer etc.


Lisa Hoel for the Funkie Junkie Boutique - 'A Time to be Grateful' challenge, project using Eileen Hull's Post Box Die from Sizzix
Back side of box


Lisa Hoel for the Funkie Junkie Boutique - 'A Time to be Grateful' challenge, project using Eileen Hull's Post Box Die from Sizzix
I added a magnetic closure to the flap.

After I finished my box, I realized that I didn't have any step by step photos! oops! I used the same techniques to make a card (below) so I could take pictures. So, imagine doing these steps on the Post Box Die cut out. ;-)

Step 1 - I spritzed my craft mat with Speckled Egg Distress Stain in both regular and Oxide stains. I dipped my background into it a few times, drying it with my heat tool each time. The far background trees I stamped in Distress Oxide Ink, Iced Spruce using the watercoloring stamping technique. (super easy!) Ink up your stamp, lightly mist with water and then stamp as usual. It gives a great watercolor effect.


I filled in the area under the stamped image with more Iced Spruce, using a blending tool.

Step 2 - A few weeks ago, one of Tim Holtz's Saturday Facebook Lives focused on making a stash of backgrounds that you could cut up into greens for your holiday projects. I used one of them (made with new the Rustic Wilderness color) to cut my foreground trees out of. It's handy to have a stash!


Step 3 - Assembling the background: For my original Post Box project, I glued the die cut trees around my stamped, then assembled box. Then I added the strip of Christmas Fabric tape around the bottom and topped it with a strip of the washi Trim Tape. For the card below, I mounted all the layers on a dark red mat layer.


Step 4 - I die cut the deer out of brown card stock and then embossed them with Vintage Photo Distress Glaze. I gives them a nice shine. On the card, I left the little fawn plain so it would contrast with the doe.

Final card:

Lisa Hoel for the Funkie Junkie Boutique - 'A Time to be Grateful' challenge, project using Eileen Hull's Post Box Die from Sizzix


Thanks for stopping by and checking out my post! I hope you join in the 'A Time to Be Grateful' challenge over on the Funkie Junkie blog. It is really important to remember all the things we do have to be thankful for, especially when times are tough. I am grateful that I can use my art to show what I'm thankful for! =)

Supplies used:

Dies:
Eileen Hull Sizzix 
Post Box Die  ( Sizzix / SB ) 
Credit Card Sleeve & Tags Dies - retired

Tim Holtz Sizzix
Tree Line ( Sizzix / SB )
Darling Deer ( Sizzix / SB )

Tim Holtz Stamp sets - Tree Line, Snarky Cat Christmas, Stamptember 2018
Distress Spray Stains, Oxide Ink, original Distress Ink
Distress Glaze - Vintage Photo
Tim Holtz Christmas Idea-ology: Trim Tape, Fabric Tape

Some links in this post are affiliate links which do not affect the price you pay but allow me to earn a small percentage of a sale. Thanks! (My husband also thanks you!) If you shop at Topflight Stamps, use my coupon code LISAHOEL for 12% off your order.


Thursday, September 13, 2018

Frilly & Funkie Challenge - All Creatures Great & Small

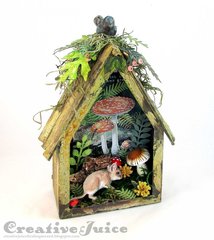
Hello and happy Thursday! I am honored to be a guest designer on the Frilly and Funkie blog for their new All Creatures Great and Small challenge. The projects must have animals as the focus - no humans allowed. ;-) I have created a little decor piece that features a forest mouse (and has a little bird on top. Double whammy, woo hoo!! lol)


Here's a closer peek inside:


and a view of the top:


It was pretty straightforward to put together. The graphics came from two vintage books that I recently found at a thrift store:


Book lovers, do not worry, no books were harmed in the making of this project! I scanned the book cover and the mouse and printed them out for it. ;-)

My biggest tip comes from a rookie mistake that I made. I added all sorts of lovely crackle paste to the little house's bare metal and it promptly fell off when it dried. Oops! I forgot the number one rule of needing to add something like..... clear gesso!.... to the metal first before the texture paste. So I knocked off all the old crackle that hadn't already flaked off and applied a layer of clear gesso. When that was dry I redid the crackle and it worked perfectly! I used DecoArt Media Liquid Acrylics to add color afterwards.


Thanks for stopping by and be sure to check out the challenge at Frilly & Funkie. Show them your stuff!

Dies:
Garden Greens (Sizzix / SB)
Garden Greens Thinlits (Sizzix / SB)
Tiny Tattered Florals (Sizzix / SB)
Funky Florals #3 (Sizzix / SB)
Tattered Leaves (Sizzix / SB)
Tapered Fringe (Sizzix)

Other:
Tim Holtz Stamp Set - Falling Leaves
Ranger Archival Ink - Fern Green
Distress Inks - Pine Needles, Vintage Photo, Twisted Citron, Mowed Lawn, Peeled Paint, Mustard Seed, Fossilized Amber
Prima Clear Gesso
Prima White Crackle Texture Paste
Tim Holtz Idea-ology Foliage
DecoArt Media Liquid Acrylics - Geen Gold, Cerulean Blue, Transparent Yellow Iron Oxide, Burnt Umber, Dark Grey 3, Sap Green, Phthalo Green-Gold
moss
vintage faux mushrooms
bark
spanish moss

Sizzix and Scrapbook.com links in this post are affiliate links which do not affect the price you pay but allow me to earn a small percentage of a sale. Thanks! (My husband also thanks you!)


Tuesday, November 14, 2017

Eileen Hull's Book Club Collection Release!

Hello, Eileen's new collection, Book Club, will soon be in the stores! This collection is chock full of cool dies but some of the coolest are the 3-in-1 dies. They are XL Bigz dies and are designed so you can make several different types of projects from the same cuts. My favorite is the Book & Pages, Trinket Box & Frame Die. (Check out the projects the Inspiration Team is sharing on Eileen's blog all this month. You will see the variety you can achieve!) I created a little winter scene in my trinket box:


I have a quick little tutorial for you. These are pretty easy to put together! To start, I cut all the pieces out of white matboard (I love how the Sizzix matboard takes ink.) For the inside of the box, I first smooshed Antique Linen and Pumice Stone Distress ink onto my craft mat, sprayed with water and then smooshed the matboard into the puddle and then dried it. Using the Bare Trees stencil, I made a monoprint over that.


Making a monoprint is easy. I used the Hickory Smoke ink pad to apply ink directly to the stencil. I then lightly misted it with water and placed it ink side down onto the background. It helps to press down on the stencil with a paper towel or cloth to absorb any extra water that squishes out.

I neglected to take more photos (oops) but the box goes together quite easily. Before assembly, I stamped the outside surfaces with a woodgrain stamp and Antique Linen ink. I then glued the box sides to the back and filled it before gluing on the front. I built up a little platform from scrap matboard so the tree and deer would be high enough to show properly in the window. I used Texture Paste to make the snow and covered it with Rock Candy Glitter.


The wooden birch tree, mini pine cones and wooden snowflakes I had in my stash. The base is an old wooden spool I painted white and wrapped with grey Jute Twine.

Thanks for stopping by! Ask about Eileen's new collection at your local scrapbook store. Also be sure to check out Eileen's blog to see what everyone else is sharing. =)


Dies Used: 
Sizzix:
Eileen Hull - Book & Pages, Trinket Box, Frame (Sizzix) 
Eileen Hull - Floral Arch & Words(Sizzix)
Mover & Shapers Mini Reindeer (Sizzix) 

Other supplies:
Dreamweaver Bare Trees Stencil
Tim Holtz Jute Twine
Tim Holtz Christmas Word Bands (retired)
Distress Glitter - Rock Candy, Vintage Platinum
Sizzles matboard
Distress Ink - Antique Linen, Hickory Smoke, Pumice Stone
Stickles - Rock Candy
Distress Collage Medium

Simon Says Stamp and Sizzix links in this post are affiliate links which do not affect the price you pay but allow me to earn a small percentage of a sale. Thanks! (My husband also says thanks!)

Thursday, December 1, 2016

Mixed Media Monthly Challenge #31 – Merry & Bright


Hello and welcome to the 31st Mixed Media Monthly Challenge – Merry & Bright! It's December and time to get serious about being festive! ;-) Our sponsor this month is Eileen Hull. She sent each member of the Design Team cuts from her Loaf Pan and Square Box dies to see what we could do with them. I think you will be inspired! For my project I stacked two loaf pans to make a base for a little woodsy scene.


It's easy, let's take a look!

Step 1 – First I used a stencil and Ranger Texture Paste to create the snowflakes on the two base pieces. I made sure I didn't get any paste on the flaps that you glue and score through the paste on the fold lines so it will break cleanly when you assemble them.


Step 2 – Once the texture paste was dry, I misted the pieces with Iced Spruce, Hickory Smoke and Brushed Pewter Distress Stains. I also misted with plain water to help the colors blend together.


Step 3 – After assembling the loaf pans, I stacked them and glued them together to form the base. I also cut some scraps of styrofoam to fill up the top pan and form a platform for my scene.


I crumbled sheets of white tissue paper into the top to build up the "hill" and covered the whole thing with Mod Podge and Rock Candy Distress Glitter. Previously, I had prepared the Woodlands trees (sprayed with Distress Stain and glittered) and little Decorative Deer (colored with Mushroom Alcohol Ink). Before the Mod Podge dried I glued the trees and deer in place and added the other decorative elements. When everything was dry I added the crinkle ribbon and charms.

Thanks for stopping by! Head on over to the Mixed Media Monthly blog challenge post Merry & Bright to check out the other fabulous projects by the team. Join in and you could win Eileen's retired Sizzix Loaf Pan die! There will be a mid month post with more projects on the 15th so don't miss that as well.

A little birdie told me that there just might be several giveaways this month on MMM's various social media channels. I'd keep an eye on them if I were you – just sayin'! ;-)


The supplies I used for this project can be found at Sizzix or Simon Says Stamp. Follow the links below and a shopping you may go.