Monday, November 30, 2020

Day 2 of Eileen Hull's Christmas Journaling Event!


We need some fun in our lives so all of us at Eileen Hull Designs put our heads together and came up with an event that you can participate in as much or as little as you'd like. It's a challenge of sorts and we'd like to see you to make a Holiday Journal for this season using any of Eileen Hull Design's book dies. Your journal could include activities, photos, recipes, shopping lists, daily thoughts, etc. Really, it can include anything you want; after all, it's your journal!
Every Monday, Wednesday, and Friday between November 27th and December 23rd there will be a post in the Eileen Hull Fan Club from one of Eileen's team members with a prompt for a journal page. These prompts are meant to get your creative thoughts flowing and give you page ideas for your Holiday Journal. It might be in the form of a blog post, Facebook Live, recorded quick video, or a Facebook post in the group. It's up to you to take it from there and we can't wait to see what you come up with, so please share your covers and pages with us in the Eileen Hull Fan Club.
Today it's Day 2 and it's my turn to share today's prompt which is… Christmas baking! If you misssed my post about my cover, check here. I used Eileen's XL Journal Die so I created pages to fit inside. For this journal, I'm going to work on the pages separately and then bind them into signatures after the event is concluded. I find that easier if I'm stamping, stenciling etc as I go along.
Lisa Hoel for Eileen Hull's Comfort & Joy Christmas Journaling event! Day 2 promt: Christmas baking!

Today's tutorial will show you how to make these pockets to hold favorite recipes!

Lisa Hoel for Eileen Hull's Comfort & Joy Christmas Journaling event! Day 2 promt: Christmas baking!

I also included some throw back photos of my eldest son doing some baking when he was a little guy (so long ago LOL). He is now 17!! I will have to see if I can get some new photos of him participating (probably by tasting) for this years baking and add it to the journal. I also added a little journaling note. Back before the boys came along, I would bake several different kinds of cookies, make up cookie plates, and then anonymously drop them off at various friends' residences in the wee hours of the morning. How did I have the energy for that?? Then I had babies and got tired ha ha. I still love baking and sharing cookies but I've toned it down a bit in the years since. So, let's get on with the how-to! Also, at the end of the post I have a downloadable PDF file of recipe cards with some of my family's favorite cookie recipes. Some of these were my great-grandmother's recipes! So don't miss those. ;-)

Pocket Tutorial:
Step 1 - I first cut out a pile of pages to use throughout the whole Comfort & Joy event. Since I used the XL Journal Die, I cut my pages to 8.5" wide by 8.25" tall and then folded them in half. This gives you a folded page that is 4.25" x 8.25" which fits perfectly in the cover. I used a variety of patterned paper and plain paper so I can mix it up as I go.


Step 2 - Pockets! I made the pocket sizes to fit 3 x 5" recipe cards. I arranged it so I can cut four pockets out of one 8.5 x 11" piece of cardstock. For maximum efficiency, I scored my fold tabs before I cut them all apart (ah ha! Saving time, oh yes.) See the diagram below. Dashed lines are score lines and solid lines are cut lines. 

Oops! Forgot to add the pocket height to the diagram. 
The finished height is 4.5" (so add 3/8" to the bottom of that for the tab).

Here is a sheet all scored:

I then cut out the pockets. Trim the lower corners as shown:

Fold in the tabs. It helps to use a bone folder to get a nice sharp crease. 
Step 3 - Glue the pockets to your pages. If you are layering pockets like I did, glue the top one on first! If you are using a different sized journal die you will have to adjust as you see fit. Maybe you will only fit one pocket on a page, that's okay. Use your favorite adhesive but make sure it's strong enough to hold the pocket on tight.


Step 4 - Decorating the pages! I used Eileen's Journaling Cards Die (sadly retired) to cut some decorative covers for the bottom pockets. I added some additional die cuts and pieces of ready to go ephemera. I tried not to overthink it. Use your stash to decorate your pages! =)


Last but not least, here are some cookie recipe cards for you to download. Click on the chicken below to download a pdf of recipe cards. 

Cookie Recipes For You


Thanks for stopping by! Check out Eileen's blog and if you are not already a member, join the Facebook Eileen Hull Fan Club group. If you want to participate in the Comfort & Joy Event with us you will need to join as that is where all the action will be! It is a warm, supportive group with lots of inspiration and sharing going on. You'll just have to answer a few simple questions when asking to join (to keep out spammers) and then you'll be added. ;-)
Supplies used:

Dies:
Eileen Hull Sizzix 
(For cover) Journal XL Die  Sizzix / SB ) 
Journaling Cards, Flowers & Leaves #662811 - retired

Tim Holtz Sizzix
Holiday Greens Sizzix / SB )
Fresh Baked #2 Sizzix / SB )

Tim Holtz Layering Stencil, Shifter - Peppermint
Tim Holtz stamp set - Christmas Blueprint #3
Distress Spray Stains, Oxide Ink, original Ink
Tim Holtz Christmas Idea-ology: Fabric Tape, Snippets

Some links in this post are affiliate links which do not affect the price you pay but allow me to earn a small percentage of a sale. Thanks! (My husband also thanks you!) If you shop at Topflight Stamps, use my coupon code LISAHOEL for 12% off your order.


Friday, November 27, 2020

Kick Off Time for Eileen Hull's Christmas Journaling Event!


We need some fun in our lives so all of us at Eileen Hull Designs put our heads together and came up with an event that you can participate in as much or as little as you'd like. It's a challenge of sorts and we'd like to see you to make a Holiday Journal for this season using any of Eileen Hull Design's book dies. Your journal could include activities, photos, recipes, shopping lists, daily thoughts, etc. Really, it can include anything you want; after all, it's your journal!
Every Monday, Wednesday, and Friday between November 27th and December 23rd there will be a post in the Eileen Hull Fan Club from one of Eileen's team members with a prompt for a journal page. These prompts are meant to get your creative thoughts flowing and give you page ideas for your Holiday Journal. It might be in the form of a blog post, Facebook Live, recorded quick video, or a Facebook post in the group. It's up to you to take it from there and we can't wait to see what you come up with, so please share your covers and pages with us in the Eileen Hull Fan Club.
Today it's Day 1 and I'm sharing the journal cover that I made for the event. I can't wait to fill it up with Christmas goodies and share some prompts with you too.

Lisa Hoel for Eileen Hull - Comfort and Joy Christmas Journaling event 2020
Front

I used Eileen's XL Journal Die for my cover base. Delving into my stash, I used a ton of Tim Holtz media, stamps, dies and Idea-ology ephemera to decorate it! (I have quite a *ahem* collection lol.)

Lisa Hoel for Eileen Hull - Comfort and Joy Christmas Journaling event 2020
Back

Here's a peek at the inside too:
Lisa Hoel for Eileen Hull - Comfort and Joy Christmas Journaling event 2020
Inside

Lisa Hoel for Eileen Hull - Comfort and Joy Christmas Journaling event 2020


Thanks for stopping by! Check out Eileen's blog and if you are not already a member, join the Facebook Eileen Hull Fan Club group. If you want to participate in the Comfort & Joy Event with us you will need to join as that is where all the action will be! It is a warm, supportive group with lots of inspiration and sharing going on. You'll just have to answer a few simple questions when asking to join (to keep out spammers) and then you'll be added. ;-)
Supplies used:

Dies:
Eileen Hull Sizzix 
Journal XL Die  Sizzix / SB ) 

Tim Holtz Sizzix
Festive Trims, Colorize Sizzix / SB )
Crochet Sizzix / SB )
Large Funky Festive Sizzix )
Holiday Greens Sizzix / SB )

Distress Crayons
Distress Spray Stains, Oxide Ink, orginal Ink
Tim Holtz Christmas Idea-ology: Trim Tape, Snippets, Sticker Book, Layers & Baseboard Frames, Paper Dolls

Some links in this post are affiliate links which do not affect the price you pay but allow me to earn a small percentage of a sale. Thanks! (My husband also thanks you!) If you shop at Topflight Stamps, use my coupon code LISAHOEL for 12% off your order.


Monday, November 16, 2020

Celebrate Fall!

Hello there! Before I move onto Christmas projects, I wanted to do one last fall project. Fall is my favorite season! I love the crisp days, golden light and above all the colorful leaves. The bright autumnal hues are totally my jam! I still had a stash of paper leaves I made during the fall Facebook live demonstrations that Tim Holtz did last month so I was able to incorporate them into my little thrift store upcycling project:

Lisa Hoel – upcycled thrift store finds into a fun autumn arrangement, celebrate fall! #creativejuicefreshsqueezed #tim_holtz #timholtzleaflove #mymakingstory

I found the bottom half of a nut dish at the thrift store as well as a pair of cute squirrel salt and pepper shakers (into my basket they went!) Perfect for a fall project!


Lisa Hoel – upcycled thrift store finds into a fun autumn arrangement, celebrate fall! #creativejuicefreshsqueezed #tim_holtz #timholtzleaflove #mymakingstory

I wanted it to look like a forest floor on a fall day. I sprinkled the leaves about along with moss and berry like things. I also discovered that you can use Distress Glaze on the Idea-ology Toadstools and they look great!


Lisa Hoel – upcycled thrift store finds into a fun autumn arrangement, celebrate fall! #creativejuicefreshsqueezed #tim_holtz #timholtzleaflove #mymakingstory

As Tim shared in one of his demos, when applying Glaze to an impervious surface, it works best to coat the surface with Collage Medium and glue the embossing powder to it. When it's dry, you can emboss as usual. It worked perfectly! I painted some spots on afterwards. Love them! I may need to stock up on more Toadstools ha ha.

Thanks for stopping by! I hope you have a great week and get inky!

I am also entering this into the Funkie Junkie Boutique Blog's current challenge, "Celebrate". It runs for another week so you have a chance to enter too.


Supplies used:

Dies:

Tim Holtz Sizzix
Fall Foliage ( Sizzix / SB )

Tattered Leaves 656927 
- retired

Idea-ology Toadstools (in stock here)

Ranger Distress Glaze - Crackling CampfireFired Brick
Ranger Distress Inks - various fall colors
Ranger Distress Oxide Inks - various fall colors
Ranger Distress Spray Stains - various fall colors
Ranger Distress Spray Oxide Stains - various fall colors


Some links in this post are affiliate links which do not affect the price you pay but allow me to earn a small percentage of a sale. Thanks! (My husband also thanks you!) If you shop at Topflight Stamps, use my coupon code LISAHOEL for 12% off your order.

Thursday, November 5, 2020

Blessed Home Fall Wreath

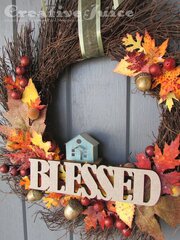
Howdy readers! I am on a wreath kick. I had picked up a few wreaths (with re-do possibilities) from the thrift store so I could get a base for the new Halloween wreath I wanted to make this year. I ended up using a black grapevine wreath for the Halloween project so I had a brown twiggy one left. I knew it would make a great fall wreath and the dark brown would make my Tim Holtz #timholtzleaflove challenge leaves really pop! I also had the theme in mind from the current Funkie Junkie Boutique Blog challenge, "Home is Where the Heart Is". 

Lisa Hoel - Blessed Home fall wreath #timholtzleaflove

Home really is where the heart is and I feel very fortunate to be living where I do with my family. We are truly blessed and I am so thankful! We have not regretted moving to our new state for a moment and we are thriving here. It was all the Lord's doing and looking back we can see his plan for us in coming here.

Lisa Hoel - Blessed Home fall wreath #timholtzleaflove

The leaves are cut using various Sizzix leaf dies designed by Tim Holtz. The past two Saturdays Tim has been doing Facebook Live demos showing all sorts of techniques using his products to make fall projects (Fall Vibes and Leaf Love). What fun! I used part of my pile 'o leaves to decorate this wreath. The little house is from his new die set Paper Village (oh I have plans for this set!!)

Lisa Hoel - Blessed Home fall wreath #timholtzleaflove

Thanks for stopping by! I hope you have a great weekend and have a chance to do something crafty and creative. =)

I am also entering this into the Funkie Junkie Boutique Blog's current challenge, "Home is Where the Heart Is". It runs for another week so you have a chance to enter too.


Supplies used:

Dies:

Tim Holtz Sizzix
Paper Village ( Sizzix / SB )
Fall Foliage ( Sizzix / SB )
Layered Leaf 660039 - retired
Tattered Leaves 656927
- retired

Ranger Distress Glaze - Crackling Campfire, Fired Brick
Ranger Distress Inks - various fall colors
Ranger Distress Oxide Inks - various fall colors
Ranger Distress Spray Stains - various fall colors
Ranger Distress Spray Oxide Stains - various fall colors


Some links in this post are affiliate links which do not affect the price you pay but allow me to earn a small percentage of a sale. Thanks! (My husband also thanks you!) If you shop at Topflight Stamps, use my coupon code LISAHOEL for 12% off your order.

Tuesday, November 3, 2020

Deck the Halls with Eileen Hull's Dies!

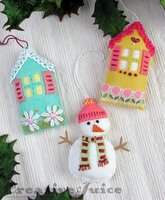
Hello everyone! Here we are in November and Eileen Hull's theme for the month is Seasons' Greetings! The Inspiration and Educator Teams are going to be getting crafty with all the holidays and seasons coming up. I've been in a stitchy mood lately so I thought I would make some more felt Christmas tree ornaments. You may remember the Mitten ornament I made back in July with Eileen's then new Mitten Box Die. I decided to give her House Ornament and Snowman Box Dies the felt treatment too!

Lisa Hoel for Eileen Hull – felt Christmas ornaments made using Eileen's versatile Sizzix dies

I am again using the wool blend felt from Benzie Design. I really like how it feels and it holds together better (especially the little small pieces) than 100% wool felt. It is also more economical!

The House Ornament Die is a 3-D die but all I had to do was cut off the tabs etc. from my piece of die cut felt. I backed the windows with a piece of felt on the inside and stitched around it to hold it into place. I searched through my *ahem* extensive stash of ribbon and trims to find just the right elements to use for the roofs and 'gardens'. I was winging it again with the stitches and just made it up as I went along. A little polyfil stuffing gave them dimension.

I did the same thing with the Snowman ornament (winged it lol). I cut the little stick arms out of Sizzix Paper Leather (Kraftex paper is similar.) Basically I didn't want to use skinny felt cuts because they'd probably tear off. Same thing with regular paper cardstock, it didn't seem like it would be sturdy enough. The Paper Leather or Kraftex is made to stand up to wear and tear. As I was sewing together the front and back of the ornament, I stitched the ends of the arms into the seams. 

I encourage you to try this out. Cut out some felt pieces and just play! =)

Thanks for stopping by! Check out Eileen's blog and if you are not already a member, join the Facebook Eileen Hull Fan Club group. It is a warm, supportive group with lots of inspiration and sharing going on. You'll just have to answer a few simple questions when asking to join (to keep out spammers) and then you'll be added. ;-)

Supplies used:

Dies:
Eileen Hull Sizzix
House Ornament Die  Sizzix ) (50% OFF on the Sizzix site right now!)
Snowman Box Die  Sizzix / SB ) (also on sale on the Sizzix site right now!)

embroidery floss
polyfil stuffing
embroidery needles

Some links in this post are affiliate links which do not affect the price you pay but allow me to earn a small percentage of a sale. Thanks! (My husband also thanks you!) If you shop at Topflight Stamps, use my coupon code LISAHOEL for 12% off your order.

Saturday, October 31, 2020

Happy Halloween from Topflight Stamps!

Happy Halloween! I wanted to share a fun little shaker card made Topflight Stamps style! I posted it off to my nephews earlier this week and I hope it gets there in time. My crafting time keeps getting squeezed. (bother!)

Lisa Hoel for Topflight Stamps - Halloween shaker card

I loved the fun papers in the Polkadoodles Halloween paper pad and picked out two contrasting ones to use for the card base and the shaker top. The plastic is scrap from some packaging (it pays to save it!) and I stamped on it with the Fairy Web stamp and archival ink. The shaker bits are from my extensive craft stash. I couldn't resist the super cute cat die set from Swirlcards and I think it adds the perfect focal point to the card. Some Hunkydory Diamond Sparkles add a finishing touch of bling.


Thanks for stopping by! I hope you can have a safe Halloween celebration and have a chance to get crafty too this weekend.

Supplies used:

Topflight Stamps Products:

Lavinia - Fairy Web stamp
Swirlcards die set - Cats
Polkadoodles Halloween paper pad
Versafine Ink - Onyx Black
Hunkydory foam adhesive squares
Hunkydory Diamond Sparkles - Precious Purples

Dies:

Tim Holtz Sizzix
Postage Stamp Frame - retired
Movers & Shapers Rectangles - retired
Labels ( Sizzix / SB )

Tim Holtz stamp set - Scared Silly

Some links in this post are affiliate links which do not affect the price you pay but allow me to earn a small percentage of a sale. Thanks! (My husband also thanks you!) If you shop at Topflight Stamps, use my coupon code LISAHOEL for 12% off your order.

Thursday, October 29, 2020

Tim Holtz Halloween Inspiration

Hello everyone! I have a last few Halloween projects to share with you before the 31st is past. I was inspired by one of Tim Holtz's recent Saturday Facebook Live tutorials, Halloween tips + tricks 2. He showed us how to make 'drippy candles' that light up too! Wow!! I knew I had to try them also. I created a little scene in one of his Display Domes. Check out the link above to his blog where you will find the video tutorial on how to make them for yourself. (Also learn how to make a glowing crystal ball!) Enjoy the photos and happy Halloween:

Lisa Hoel, Tim Holtz Halloween Inspiration, check out his drippy candle tutorial! #tim_holtz #creativejuicefreshsqueezed #halloweencrafting

The little cat figurine I found at Michael's at the beginning of the season. It's perfect for this project!

Lisa Hoel, Tim Holtz Halloween Inspiration, check out his drippy candle tutorial! #tim_holtz #creativejuicefreshsqueezed #halloweencrafting

Flick on the Tiny Lights switch and feel the glow!

Lisa Hoel, Tim Holtz Halloween Inspiration, check out his drippy candle tutorial! #tim_holtz #creativejuicefreshsqueezed #halloweencrafting

Here's a better view without the glare of the glass dome. Scroll on for more details…

Lisa Hoel, Tim Holtz Halloween Inspiration, check out his drippy candle tutorial! #tim_holtz #creativejuicefreshsqueezed #halloweencrafting

Lisa Hoel, Tim Holtz Halloween Inspiration, check out his drippy candle tutorial! #tim_holtz #creativejuicefreshsqueezed #halloweencrafting

Lisa Hoel, Tim Holtz Halloween Inspiration, check out his drippy candle tutorial! #tim_holtz #creativejuicefreshsqueezed #halloweencrafting

The tall pedestal is one of the finials from the Vignette Finial Set.

Lisa Hoel, Tim Holtz Halloween Inspiration, check out his drippy candle tutorial! #tim_holtz #creativejuicefreshsqueezed #halloweencrafting

I hid the wire coming down from the top candle underneath a piece of gold ribbon. (After painting the wire and a stray light bulb over with grey paint to camoflauge it) I also tucked a Creepy Eye underneath as a detail for the viewer to 'discover'.

Lisa Hoel, Tim Holtz Halloween Inspiration, check out his drippy candle tutorial! #tim_holtz #creativejuicefreshsqueezed #halloweencrafting

These candles really are a lot of fun to make and I have Christmas ideas for them too. I am also entering this project into the Country View October Challenge 'Make a Scene'.

Thanks for stopping by!

Supplies used:

Tim Holtz paper stash - Abandoned
Tim Holtz Halloween Idea-ology: Creepy Eyes, Halloween Tiny Lights, Label Tape, Adornments
Tim Holtz Idea-ology - Display Dome
Tim Holtz Idea-ology - Vignette Finial Set
Tim Holtz Idea-ology - Keys
gold starred ribbon
cat figurine from Michael's
glue gun
Distress Paint - Antique Linen
Distress Crayons - various

Some links in this post are affiliate links which do not affect the price you pay but allow me to earn a small percentage of a sale. Thanks! (My husband also thanks you!) If you shop at Topflight Stamps, use my coupon code LISAHOEL for 12% off your order.