Sunday, December 29, 2019

Birthday Celebration with Topflight Stamps

Hello! The new year is almost upon us; can you believe it? We are in a celebratory mood around here with the start of 2020 a few days away and also my husband's 50th birthday on the 4th! I made him a card:


I always love using Katzelkraft stamps because of their whimsical designs. I stamped and fussy cut this little robot and mounted it onto a Wobbler for some fun movement. The background is stamped with ombre ink and I embossed the sentiment so it would really pop. Hopefully he will like it! (and his surprise party, shhhhhhh… ;-)  )

Thanks for stopping by and have a great week! Happy New Year!!

Supplies used:

Topflight Stamps Products:

Katzelkraft - Robots 2
Creative Expressions - Enigma
For the Love of Stamps - Today is the Perfect Day
Prism Embossing Ink
Prism Ink - Peacock Green
Hero Arts Ombre Ink - Sky to Indigo
Versafine Ink - Onyx Black
Seth Apter embossing powder - Eclipse
Renke washi - Little Stars
Wobblers
Ink Blenders

Some links in this post are affiliate links which do not affect the price you pay but allow me to earn a small percentage of a sale. Thanks! (My husband also thanks you!) If you shop at Topflight Stamps, use my coupon code LISAHOEL for 12% off your order.

Friday, December 27, 2019

Magnetic Christmas Advent Calendar with Xyron


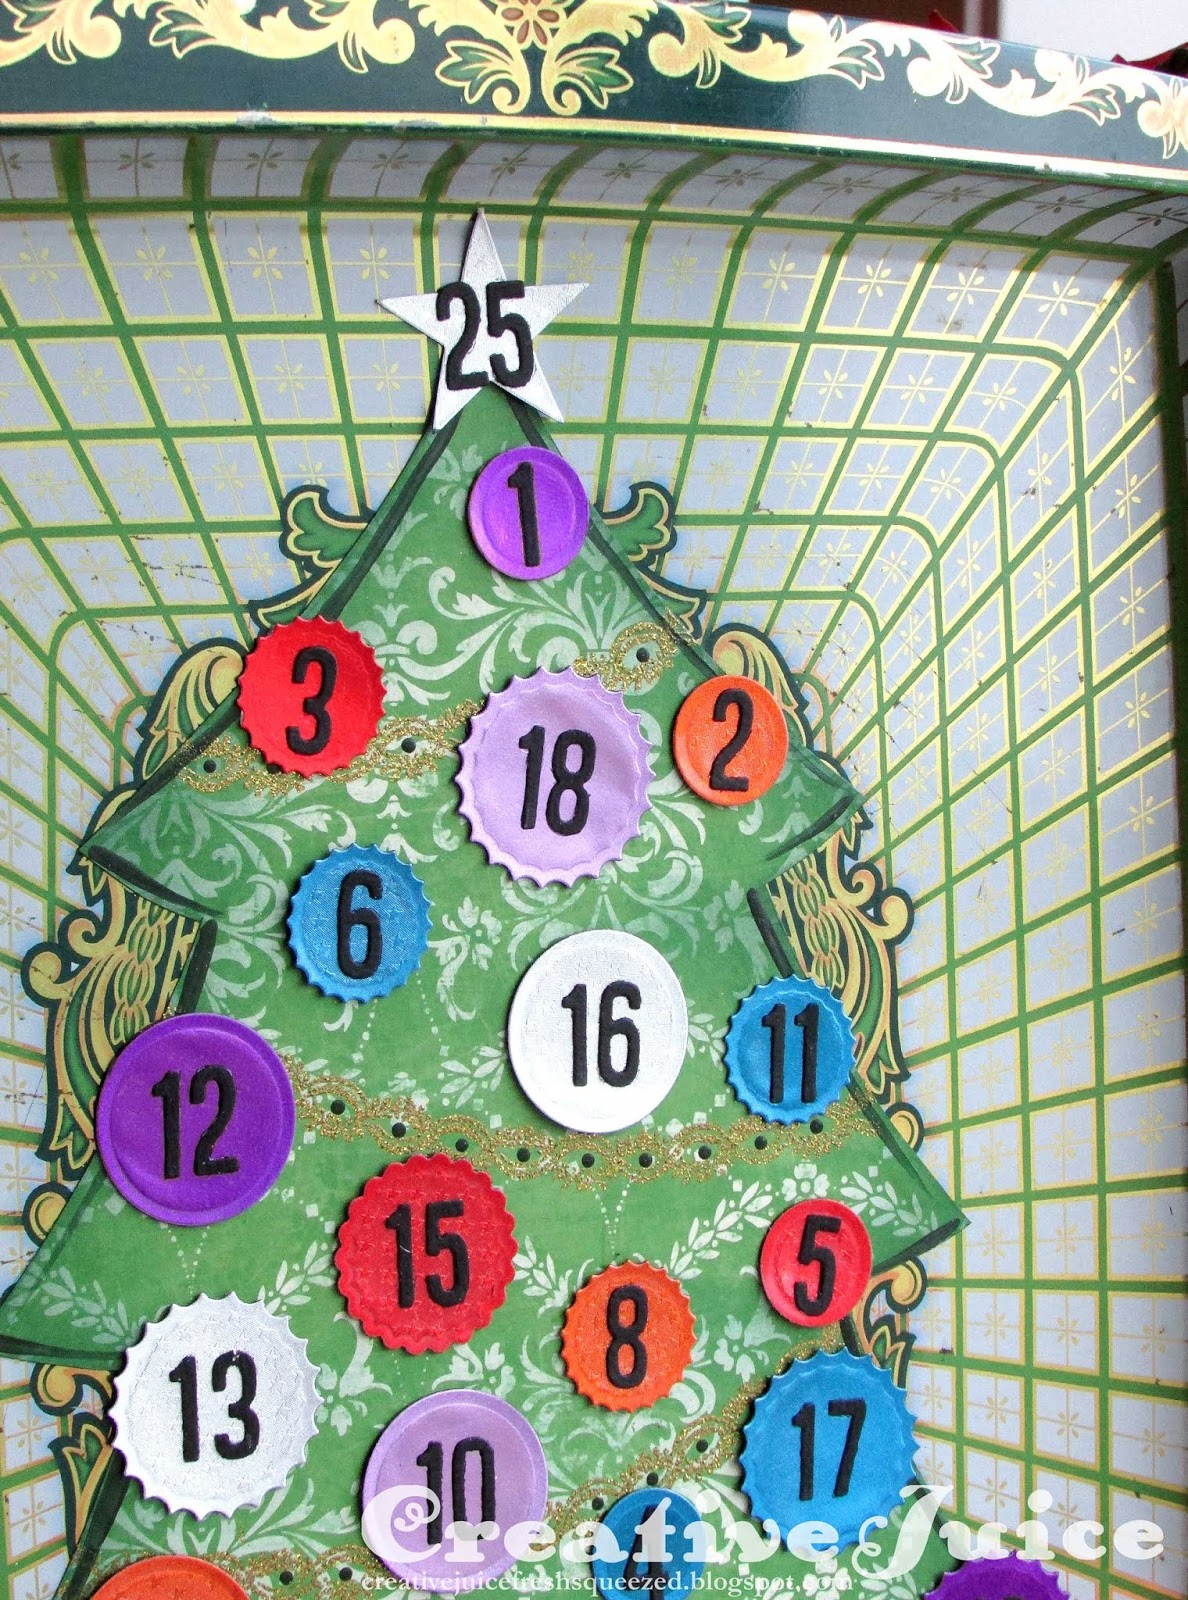
Hello! I'm not ready to let go of Christmas crafting yet! Didn't the 12 Days of Christmas just begin on the 25th? Keep going people!! ;-) This is a fun project that if you make now, will be ready to use on Dec. 1st of next year. It's a magnetic advent calendar that is sure to excite the little ones.


The base is a vintage metal tray I found at the thrift store. I cut a tree out of patterned scrapbook paper to glue onto the tray and then the numbered ornaments and presents are all magnetic!


At the beginning of December, a new ornament is placed on the tree each day. It's a fun way for the kids to count down to the big day! All the pieces are magnets so you can stick them on the tree wherever you like.

Let's see how easy it is to create this project with the help of Xyron products!

Step 1 – I found a metal tray that was the right size and was already decorated with "Christmas" colors - gold, green and white. You could also use any metal tray and paint it to your desired color; either with spray paint or like I painted the Halloween Magnetic Play Board I made in October. I used tracing paper to create a tree pattern that would cover the center of the tray, then cut it out of patterned scrapbook paper from my stash.


Step 2 – I used stamps and Gold Tinsel embossing powder to add garland to my tree. You could also use glitter glue and draw it on.


Step 3 – Time to make the magnet ornaments! I used Rinea Foiled Paper because of the beautiful colors and shine (perfect for ornaments!) It also has two surface finishes - smooth and embossed stars - so there would be some variety in visual texture. I ran the foil paper pieces through the Creative Station with the Laminate/Magnet Cartridge installed. It adheres the paper to the magnet material and then covers it with a clear laminate layer.


I then cut out the shapes with my dies. Bigz steel rule dies cut through it like butter but I was also able to use round thin dies to cut through the magnet/paper/laminate layers.

Step 4 – I used the Alphanumeric die set to cut out all the numbers from black cardstock and glued them to the ornaments. It's a little fussy but the numbers are nice and bold.

Thanks for stopping by and Happy New Years!!! See the supply list below for materials used.

Supplies used:
Xyron:
Creative Station Lite
Laminate /Magnet Cartridge

Dies:
Tim Holtz Sizzix
Labels ( Sizzix / SB )
Alphanumeric Sizzix / SB )
Crescent Moon & Stars - retired
Movers & Shapers dies - Packages - retired
various circle die sets

Other:
Tim Holtz Stamp Set - Ornate Trims
gold tinsel embossing powder
Prism Embossing Ink Pad
Rinea Foiled Paper

Store links in this post may be affiliate links which do not affect the price you pay but allow me to earn a small percentage of a sale. Thanks! (My husband also thanks you!) If you go shopping at Topflight Stamps, use my code LISAHOEL for 12% off your order.

Sunday, December 22, 2019

Mixed Media Monday Valentine for Topflight Stamps

Hello and happy Mixed Media Monday! I know Christmas is just a few days away, but on the Topflight Stamps blog we're pretty forward thinking and are taking a look at Valentine's Day projects this week! ;-)


I started with a sheet of paper I had marbled with hearts and die cut an oval out of the middle of it. Underneath I layered a piece of Neenah metallic paper that I had stenciled and stamped with the JOFY 86 "love" stamp. After putting it all together I doodled and stenciled on the top. A little washi added just the right final touch.

Thanks for stopping by and Merry Christmas!!

Supplies used:

Topflight Stamps Products:

Paper Artsy - JOFY 86
That's Crafty Magda Polakow stencil - Clouds & Hearts
Pronty stencil - Borders
Prism Embossing Ink
Prism Ink - Camellia Pink
Neenah Metallic Cardstock Paper Pack
Seth Apter embossing powder - Eclipse
Renke washi - Pink Hearts

Other:
white and black gel pens
AJVD - Oval Backdrop Die
marbled paper

Some links in this post are affiliate links which do not affect the price you pay but allow me to earn a small percentage of a sale. Thanks! (My husband also thanks you!) If you shop at Topflight Stamps, use my coupon code LISAHOEL for 12% off your order.

Tuesday, December 10, 2019

Angelic Journal with Eileen Hull

Merry Christmas!! I am astounded that Christmas is only two weeks away. How the heck did that happen? We are still in the middle of decorating our tree! Hopefully I'll still have time to make the other Christmas themed projects I have in mind but at least I can share this one with you now:


Inside view (I used pre-made inserts for the signatures that I embellished):


I didn't do a tutorial for this project but here is a peek of just the cover, outside and inside:


I used a ton of Distress Oxide inks on the cover here as well as Texture Paste through a stencil with gold embossing powder added to the top of it.


I covered the inside of the cover with pages from an old hymnal, then stamped and inked over the top.

Thanks for stopping by! Check out Eileen's blog and if you are not already a member, join the Facebook Eileen Hull Fan Club group. It is a warm, supportive group with lots of inspiration and sharing going on. You'll just have to answer a few simple questions when asking to join (to keep out spammers) and then you'll be added. ;-)

Also, I was going to submit this to the December Mini Album Makers Challenge and forgot!! Remedying that now. ;-) Check out their challenge. There is always a wealth of inspiration there to see!


Dies:
Eileen Hull Sizzix
Journal ( Sizzix / SB )

Tim Holtz:
Tree Line Sizzix / SB )
Angelic - retired

Other:

Sizzix Sizzles Matboard
Tim Holtz Stamp Set -  Handwritten Holidays 1
Tim Holtz Stamp Set -  Tree Line
Tim Holtz Stamp Set -  Reindeer Flight
Tim Holtz Stamp Set -  Joyful Song
Tim Holtz Stamp Set -  Grunge Flakes
Tim Holtz Stamp Set -  Ornate Trims
Tim Holtz Stencils - Sparkle, Burst
Jet Black Archival Ink
Distress Ink- Vintage Photo, Shaded Lilac
Distress Oxide Ink - Pine Needles, Weathered Wood, Faded Jeans, Stormy Sky, Broken China
Distress Spray Stains - Tea Dye, Brushed Pewter
Distress Spray Oxide Stains - Antique Linen
Ranger Texture Paste
gold embossing powder
Tim Holtz Adornments - Snowflake
Tim Holtz Christmas Story Stick
Distress Crayon - Picket Fence
elastic
traveler's notebook inserts

Some links in this post are affiliate links which do not affect the price you pay but allow me to earn a small percentage of a sale. Thanks! (My husband also thanks you!) If you shop at Topflight Stamps, use my coupon code LISAHOEL for 12% off your order.

Sunday, November 24, 2019

Steampunk Christmas Card for Topflight Stamps

Hello, I'm here to kick off the week with a mixed media Christmas card, steampunk style, for Topflight Stamps! I layered gear die cuts over some patterned paper from a Tim Holtz Christmas paper pad. The stamped portrait of "Monsieur" sits atop a layer that I stamped and embossed with other steampunk themed stamps. I also found that the Santa hat from the Katzelkraft Funny Accessories stamp set fit him pretty well. ;-) I stamped and fussy cut that out separately. Some Christmas Selection Precious Pearls finished it off with just a bit more bling.


Thanks for stopping by and if you are here in the USA, happy Thanksgiving! Hopefully the weather will not hamper your travels. We are keeping a close eye on it here. Eek!

Supplies used!

Topflight Stamps Products:

Creative Expressions - Festive Steampunk Sentiments
AALL & Create - #116 Steampunk
Carabelle - Monsieur
Katzelkraft - Funny Accessories
Prism Embossing Ink
Hunky Dory Diamond Sparkles Precious Pearls - Christmas Selection
Pick-me-up Tool

Other:
Gold embossing powder
archival ink
Tim Holtz Gearhead Sizzix Die

Some links in this post are affiliate links which do not affect the price you pay but allow me to earn a small percentage of a sale. Thanks! (My husband also thanks you!) If you shop at Topflight Stamps, use my coupon code LISAHOEL for 12% off your order.

Sunday, November 17, 2019

On the Farm Card with Topflight Stamps

Hello there, happy Monday! I'm here to share a Topflight Stamps card with you. It's one I made for my mother-in-law and she loved it. =) (She is a big fan of barns and other farm themed things.)


I used the Hobby Art stamp set On the Farm to create this scene. It is a set with a multitude of detailed parts that you can arrange just as you wish:


I stamped the scene using archival black ink and then used watercolors to color it. I'm really pleased with how it turned out. Thanks for stopping by and have a great week!!

Supplies used!

Topflight Stamps Products:

Hobby Art stamp set - On the Farm
Darkroom Door stamp set - Happy Birthday Sentiment Stamps
watercolors

Some links in this post are affiliate links which do not affect the price you pay but allow me to earn a small percentage of a sale. Thanks! (My husband also thanks you!) If you shop at Topflight Stamps, use my coupon code LISAHOEL for 12% off your order.

Tuesday, November 12, 2019

Thanksgiving Card with Eileen Hull

Hello! I've been playing more with Eileen's Molten Dimensions Embossing Powder and Clearsnap Blends Ink and have created a fall Thanksgiving card. Read on to see the embossing techniques I used!


The powders are chunky and you get really good coverage and dimension. I discovered that I can use my Melting Pot to easily make all the embossed die cut leaves. (The Ranger Melting Pot was designed by Suze Weinberg and they were sadly discontinued a few years ago. You might have one in your craft stash already or be able to find one used on eBay etc.)

I die cut the leaves, inked them with Eileen's clear (super sticky!) Blends Ink, applied the powder and set it into the pre-heated pot to melt. (It doesn't take long!) I had these non-stick inserts with side flaps that were made to fit into the tray which made it really easy to remove the melted die cut. I just lifted the liner out and let it cool off to the side before handling it. You could do the same thing with a folded piece of foil or paper. While the leaves were in the pot and the base powder had melted, I sprinkled on a little bit of a second color. It melted in and created a speckled texture on the leaves. So cool!!! I have lots of ideas to try with this. (Play time!)


Love that speckled look!!

For the card base, I used a piece of patterned paper in my stash and made a dry embossed center panel using Eileen's retired Honeycomb embossing folder.


Once the card base was done, I played around with my embossed leaves and other elements until I was happy with the placement. Then I glued it all down. I had to use a strong liquid adhesive to glue the leaves down because of the slick embossed surfaces. Crafter's Pick The Ultimate! glue is one of my favorites for such jobs.

Thanks for stopping by! Check out Eileen's blog and if you are not already a member, join the Facebook Eileen Hull Fan Club group. It is a warm, supportive group with lots of inspiration and sharing going on. You'll just have to answer a few simple questions when asking to join (to keep out spammers) and then you'll be added. ;-)

I am also entering this into the TFJB Challenge - Fabulous Fall!

Dies:
Eileen Hull Sizzix
Journaling Cards - Flowers & Leaves ( Sizzix / SB )
Spring Leaves Sizzix / SB )
Honeycomb embossing folder - retired

Other:
Eileen Hull Embossing Powder by Emerald Creek - Golden Rod
Eileen Hull Embossing Powder by Emerald Creek - Polished Silver
Eileen Hull Embossing Powder by Emerald Creek - White Wonder
Eileen Hull Embossing Powder by Emerald Creek - Black Magic
Eileen Hull Clearsnap Blends Ink - Clear
cardstock

Tim Holtz Big Chat Stickers
Ranger Melting Pot - retired


Some links in this post are affiliate links which do not affect the price you pay but allow me to earn a small percentage of a sale. Thanks! (My husband also thanks you!) If you shop at Topflight Stamps, use my coupon code LISAHOEL for 12% off your order.